Keywords are your short phrases to success that let people find your content when putting in a search query. On the other hand, meta descriptions are HTML meta tags that inform search engines about your post and page content.
As you can judge by the definitions, both are really, really important for SEO.
This guide will help you understand how you can add keywords and meta descriptions in WordPress to make your website more enticing and click-worthy.
Ready? Let’s begin.
What to Expect When Adding Keywords and Meta Descriptions in WordPress
- Step 1 – Install and Activate Yoast SEO Plugin
- Step 2 – Add the Focus Keywords and Meta Description
- Step 3 – Adding the Keywords and Meta Descriptions Manually
The Good
The very first result on Google gets 31.7% of all clicks, while the results on the second page receive just 0.78% of clicks. That’s the difference applying SEO best practices can make to your content, and in turn, your business.
Keyboards and meta descriptions are the little parts of SEO that can help you rank your web pages higher in the search engine results pages (SERPs), and the higher the rank, the better for your business.
They provide additional information to search engines and uses about your content. When Google knows exactly what your content is about, its chances of showing your article to users wanting to learn more about a specific keyword are higher.
More views translate to higher traffic and possibly more sales and conversions.
You can also use SEO plugins to add meta descriptions and keywords designed to optimize content, and honestly, they are awesome. For WordPress, in particular, they help expand the scope of the source software with special tasks and functions that typically affect crucial aspects like SEO, online marketing, and web analysis.
In other words, it makes optimizing your website content easier and more effective. Not to mention very quick, too.
The Bad
One can’t really be sure about how much weight search engines put on keywords and meta descriptions. There’s a general disagreement among WordPress experts on whether keywords and meta descriptions really matter to improve your ranking or if they are just extra work that doesn’t pay off.
Additionally, while Yoast SEO is one of the best plugins to optimize content, it doesn’t give you the facility to add meta keywords.
Meta keywords are a specific type of media tag that appears in the HTML code of a web page. That main job is to inform search engines about the topic of the page in more detail. If you want to add meta keywords to a webpage, you’ll have to do so manually, which can be slightly more complicated than simply using a plugin.
Another thing that I want to bring to your attention is keyword stuffing.
Yoast SEO gives you suggestions to make your content more appealing to the SERPs, and that’s no doubt amazing. However, there are times when adding the keywords—plus all the suggested changes—to your content can take away the natural flow and make it look forced and too “optimized.”
So while optimization is great, it shouldn’t be at the cost of the flow and quality of your content.
Step 1 – Install and Activate Yoast SEO Plugin
I recommend Yoast SEO since it’s pretty much the best. Don’t take my word for it—just google “best SEO plugins” and you’ll have your answer.
This plugin simplifies SEO settings and comes packed with many useful features like multi-page and tabbed settings, both of which give it an edge over its competitors. What’s more, it makes it incredibly easy to edit elements like the title and description, helping you propel the top of the search rankings.
Other than Yoast SEO, you can also try Rank Math and All In One SEO—the choice is yours. In this section, though, I’ll show you how to add keywords and meta descriptions through Yoast SEO—but first, you need to install it.
Below is how you can add Yoast SEO to your WordPress website.
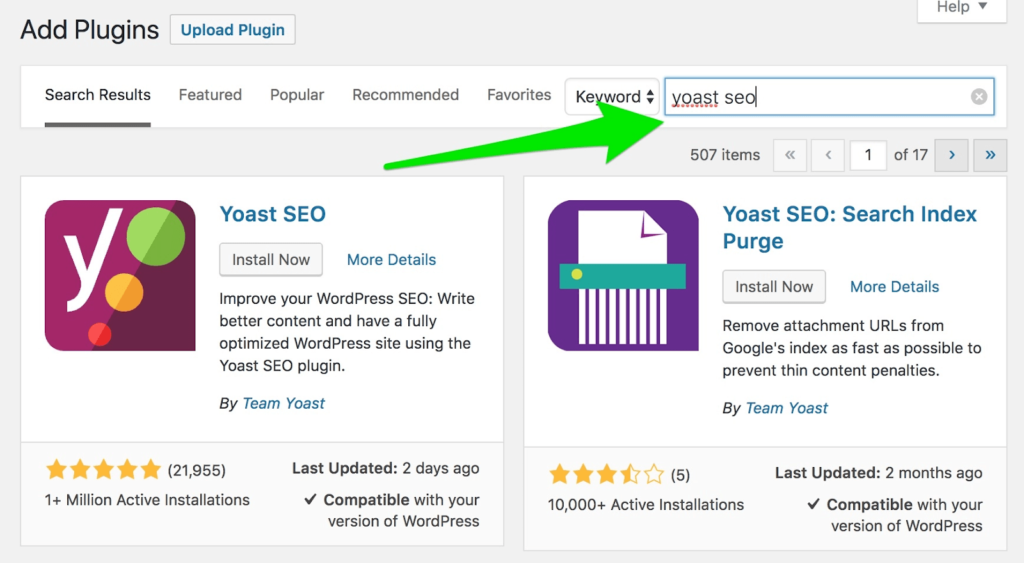
Search for Yoast SEO from WordPress Plugin Directory
Log in to your WordPress account. You’ll see your admin dashboard by default.
You’ll see a side menu on the left-hand side of your screen. Click on Plugins from there. A dropdown menu will appear with a list of additional options.
Click on Add New.
In case you don’t see the Add New option, it means your site is a part of a network. Here, you’ll have to install the plugin through the Network Admin. You’ll find this option under My Sites, followed by Network Admin.
Type in “Yoast SEO” in the search bar located on the top right-hand side of your screen, and hit Search.
Install Yoast SEO
After you search for the plugin, you’ll see the Yoast SEO option displayed on your screen. Click on the Install Now button to start installing the plugin.
Activate Yoast SEO
Once Yoast SEO finishes installing, you’ll have to activate the plugin.
For this, click on the Activate button that will appear immediately once the installation process is over. It’ll be in the same place where the Install button was previously located.
With the plugin now installed and activated, you can focus on adding the keywords and meta description.
Step 2 – Add the Focus Keywords and Meta Description
At this stage, Yoast SEO is ready to use. The next step is to add the keywords and meta description to begin the optimization. The idea here is to incorporate these keywords naturally in your article so your content can rank higher in the SERPs.
You can no longer add meta keywords to your posts and pages since the latest version of Yoast SEO doesn’t support it. However, you can add a focus keyword, which can be a word or phrase that defines your article best.
Yoast SEO’s job is to help you include these focus keywords in your article by giving you (good) suggestions. Let’s take a look at how to add keywords and meta descriptions in Yoast SEO.
Add the Focus Keywords
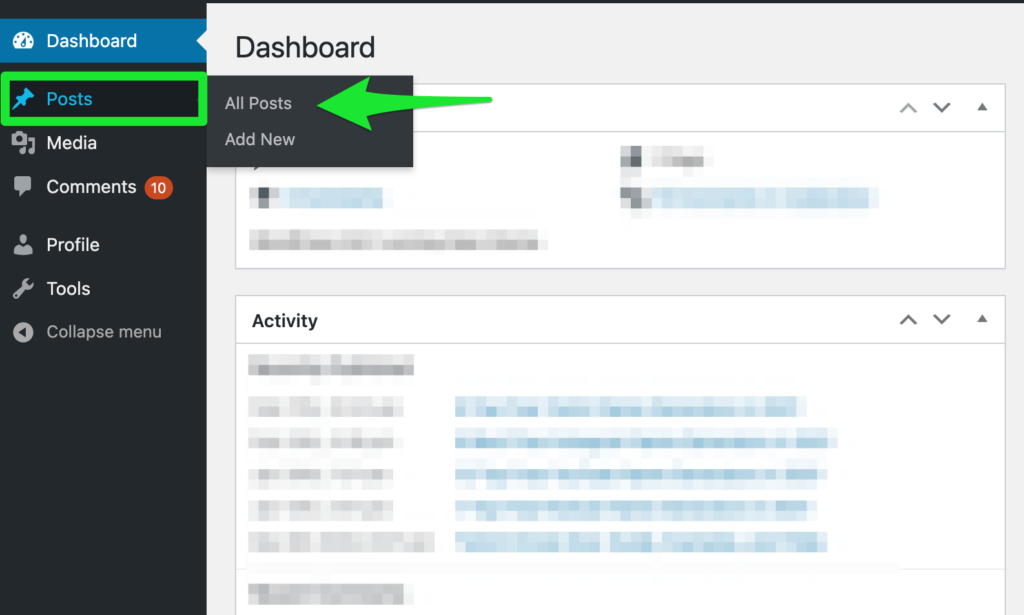
Open the post, page, or category you wish to edit from your WordPress admin dashboard. Those who want to edit a post can find it by clicking on Posts, followed by All Posts.
Since you’ve already activated the SEO plugin, you’ll see a Yoast SEO box located at the bottom of the page—below your post content.
Set your focus keyword on the Keyword tab. You’ll instantly see suggestions made by Yoast SEO, such as adding the keyword in your H2 subheading, your post title, increasing the number of times the content is mentioned in the post, and so on.
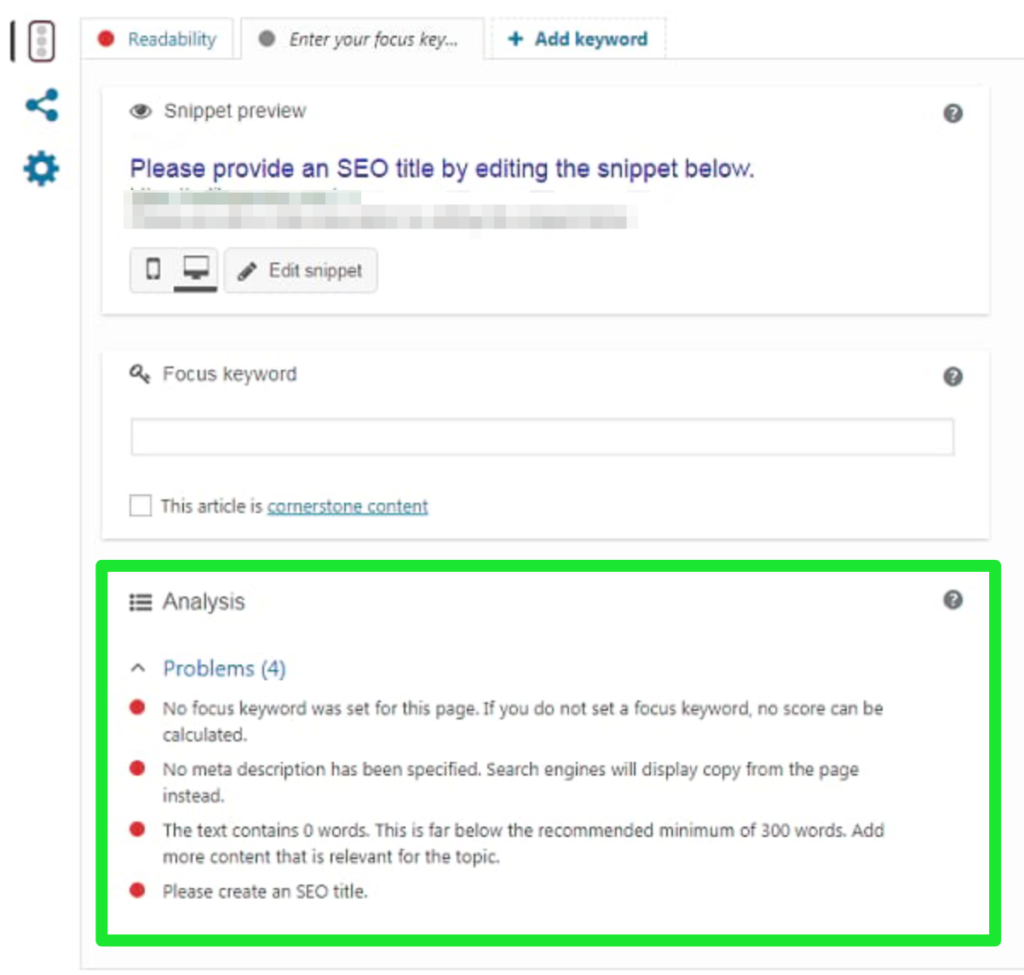
Try to follow and incorporate as many suggestions as you can if you want a well-optimized article. Your search rankings can improve considerably by making these tiny tweaks. You want to get as few red dots as possible for better optimization.
Want to add meta keywords as well? As mentioned before, it isn’t possible to add it in Yoast SEO, but you can do it manually. I’ll get to that later in this article.
Add the Meta Description
When you enter the keyword in the Keyboard tab, you should also see a snippet preview of how your article will look on Google. Think of it as a final pitch to the visitor to read your content.
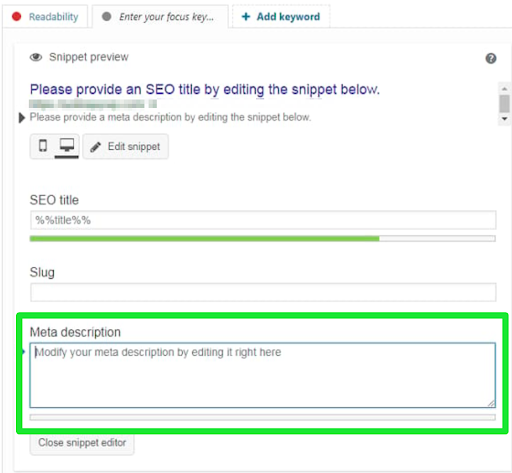
This is also where you’ll add the title and description of your page. Make sure your media description is short, concise, and readable. You must also include helpful and relevant keywords to further improve your chances of scoring a higher rank.
The following are a few pointers to keep in mind when you’re drafting your description:
- Keep the meta description about 155 characters long despite the 300+ character limit. This way, it‘ll be easy to read and encourage page clicks.
- Always include your keywords—or their synonyms—in your meta description.
- Add the keywords as naturally as possible within the text.
- Make sure your meta description reflects your website niche and content. Avoid misleading descriptions as the visitor will likely leave your home once they find out about, which, in turn, increases bounce rates.
- Try to write a media description with the essence of what you want to deliver through the category, page, or post.
Type your media description in your text in the Meta Description field.
Keep modifying it until the bar turns green. If the bar is orange, it means the description is too short, while the color red indicates it’s too long.
And not only posts, but Yoast SEO also lets you set a meta description for individual categories and tags.
To do this, go to Posts followed by Categories (or Posts followed by Tags depending on where you want to add a description). Find the category or tag whose meta description you want to change, and click on Edit.
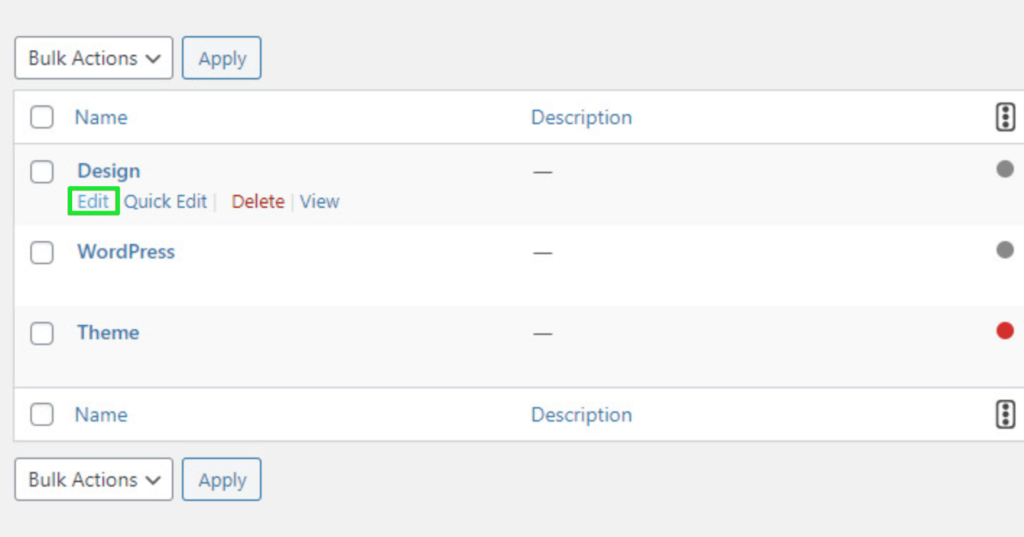
Here, you’ll find Yoast SEO options to change your meta description.
Step 3 – Adding the Keywords and Meta Descriptions Manually
You may not like people using a plugin when it comes to adding keywords and meta descriptions. Maybe you prefer to do things yourself, or perhaps you want to add meta keywords.
Either way, you can add meta attributes and keywords to WordPress without Yoast SEO or any other SEO plugins.
Just follow the steps below to do this.
Enter Your header.php File
You can create generic media tags in WordPress that affect your title, description, and keywords by adding them to your header.php file. Editing the code to change the website title or description isn’t required.
Go to Administration, and then click on Settings. Select General from the presented options, and change the title or description as need be.
If you want to add the meta attributes to the header, you can either access WordPress and header.php through FTP or edit it from the dashboard. For the latter, you’ll have to click on Appearances, followed by Editor, and then header.php.
You likely find your title tag in the header file. It should look similar to this:
<title><?php bloginfo(‘name’); ?><?php wp_title(); ?></title>
This is the calling from the title you set in your Administration settings, so I recommend not editing the code. That said, you can change it to a simple <title>Your site name</title> function —but doing this may also tweak the title for every page on your site.
Below the code line, you can add your meta attributes for keywords and site description. Keep in mind that this is a generic description that applies to your whole website.
For your search engine snippet, copy and paste the following:
<meta name=”description” content=”your description here” />
For your keywords, use this:
<meta name=”keywords” content=”your keywords here” />
After this, replace the content tag in quotes with the description and keywords you want to set. Remember that the snippet should be within 130-150 characters as per Google’s approved range. Avoid keyword stuffing and only use relevant phrases.
Add a Conditional Tag Query
Generally, I recommend using a plugin if you want to change the description and keywords for specific pages as it’s easier. But if the manual is the way you like, you can use a conditioner tag query too.
Here’s what you need to type in:
<meta name=”description” content=”<?php if ( is_single() ) {
single_post_title(”, true);
} else {
bloginfo(‘name’); echo ” – “; bloginfo(‘description’);
}
?>” />
Writing this code will create a description you set for that specific page to appear if WordPress is on a single post view. Otherwise, it’ll roll back to displaying the default.
And that’s it! You should now have your customized description and keywords for every web page.


from Quick Sprout https://ift.tt/3fqomzN
via IFTTT
