
One billion – that’s how many people use Instagram each month.
With such a huge, highly engaged audience, you can bet the competition between brands is tough. This is why small details can make all the difference, and Instagram filters could play a part in making your social media campaigns more successful.
What are Instagram Filters?
Everywhere you look, marketing advice says you need high-quality images to succeed on platforms like Instagram. But what if you’re not a professional photographer?
This is where Instagram filters can be a game-changer for your marketing and particularly your paid social media campaigns—they can make your images look as sleek as if they’d been professionally shot.
Here’s an example of an unfiltered image vs. its filtered twin:
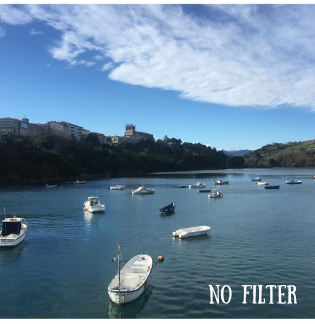

Not only do Instagram filters make things look cleaner, but they also allow you to edit your image with one click. Where most editors make you alter contrast, saturation, and so forth individually, Instagram lets you pick a pre-set filter that suits your image—though you can tweak them if you’d like.
While these filters have been around since 2011, they’ve taken off in recent years. With the added capabilities of augmented reality (AR) technology—which adds imaginary images to those of the real world—they can significantly impact your social media campaigns.
Why Should You Use Instagram Filters in Your Paid Posts?
Social media platforms are competitive, and standing out from the crowd isn’t easy. If you’re going to get the best cost per click with your paid social media campaigns, then your brand needs to grab attention and drive engagement.
When you run an Instagram ad, you don’t have much real estate to work with, so you’ve got to find ways to draw your audience in with the limited space you have.
If you can combine innovative use of filters with creative images and excellent text, then you could achieve exceptional results— as Opel did with their “Opel Adam” campaign. In just two weeks, the campaign achieved a 2.5x increase in registrations and significantly lowered Opel’s cost per registration.
It’s possible to achieve the same results for your business, but you’ve got to make the most of the tools available to you.
If only 18% of Instagram posts use a filter, this means you’ve got an opportunity to make your content stand out over the other 82%. Research shows that AR filters have an average dwell time of 75 seconds, which is four times that of even video content—so using it can make a huge difference.
Social media platforms crave engagement, and if your advertisements give them that, you may find you reach more people for less—and Instagram filters are one of the best tools to help you achieve this.
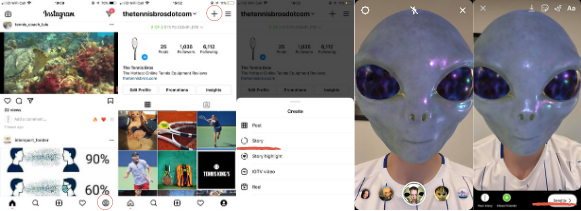
How to Use Instagram Filters for Your Paid Campaigns
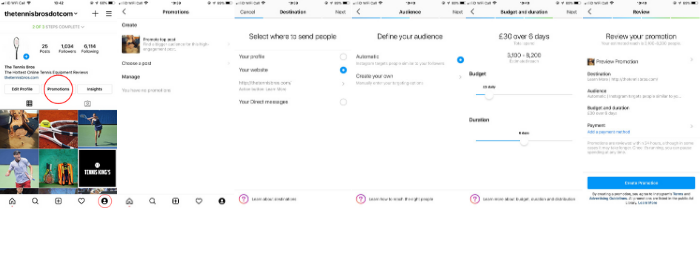
Turning your posts into paid campaigns through the Instagram app couldn’t be easier. All you need is a business or creator account, and then you can get set up with your paid ads.
- Click the profile icon in the bottom right-hand corner.
- Select promotions.
- Choose a post to promote. Instagram will prompt you to use your top post, but you can select any of your previous posts to promote.
- Select where to send people— your profile, website, or direct messages.
- Define your audience. The easiest option is to choose “automatic,” which targets people similar to your followers, but you can create your own.
- Choose your budget, setting your daily cost and how long you want the campaign to run for.
- Review and publish.
To create a promotion through the app, you need to have already created your post or story. Luckily, Instagram makes it exceedingly easy to snap an image on the go, add a great filter, and promote it within seconds.
Tips for Picking the Right Instagram Filter for Your Campaign
The right Instagram filter might be a quick way to give your images the professional touch, but the wrong filter can have the opposite effect. When you’re choosing your filter, keep these three points in mind:
- Your images reflect your brand
- Consistency works well on social media
- Don’t go filter crazy
Your images help define your brand, so the filters you choose matter. Your filters should reflect the mood of the product or service you’re promoting, and you need to stay consistent with this.
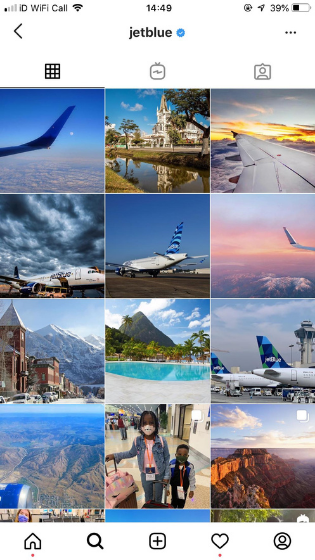
A great example of this is JetBlue’s Instagram account. You can easily spot how consistency has allowed them to develop their own simple yet effective style by using similar image styles, colors, and more.
While the right filter can make things look amazing, “over filtering” can have the opposite effect. You don’t want to alter things so much that they look surreal. Instagram filters are optimized to please, so it’s often worth sticking to the tried and tested rather than over-editing.
If you’re looking for inspiration, Canva studied the most popular filters, and Clarendon, Gingham, and Juno came out on top.
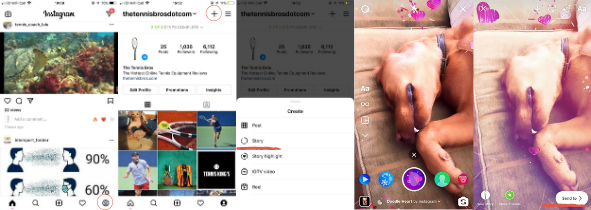
Instagram Filters for Posts
Adding filters to your Instagram posts couldn’t be easier. In five simple steps, you can post amazing images that grab your audience’s attention.
- Click the + button at the center of your home screen.
- Select the image you want to use from your library, or select “photo” or “video” to create a new one. Click next.
- Choose your filter from the list at the bottom of the screen. Remember, you can add more by clicking manage at the end of the reel.
- Add your caption, tag people in your posts, post your location, and choose other social platforms you would like to post to.
- Hit share.

Instagram Filters for Stories
Instagram stories allow you to post photos and videos that vanish after 24 hours. One-third of the most viewed Instagram stories are created by businesses, so they are an excellent way to make your posts go further.
The process of posting stories with filters is just as simple as with posts, but you’ll notice a lot more options when it comes to AR filters.
For a live video or image:
- Select your profile icon.
- Hit the + button in the top left-hand corner.
- Select “story” from the pop-up menu.
- Use your camera to take live video or images, or select an existing one from your library by clicking on the image in the bottom left-hand corner.
- Choose between your front-facing and rear-facing camera if you’re taking a live image.
- Select your filter from the reel at the bottom.
- Tap the center button to take a picture or hold the button to take a video.
- Use the editing buttons in the top right-hand corner to add extra filters, overlay text, or download to your library.
- Hit “send to” and select where to share your story.
Bonus Instagram Filter Tip
If you’re scrolling through Instagram and see a filter you like, you can save it to use on your own stories.
- Go to the profile of the person with the filter you like.
- Click the smiley face emoji to see all their filters.
- You can save it by clicking the down arrow or try it on.
- When you’re trying on the filter, click the drop-down menu.
- From here, you can save the effect or send it immediately as a story.
- The next time you send a story, the filter will be ready for you to use.
Instagram Filters for Faces
When you created your first story pin, you likely noticed there are a lot of things you can do to your face with AR.
AR allows you to add computer-generated effects over the live image you see on your camera. For example, if you want to see what you look like wearing sunglasses, there’s an AR filter for that. The sunglasses appear on your face and follow you as you move.
There are endless Instagram filters with AR, which gives you more options to engage your audience. However, as with any Instagram filters, it’s essential to find the ones that suit your brand.
Some companies have had great success with AR filters on Instagram, such as this one by Ray-ban. But if you’re going to use these filters, then you’ve got to make sure you stay on-brand.

To create a story with AR filters, simply follow these steps:
- Select your profile icon.
- Hit the + button in the top left-hand corner.
- Select “story” from the pop-up menu.
- Choose between front- and rear-facing camera.
- Slide between the filters at the bottom and watch as your face is brought to life with AR.
- For more effects, slide to the end of the reel and select “browse effects.”
- Choose a filter.
- Click the middle button to take a photo, hold to take a video.
- Click send and then select where to share.
Other Instagram Features to Help Your Paid Campaign
One of the reasons Instagram is so popular with advertisers is because it gives you lots of tools to give your paid campaign extra oomph. The beautiful thing about it is it’s so easy for anyone to add filters, gifs, text, and music to their images.
While a recent study found that images without text overlay generally perform better than those with text, marketing is all about finding the message that engages your audience, so it’s worth experimenting to find the formula that works for you.
These Instagram features give you added options when it comes to reaching and engaging your target audience.
Adding Gifs
Gifs provide a great middle-ground between static images and video. They were talked about as a big marketing trend, and while AR has taken over somewhat, they’re still a handy tool for your paid Instagram campaigns.
A gif is a quick and easy way to add something extra to your story, and once again, Instagram makes it exceptionally easy to do:
- Select your profile icon.
- Hit the + button in the top left-hand corner.
- Select “story” from the pop-up menu.
- Choose between front and rear-facing cameras or open your library via the icon in the bottom left-hand corner.
- Take a picture, or choose an image from your library.
- Choose the square smiley face at the top of the screen.
- Select gifs, or use the search bar to find a specific gif.
- Make your gif bigger or smaller by pinching in or out with two fingers and drag it into position.
- Select “send” to and choose who you want to see your story.
Adding Text
Instagram might be a very visual platform, but that doesn’t mean there isn’t use for text. The right use of text can help give your posts and stories context, grabbing people’s attention and linking the image to your brand.
Text is a vital part of Instagram because this is where you make use of one of the most important features: hashtags.
Hashtags not only help people find your posts, but they also boost engagement and allow you to zero in on what’s popular in your industry. The statistics show that Instagram posts with even just one hashtag can see an increase in engagement of 12.6%. So with only a little extra text, you can give your campaigns a better chance of success.
You can also use text overlay on your stories. You’re in control of your text’s font, color, and look, which means you have another way of giving your images a professional look.
To add text overlay to your stories, simply:
- Select your profile icon.
- Hit the + button in the top left-hand corner.
- Select “story” from the pop-up menu.
- Select your image or video.
- Click the “Aa” in the top right-hand corner.
- Type your text.
- Choose your font, color, and effects, using the tools at the top of the screen.
- Hit “done.”
- Select “send to” and choose your audience.
Adding Music
Music has always played an important part in advertising. Music helps make advertisements more memorable, evokes emotion, builds the story, and accentuates the brand, so it can be an essential tool.
While some people will use Instagram with the sound off, Instagram makes it so easy to add features such as music that you don’t lose anything by using them.
Again, make sure whatever you choose fits your brand and is going to engage your audience.
Here’s how you can add music to your Instagram stories:
- Select your profile icon.
- Hit the + button in the top left-hand corner.
- Select “story” from the pop-up menu.
- Choose between front and rear-facing cameras or open your library via the icon in the bottom left-hand corner.
- Take a picture or choose an image from your library.
- Choose the square smiley face at the top of the screen.
- Click the music icon.
- Choose your song.
- Edit which part of the song you want to showcase, clip duration, and how you want to credit the song.
- Click “done.”
- Move the music sticker, making it bigger or smaller to suit your image.
- Hit “send to” and select your audience.
Instagram Filter Features Within Other Photography Apps
You might be thinking, “I want my Instagram posts to stand out, so why would I use the most common filters such as Clarendon?” While many brands find success with Instagram’s filters, you have other options if you choose to go that route.
To help you with this, there are lots of photography apps that have curated Instagram filters you can pay for or give you the ability to create your own, including:
- VSCO
- Afterlight
- A Color Story
- Tezza
- Spark AR
You may have to invest some time in finding or creating the perfect Instagram filter, but once it’s saved to your Instagram account, you can add it to all your posts and stories in seconds.
Conclusion
The right Instagram filter can immediately improve your images and give your brand an identity. When you’re running paid media campaigns, you want to give your images and videos every chance of standing out from the crowd, and filters can help you achieve this.
Instagram makes it incredibly easy to add this extra element to your posts. Turn your images into posts that people want to engage with and share, then watch how they may improve your paid social media campaigns.
What’s the go-to Instagram filter for your brand?
The post How to Use Instagram Filters in Paid Social Media Campaigns appeared first on Neil Patel.


from Blog – Neil Patel https://ift.tt/32J3tKv
via IFTTT
