WordPress is the world’s most popular content management system (CMS). It powers more than one-third of all websites on the internet.
One of the reasons why WordPress is so popular is because it’s easy to install. This CMS platform is extremely versatile and can accommodate websites of all shapes and sizes. Whether you’re launching a personal blog, small business website, ecommerce site, or anything else, WordPress is flexible enough to accommodate everyone’s needs.
But before you can start using WordPress to run your site, the CMS must be installed.
As someone who has owned and operated dozens of websites throughout my career, I consider myself an expert in the WordPress installation process. There are several ways to install WordPress, but I created this guide to explain the most effortless approach.
Follow the step-by-step instructions listed below to install WordPress on your website.
What to Expect When Installing WordPress
The best way to install WordPress is by using Bluehost—a web hosting provider that offers one-click and automatic WordPress installations. The four steps to install WordPress are:
- Explore your options
- Visit Bluehost.com and choose a hosting plan
- Create an account
- Install WordPress
The Good
It’s easy to install WordPress. In many cases, the actual installation process can be completed in just one or two clicks. Lots of web hosting providers offer one-click WordPress installations. Some web hosting packages even come with WordPress pre-installed.
For those of you creating a new website for the first time, you can rest easy knowing that this isn’t a complicated process.
You don’t need to learn how to code or have a technical background to install WordPress. Hiring a web developer isn’t necessary either. As long as you’re capable of browsing the internet, you won’t have any trouble installing WordPress.
Once installed, WordPress will make your life much easier as a webmaster. The CMS is so flexible that the possibilities are virtually limitless. Other website builders and CMS platforms on the market are rigid and have restrictions in terms of functionality. But as an open-source CMS, WordPress allows you to do anything you could possibly want with your website.
Another benefit of using WordPress is the cost. WordPress is free to install. Even if you’re installing WordPress through a third party, such as a web hosting provider, there won’t be any added costs for installing WordPress.
The Bad
While the installation process itself is easy, everything else surrounding the WordPress installation can be a bit more time-consuming.
There are a bunch of different ways you can install WordPress. So, if you run a quick internet search or browse for videos explaining the process, ten different people could tell you ten different methods. Some of these methods are undoubtedly easier than others. I’m obviously a bit biased here, but I can confidently say that my method is the best. This statement comes after years of experience and plenty of trial and error.
Furthermore, it’s worth noting that WordPress isn’t really an “all-in-one” solution or a “one-stop-shop” for websites.
You’ll still need to register a domain name and sign up for web hosting. WordPress doesn’t offer either of these out of the box. If you’re going to buy a domain from one platform and host your site on another, it’s going to take a bit longer to get up and running.
These other requirements cost money as well. Web hosting isn’t free. Getting a domain name isn’t usually free (although it can be, and I’ll show you how to get a free domain shortly).
While the WordPress installation itself will go quickly and smoothly, there’s still plenty of work to be done after this step. Lots of people get frustrated with actually creating pages and content on their websites. This isn’t something that happens overnight. It takes time and patience to start and operate a successful website.
Step 1 – Explore Your Options
As previously mentioned, there are several different ways to install WordPress. While I can’t say that I recommend all of these options, it’s still worth mentioning so you can make a decision on your own.
The remainder of this step-by-step tutorial will focus on the easiest I’ve found to install WordPress—using Bluehost.
But here’s a brief overview of the alternative ways to install WordPress.
Installing WordPress With a Web Hosting Provider
Web hosting from a third party is a requirement of using WordPress. There are plenty of great web hosting providers on the market today, and lots come with WordPress pre-installed. Some providers even offer one-click WordPress installations and managed WordPress hosting packages.
This is by far the easiest way to install WordPress, especially for new websites. Lots of hosting providers offer domain names as well—sometimes for free.
By installing WordPress with your web hosting provider, it eliminates complicated and unnecessary steps from the process.
Installing WordPress With a cPanel Autoinstaller
As the name implies, an auto-installer will automate the WordPress installation process and reduce the number of manual tasks required to install WordPress.
cPanel is one of the most popular and user-friendly web hosting control panels on the market today. Lots of web hosting providers offer cPanel by default. From your cPanel dashboard, you can search for an auto-installer, fill out some information, and let the tool handle the rest.
The exact interface will vary depending on the auto-installer being used. But the functionality remains the same across the board.
The reason why I don’t like this option is that there are too many extra steps. You’ll have to manually enter different details about your WordPress installation, such as the protocol for your software setup, directory, site settings, admin information, and more. This can often be confusing, especially for non-technical users.
Installing WordPress Manually
This process is outdated, and I can’t recommend it to anyone. There are roughly a dozen steps using this method, and it’s not practical, especially for beginners.
It involves creating databases, FTP transfers, and other technical aspects that you shouldn’t have to deal with. Unless you’re tech-savvy and enjoy learning complicated, useless skills, avoid a manual installation at all costs. It takes so much longer to complete, and there’s a ton of room for error.
Installing WordPress on Your Computer
Here’s another option that’s not very useful. You have the option to install WordPress locally on your computer, which is known as a “localhost.”
While this provides you with a functional WordPress installation, it’s not accessible to anyone else. There are other ways to learn how to use WordPress, so this type of installation is useless.
Step 2 – Visit Bluehost.com and Choose a Hosting Plan
Bluehost is arguably the best hosting provider on the market today. It powers millions of websites across the globe.
Furthermore, Bluehost has been recommended by WordPress since 2005. So, when it comes to simple WordPress installations, it only makes sense to use a hosting provider that’s recommended by the CMS you’re installing.

In addition to its low cost and simplicity, Bluehost offers tons of additional advantages when you sign up for one of their web hosting plans. All web hosting packages come with a free domain name for one year and a free SSL certificate.
By using Bluehost, there’s no reason to use a third-party for domain registration or anything else associated with your website. Between Bluehost and WordPress, that’s all you need.
As an industry leader in the web hosting space, Bluehost has several different hosting solutions, including VPS and dedicated hosting plans. But for the purposes of this guide, we’ll stick to the best options for new WordPress websites. Here’s a brief overview of those options:
Shared Hosting Plans
Shared hosting from Bluehost is an ideal option for beginners. It’s affordable, and it’s the best way to start. A shared hosting plan is perfect for personal websites, small blogs, and any website that won’t be experiencing a ton of traffic—at least not right away.
There are four packages to choose from in this category:
- Basic — Starting at $3.95 per month
- Plus — Starting at $5.95 per month
- Choice Plus — Starting at $6.95 per month
- Pro — Starting at $13.95 per month
Choice Plus delivers the most value. But you can browse through these plans to see which one best fits your needs. All of these plans come with one-click WordPress installations.
WordPress Hosting Plans
The WordPress hosting plans from Bluehost are nearly identical to the shared packages. But there are only three plans instead of four. Choose from Basic, Plus, or Choice Plus, all offered at the same prices listed above.
The major difference between WordPress hosting and shared hosting with Bluehost is automation.
Bluehost will automatically install the latest version of WordPress to your site when you choose a WordPress hosting plan. You’ll also benefit from automatic WordPress updates after the initial installation.
Managed WordPress Hosting Plans
The managed WordPress packages are designed for high-traffic websites. These plans are perfect for medium to large-sized websites that want to prioritize high performance.
- Build — Starting at $19.95 per month
- Grow — Starting at $29.95 per month
- Scale — Starting at $49.95 per month
All of these packages support one WordPress website. The entry-level Build plan can accommodate up to 50,000 visitors per month. You’ll also benefit from advanced features like automatic backups and enhanced security.
But for the vast majority of new websites, the shared plans or WordPress plans will be more than enough to accommodate your needs. You can always upgrade to a fully managed solution down the road.
Step 3 – Create an Account
After you select a package, you’ll need to create a Bluehost account to continue. For simplicity’s sake, I chose the $3.95 Basic shared package for this tutorial.
Bluehost will automatically present you with the following prompts and form fields to finalize your account creation:
Set Up Your Domain
If you haven’t registered a domain name yet, you can get one directly from Bluehost. Remember, the first year is free, so I definitely recommend taking advantage of this option.
For those of you who already purchased a domain from a third-party registrar, just enter your existing domain in the appropriate form field on the right.
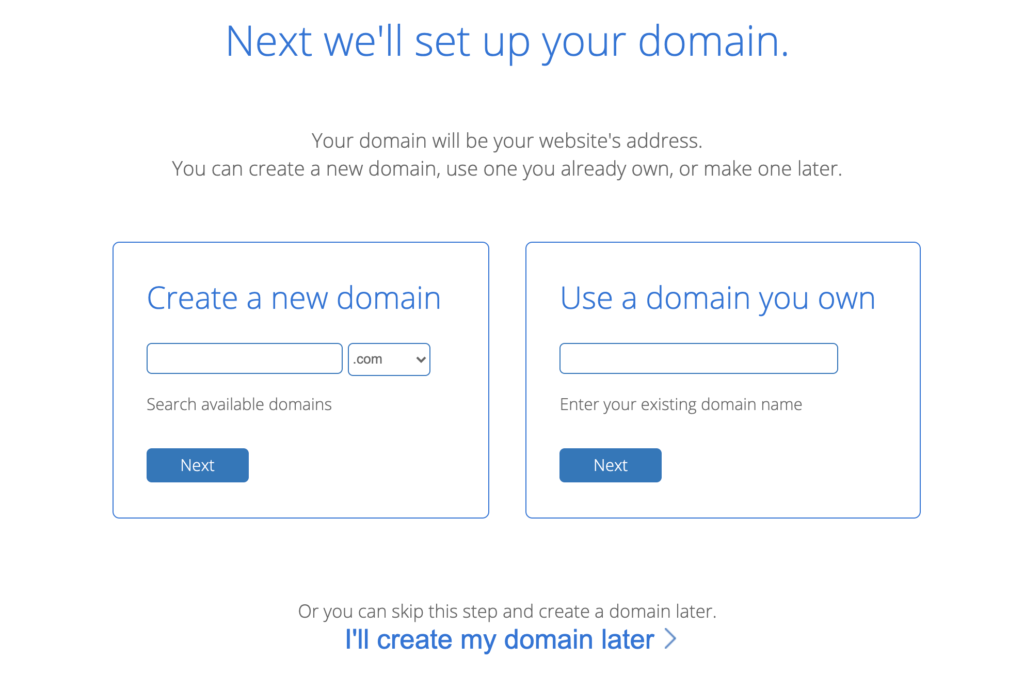
Alternatively, you can skip this step and set up your domain at a later time. You can continue creating your account without a domain, but you won’t actually be able to install WordPress until you have a domain.
Enter Your Account Information
This step is very straightforward. Simply fill out the required form fields listed on the next screen.
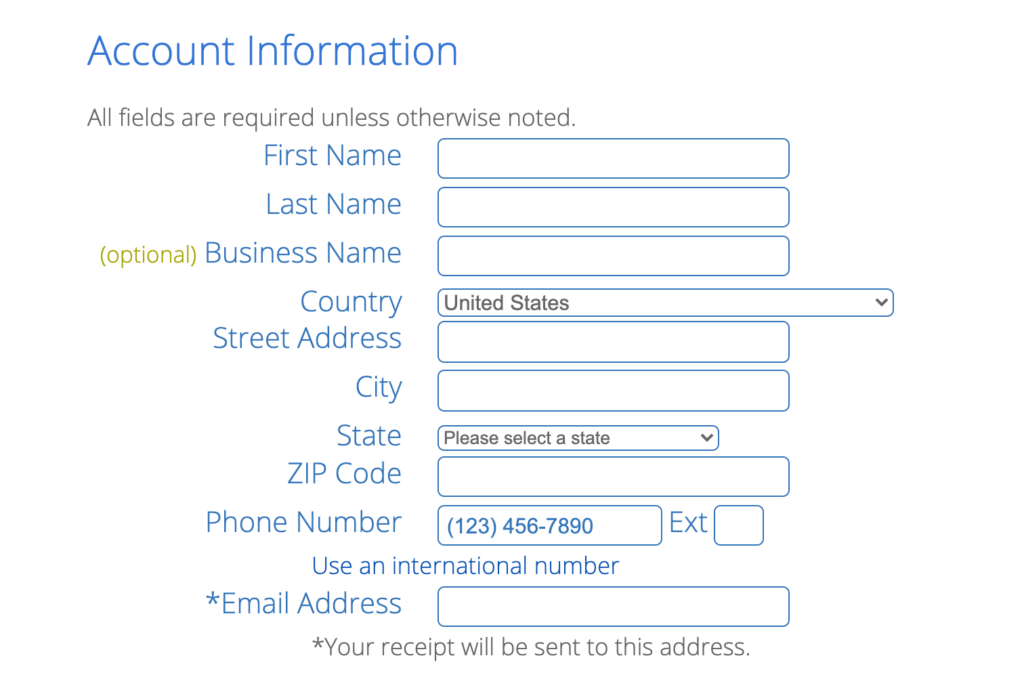
You’ll be able to do this in a minute or two at most.
Finalize Your Package Information
To get the best possible hosting rate, you need to sign up for a 36-month contract. Bluehost offers 12 and 24-month options as well.
Be aware that the price you’re paying right now is a special introductory offer. The plan will renew automatically after the first term at the regular rate, which is another reason why I recommend the 36-month term.
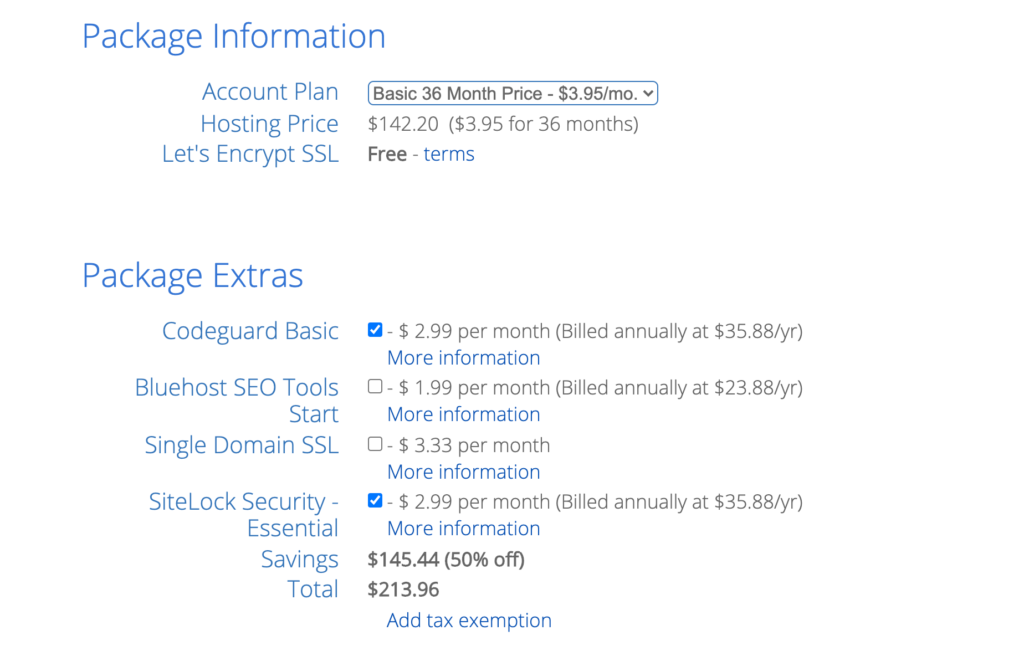
As you can see from the screenshot above, all Bluehost hosting plans come with a free SSL certificate. But there are some other extras that I’d recommend, including Codeguard Basic and SiteLock Security Essential.
These aren’t a requirement, but they’re definitely useful. Feel free to add on the SEO tools or the single-domain SSL to your package as well, although you don’t necessarily need either.
Enter Your Payment Details
Once you’ve finalized the package details and contract terms, it’s time to pay for your hosting plan.
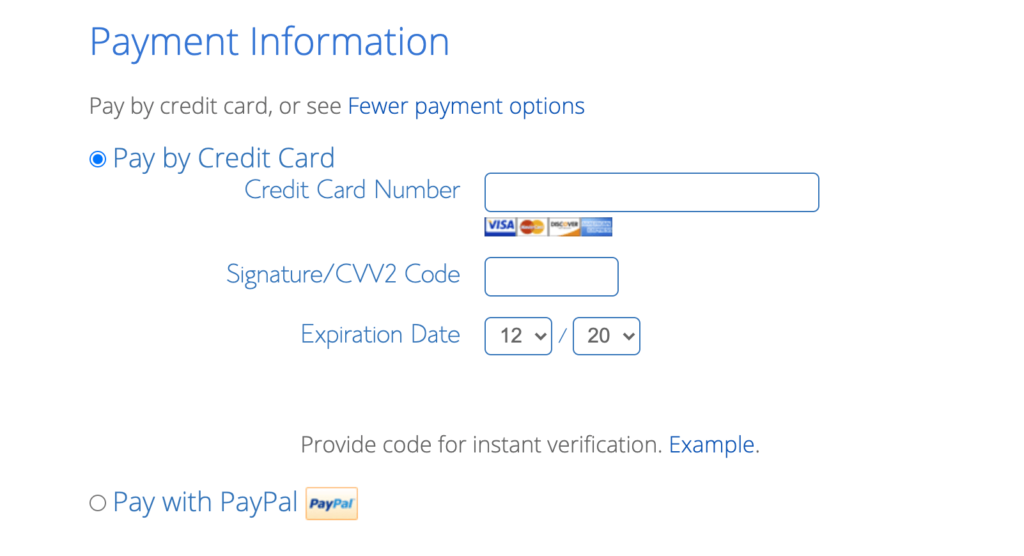
All major credit cards and PayPal are considered acceptable forms of payment with Bluehost.
With the exception of purchased domains and other add-on products from third-parties, your Bluehost hosting plan is backed by a 30-day money-back guarantee.
Step 4 – Install WordPress
Once you’ve created an account and purchased a hosting plan, you’ll be able to install WordPress using Bluehost
Remember, you’ll need to have a domain as well. So this final step is under the assumption that you’ve already registered a domain and linked it with your Bluehost account.
Click “Create Site” From the “My Sites” Menu
Navigate to your Bluehost control panel for the account that you created in the previous step. From here, look for the “My Sites” menu on the left side of the dashboard.
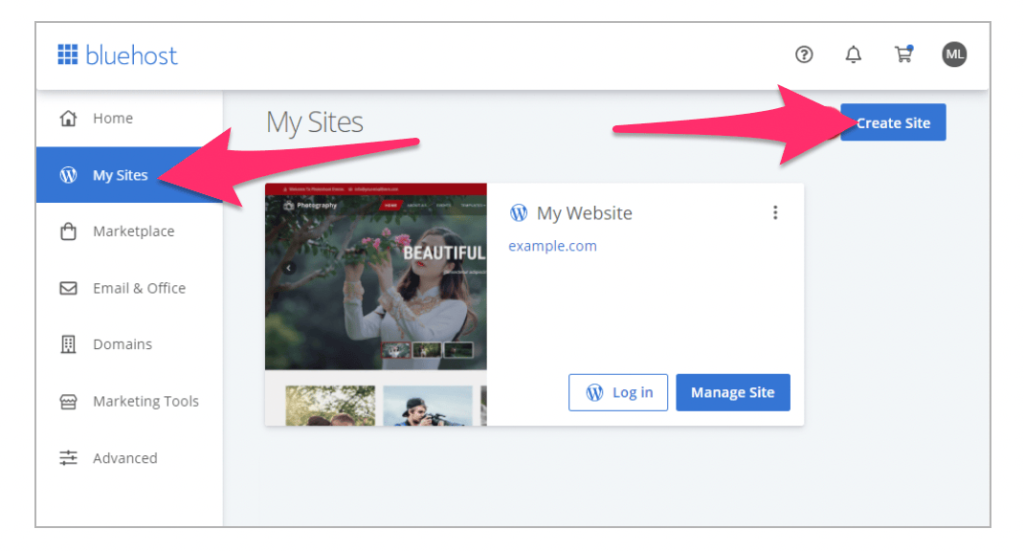
Once you land on this page, select “Create Site” in the top right corner of the screen.
Enter Your Site Information
Next, a window will appear with two recommended website builders. Click “Start Building” for the WordPress option to continue.
You’ll be prompted to enter some information about your site, including a name and tagline.
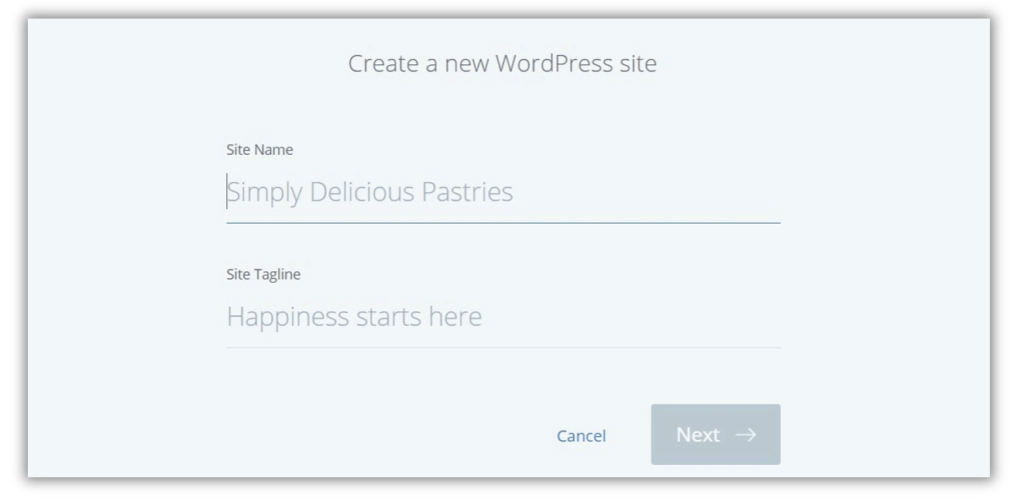
The “Site Name” field is not a URL. It’s just the name that will be displayed and used on your site. Taglines are usually a brief description or slogan. Don’t worry about this too much. You can always go back and change this information at another time.
You’ll also need to set up your WordPress admin username and password. All of your login information will be sent to you via email.
Select Your Domain
Choose a domain name from the drop-down menu that you want to install WordPress on. Only domains associated with your WordPress account will be available here.

This is another reason why using Bluehost to install WordPress is the easiest solution. Everything can be managed from within the same platform.
Log Into WordPress
After completing the steps above, the application will install within a few minutes. Once the installation is done, you can log into WordPress from the “My Sites” dashboard, as shown below:
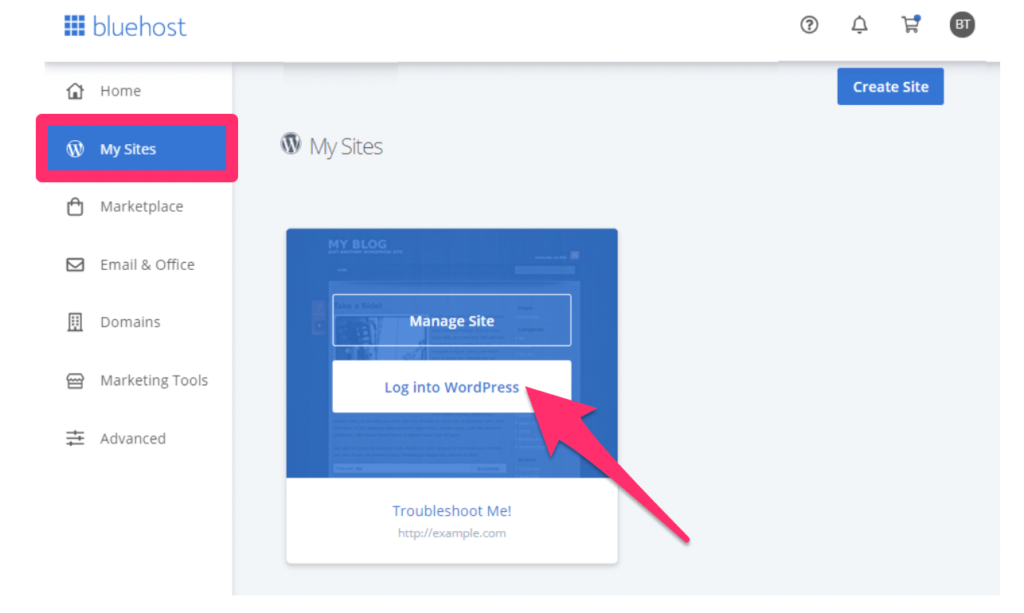
Now WordPress has been installed.


from Quick Sprout https://ift.tt/3ogrYYo
via IFTTT
