Comments are powerful and can enhance your WordPress site. It can encourage discussion and allow you to interact with your readers, and help build a community.
But sometimes, the same comments can be a pain. They can be self-promotional, spammy, and even hurtful. They may be completely unnecessary if you have a website with static pages.
So what do you do? You disable WordPress comments.
You can turn off comments on specific posts, pages, and custom post types. Globally disabling comments from your entire website is also an option.
Wondering how? Let’s find out.
What to Expect When Disabling Comments on WordPress
Disabling comments on WordPress is another feature by the platform to give you more control over your website. As one would expect, the process is simple and straightforward, and all you have to do is choose an option that fits your needs better.
Here’s what you need to do:
- Step 1 – Know Where You Want to Disable Comments on Your Site
- Step 2 – Change the Settings to Disable Comments
- Step 3 – Explore Other Comment Settings
The Good
Hateful, offensive, spammy, out of line—there can be all kinds of comments.
The good news is you can disable them all on your WordPress site in a few clicks. Trust me, it’ll take less than five minutes.
Moreover, stopping comments can help boost your loading speed as well.
Start by checking your site’s speed first using tools like PageSpeed and Pingdom. If you find that your site isn’t loading fast enough, turn off your comments temporarily. You can also globally disable them.
Comments generally spur conversation, but this isn’t the case for every website. So if you don’t need comments on your website or blog, you will be happy to know about the disabling comment feature.
The Bad
Like two sides of a coin, turning off WordPress comments also has its fair share of disadvantages.
Firstly, there won’t be any engagement or conversations on the site. This is a significant disadvantage as it ruins your chance at building lasting relationships with your audience.
Secondly, you won’t be able to gauge whether your WordPress posts are capturing your target audience’s attention. You’ll never know if you actually have a loyal base of engaged readers, which also means you won’t be able to attract and enjoy a lot of public attention.
Disabling your comments manually is more time-consuming than using a plugin. If you plan on skipping the plugin, you may find yourself spending plenty of time changing your comment settings when you want to disable comments, especially for individual pages or posts.
Understandably, this can be a rather frustrating experience for some.
Step 1 – Know Where You Want to Disable Comments on Your Site
You have to figure out where you want to fully disable comments. This can include posts, pages, attachments, individual sections of your side, or just the whole website.
To decide whether it would be appropriate to disable comments, you have to check on your readers’ behavior.
Analyze the Comment Patterns and Frequency
As discussed previously, there can be plenty of reasons why you might want to turn off your comments.
However, based on the comment patterns and how frequent the discussion is on your website’s front-end, you can determine whether you should disable comments for your whole website or a specific post or page.
Take the frequency of comments, for example.
When people leave comments under posts, they expect answers or acknowledgment. You know it, I know it, they know it. Precisely why it would be better to turn off comments if you get tons of comments every day and don’t have anyone to or want to respond to them.
That said, if only a specific page is receiving the majority of the comments, you should turn off comments for that page only.
If you find your website is experiencing higher bounce rates due to slower load times, you should again turn off comments. Every comment left on your website needs a database ask/request, and when the number of comments gets far too many, it could slow your site down.
You may also experience an onslaught of spam comments. Typically, spam is mostly targeted towards specific pages, so it would be better to disable comments on those pages.
Disabling comments for your whole site is best when commenting just doesn’t serve your website goals or brand, you have static pages, or you want to direct the conversation towards a forum instead of on your posts.
Think about the various scenarios mentioned above, and then based on your findings, determine which part of your website you want to disable comments for.
Step 2 – Change the Settings to Disable Comments
The default setting of WordPress lets everyone comment on your posts but not on your pages.
Luckily, you do have the option to either disable/enable comments for either specific posts and pages or throughout your site. What’s more, you can also moderate your comments in different ways by updating settings on the main WordPress dashboard.
Let’s take a look at how you can disable comments for different parts of your WordPress website.
#1 Disable Comments on All Your Future Posts and Page
Go to your main WordPress dashboard, and click on Settings followed by Discussion.
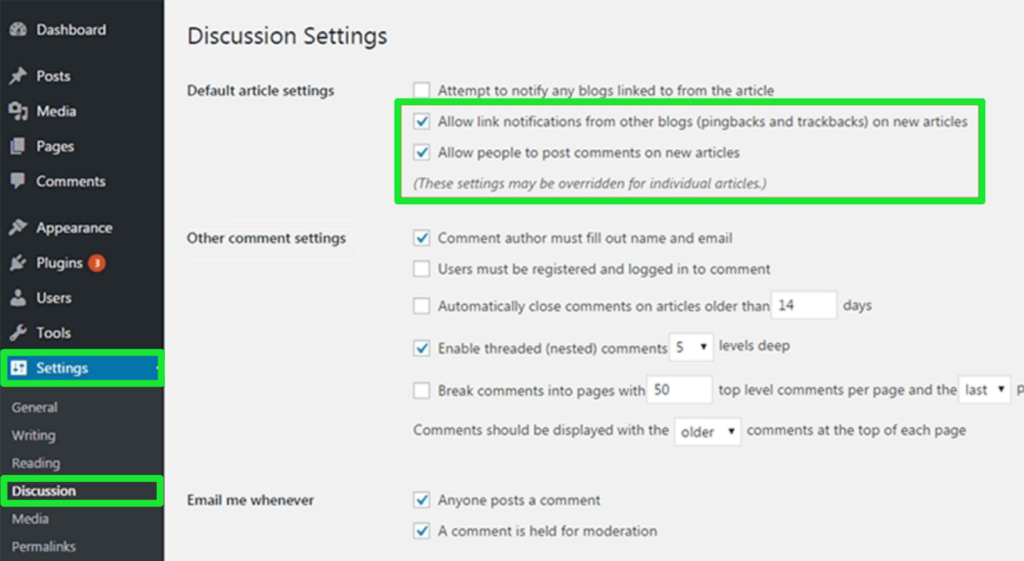
You’ll find that the option to Allow people to post comments on articles in the Default article settings field is already checked. Uncheck it.
You can also disable trackbacks and pingbacks for all your future posts on your site. To do this, uncheck the Allow link notifications from other blogs (being pingbacks and trackbacks) on new articles option.
As mentioned before, commenting and pingbacks are already disabled on pages by default.
#2 Disable Comments on Selected Posts or Pages
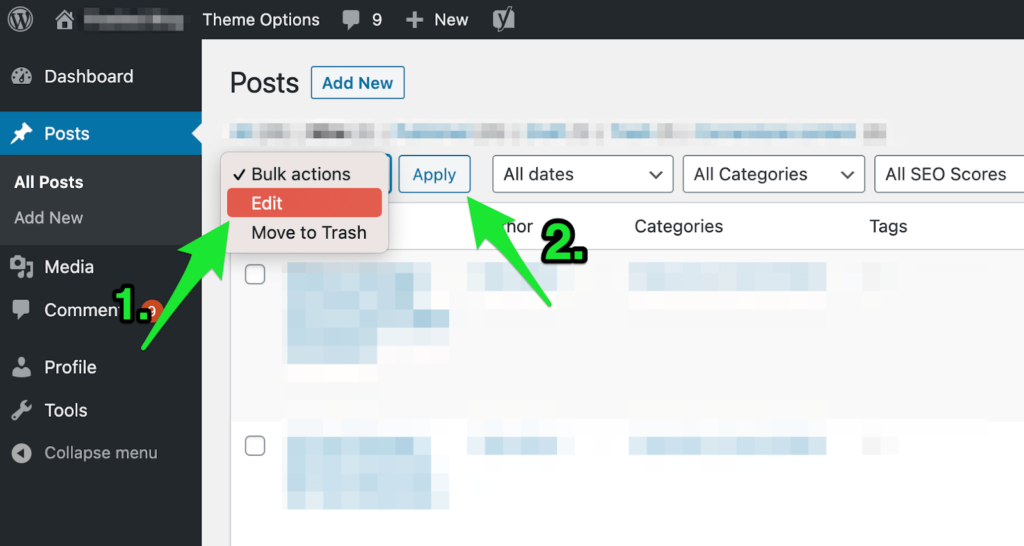
Go to All Posts on the admin dashboard, and select the posts you want to disable comments for.
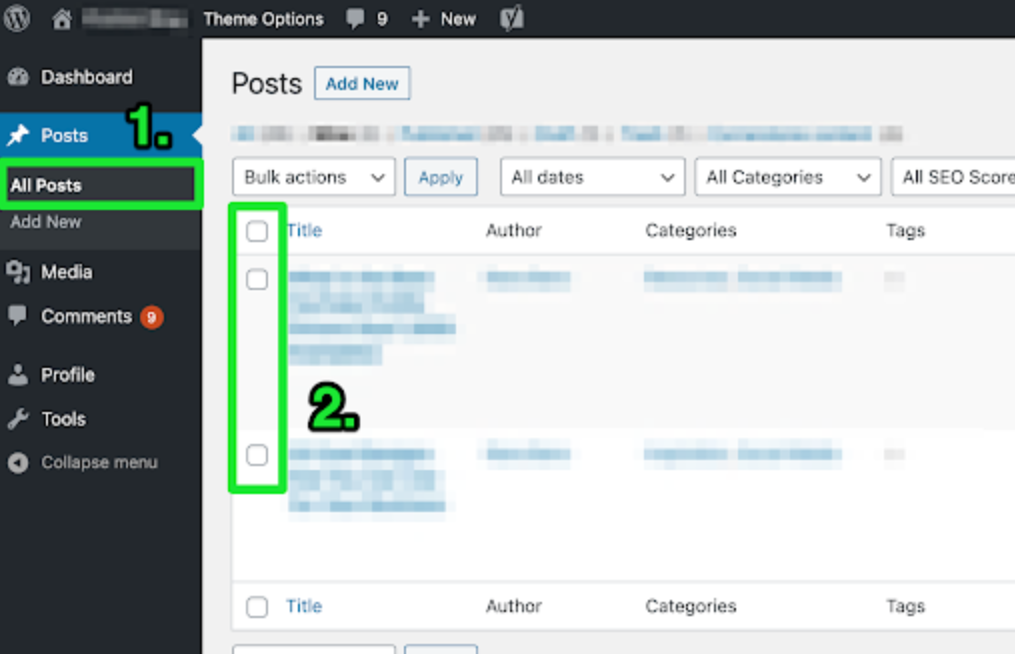
Remember, you can only select up to 20 posts at a time. If you want to select a greater number, you’ll have to make the required changes in the Screen Options section.
Click on Bulk Actions.

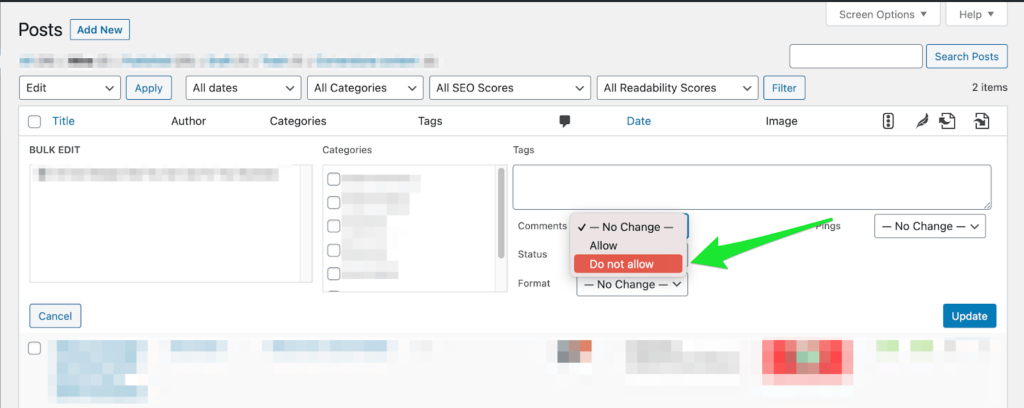
Follow this up by selecting Edit and then Apply. You’ll see a new Bulk Edit option pop-up on your screen that allows you to adjust the settings.
Select the Do not allow option from the dropdown menu for Comments.
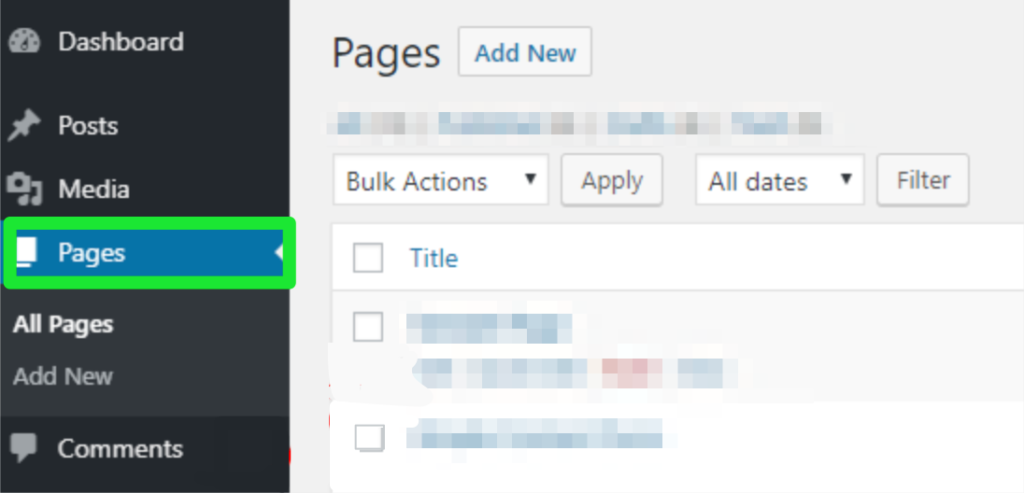
Again, comments are turned off by default on all your pages. But it’s possible to change this setting.
Click on Pages on your WordPress dashboard, followed by All Pages from the left sidebar. Hover your cursor over the page title you want to disable and enable comments for, and click on Edit.
Select the three vertical dots icon located on the top right-hand corner of your screen. Click on Options from the dropdown menu.
A pop-up box will appear on your screen. Enable the Discussion box here. Close the pop-up box.
On the right-hand side of your WordPress editor, you’ll see the Discussion meta box. Uncheck the Allow comments box. This will disable comments on the specific page.
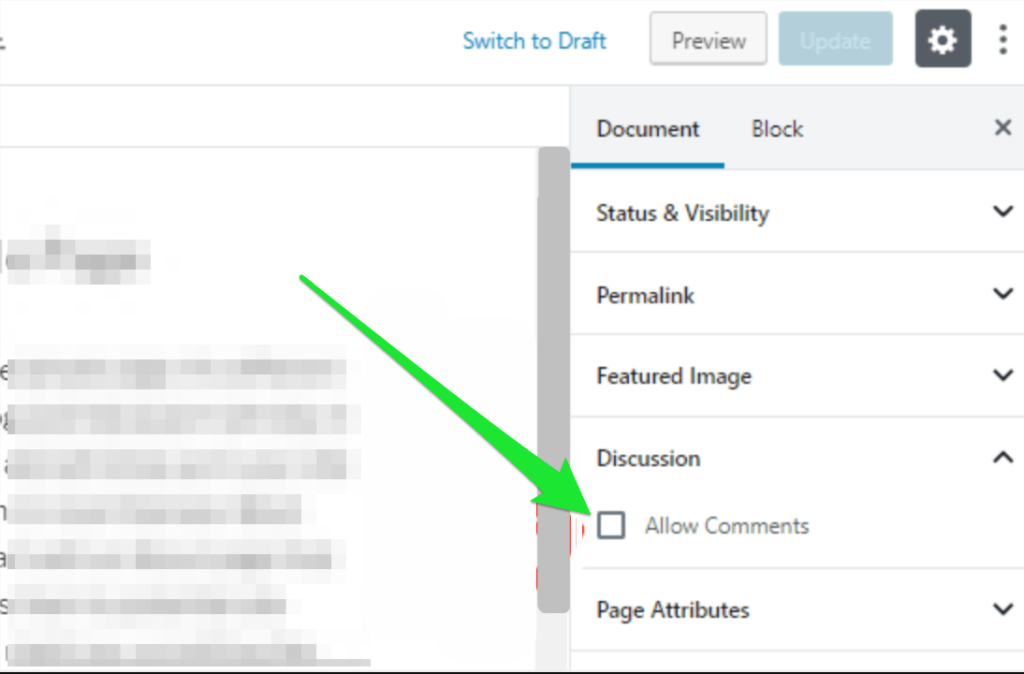
Tip: If you don’t see the Discussion meta box, click on the Document tab to view it.
Click on Update to save the settings.
If you want to enable comments for a specific page selectively, just check the Allow comments box to enable it for the respective pages.
#3 Disable Comments on Existing Posts Individually
On your WordPress dashboard, go to All Posts, followed by Edit Post.
Just below the writing area, you’ll see the Discussion field. If it isn’t visible on your screen, enable Discussion under Screen Option.
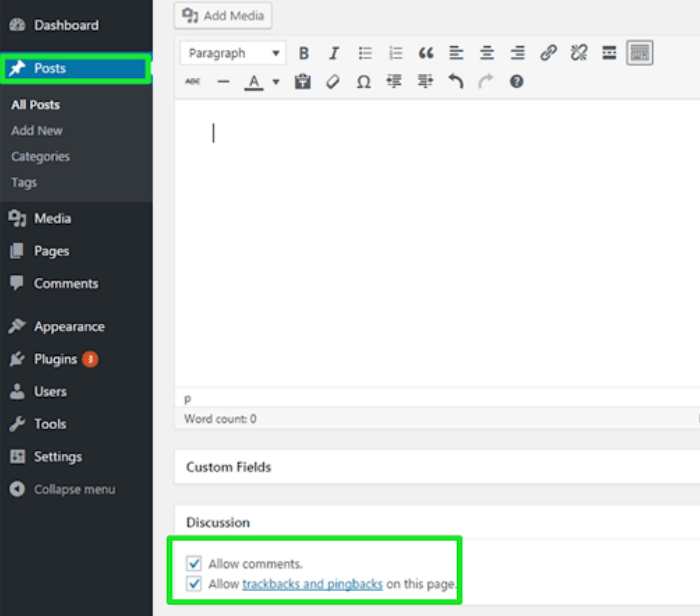
Uncheck Allow comments under the Discussion field.
Alternatively, you can click on Quick Edit and uncheck the Allow comments option.
Step 3 – Explore Other Comment Settings
WordPress lets you control your comments however you want. There are a host of options that you can try out besides disabling them altogether.
Open the Discussion Panel
After logging in to your WordPress site, click on Settings in the main dashboard. Then go to Discussions.

Test Out Other Comment Options
Here’s a list of all the other options you can opt for:
- Blacklisting IP addresses, usernames, or emails. You can blacklist known offenders or add a snippet of code to .htaccess to block known malicious IPs. Even a partial match to the list will be blocked.
- Require a moderator to approve the comment before it is published. I highly recommend this as not only does it catch bots and spam, but it also lets you approve the comments you want to publish on the front-end of your website. You’ll find all unapproved comments in the comments queue on your dashboard once you enable this setting.
- Requiring a user to register. This tactic can be useful to combat a higher frequency of comments. Every user will have to register—something not everyone likes doing—before leaving comments. It can help to bring down spam as well as the comment volume.
- Closing comments on older articles. You can specify the number of days you want to let your visitors comment on your posts. Once the last day approaches, comments will be stopped automatically. Spammers generally target older posts, so closing comments can work wonders to reduce spam.
- Approving comment authors. Approve people who can comment on your posts beforehand. This way, your posts have comments that could help with SEO, and you won’t have to waste time filtering through unnecessary ones.
- Limiting links. This is a good setting to stop spammers who leave comments with way too many links.
- Be notified when you receive comments. Receiving notifications for every new comment can help you maintain active control over your comments section. You can remove unwanted comments swiftly.
Delete Comments on All Published Posts or Pages
If you think you can remove all comments on your already published post by disabling comments, I have news for you: You thought wrong.
There’s a whole process that you need to follow.
Open the WordPress admin panel, and click on Comments from the left sidebar.
Select all the comments you see. Click on the Bulk Actions dropdown box, and choose Move to Trash. Follow this up by clicking on Apply.
Every single comment on your existing posts will be deleted. Yep, it’s that simple.
Alternative Method: Disable WordPress Comments by Installing and Activating a Plugin
I love shortcuts as much as the next person. And no doubt, manually disabling and deleting comments for every single post or page can get very frustrating very fast.
Thankfully, you can skip all the hard work by simply downloading a sophisticated WordPress plugin.
I recommend the plugin Disable Comments as it enables you to globally disable all comments on your WordPress site. But you can choose any other plugin you prefer.
Install and Activate the Plugin
Log in to your WordPress website, and go to Plugins. Click on Add New in your WordPress dashboard.
Type in Disable Comments in the search bar, and press Search. Once you see the login displayed on your screen, hit the Install Now button.
Once the installation process is over, click on Activate. This will make the plugin ready for use.
Disable Comments on Your Website
At this stage, your Disable Comments plugin is ready for use.
Click on the Settings from the side menu bar, and select Disable Comments in the WordPress dashboard.
You’ll see an interface on your screen where you can manage your website’s comments. You have to choose between two options here:
- Everywhere: Disable all comments and related controls in WordPress
- On certain post types: You can disable comments on specific posts, pages, and/or media.
Check the option applicable in your case, and click on Save Changes.
Voila! Everything’s done and your WordPress comments are now disabled.


from Quick Sprout https://ift.tt/3xGVSKc
via IFTTT
