To survive and stay relevant in the modern era, your business needs to have an active presence on social media.
When it comes to social networks, Facebook is king. As of June 2018, the platform had more than 1.47 billion daily active users and 2.23 billion monthly active users.
Over 60 million businesses have Facebook profiles.
Those companies are doing much more than just posting content to their timelines. The vast majority of these businesses are paying for ads.
In fact, 93% of marketers take advantage of Facebook advertising on a regular basis.
If you’re active on Facebook but not running ads, you might fall behind the competition.
In a perfect world, you’d be converting your social media followers into customers. That’s the reason you’re in business, right?
But some of you may have struggled with this. If you ran Facebook ads in the past and didn’t get the results you were looking for, it could be the reason why you’ve been avoiding this marketing strategy.
Don’t worry, you’re not alone: 62% of small business owners feel their paid Facebook advertisements aren’t reaching their targets.
The success of your Facebook campaigns is completely dependent on how you set up your audiences.
If you don’t want to waste money on ads that don’t reach your target audience, you need start focusing on the customer lifetime value (CLV).
If you don’t know what this is or how to get started, I’ll help you out.
I’ve been in your shoes before and wasted valuable marketing dollars on ads that didn’t convert. But after taking advantage of customer lifetime value lists, I saw different results.
I’ll show you how to create Facebook audiences that convert by leveraging lifetime value.
Learn how to calculate your CLV
Before we go any further, it’s important for you to understand the basic concepts of customer lifetime value and why it matters for your Facebook ads.
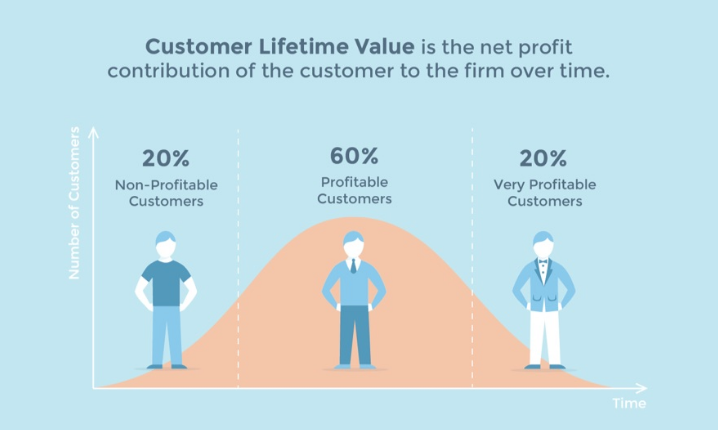
What is lifetime value?
In short, it’s a number reflecting the amount of money a customer spends at your business before they leave it.
The longer a customer stays with your business over time, the more profitable they become for the business.
If you’re not using this metric to help you make decisions, it could be an extremely costly mistake. Let me give you an example.
Let’s say your business sells watches through your ecommerce platform at bargain prices. The average retail price of your products is $30.
To drive more traffic to your website and generate leads, you start running PPC campaigns through Google AdWords.
This seems like a good strategy since the average cost per click for the retail industry is only $1.35. That’s significantly lower than for other industries.
However, the average conversion rate for retail ads is an abysmal 3.86%.
At that rate, you would need roughly 25 clicks just to get one conversion. At $1.35 per click, this single transaction would cost you $33.75.
But the average price of a watch on your website is only $30.
This is not a profitable marketing strategy, right? The truth is, you don’t know the answer to this question unless you know your CLV metrics.
That’s why you need to calculate your customer lifetime value before you begin any marketing campaign.
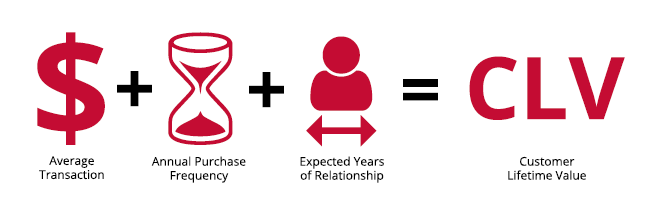
Let’s continue using the same watches sale example.
If the average transaction is $30 and the customer buys four times per year for the next five years, you can expect to make $600 from that customer.
That’s nearly 18 times the amount of your initial acquisition cost.
When it comes to your marketing strategy, it’s important to use customer acquisition tactics that won’t break the bank and yield a high ROI.
Once you’re able to determine your CLV, it will be easier for you to launch new campaigns while having a better understanding of how those costs will pay off over time.
Plus, if you’re able to increase revenue without acquiring new customers, you can ultimately boost your customer lifetime value.
I know what some of you are thinking. Sure, this sounds great, but how is this relevant to Facebook advertising? Allow me to explain.
Create a custom Facebook audience with CLV/LTV
Now that you understand what a customer lifetime value is, why it’s important, and how to calculate it, it’s time to use this data to improve your Facebook ads. Facebook uses the abbreviation LTV to refer to lifetime value of a customer.
As I said earlier, if you ran Facebook ads in the past but weren’t satisfied with the results, it’s probably because you weren’t able to target the right audience. You won’t get conversions if the wrong people are exposed to your ads, even if the promotion is great.
I’ll show you how to generate leads with Facebook ads by targeting an audience that actually converts.
Here’s a simple step-by-step guide that explains how to set up these ads with your customer lifetime value calculations.
Step #1: Prepare your customer data
Before you can set up your ads and do anything else, you need to prepare a spreadsheet with all your customer data.
This may be easier for some of you than others. If you’re well organized and have a way to export this data from your POS system to a spreadsheet, it shouldn’t be too much work.
However, if you don’t have a spreadsheet prepared yet, you can download a template directly from Facebook.
Take the spreadsheet template, and input your own customer information. This information will be used to help create your custom audience.
Basically, Facebook will take that data to match your customers and also find people similar to those customers.
Here are some examples of the information that will be included on the spreadsheet:
- phone number
- first name
- last name
- city
- state
- country
- date of birth
- age
- zip code
- gender
It even has columns for things such as mobile advertiser ID and Facebook app user ID, which you may or may not have.
It’s important that you pay close attention to the formatting required by Facebook for this spreadsheet.
For example, they want the column for the first names abbreviated as “fn” and the column for city abbreviated as “ct.”
The more details about your customers you can include in this spreadsheet, the more accurate your custom audiences will be.
Step #2: Add a column for lifetime value
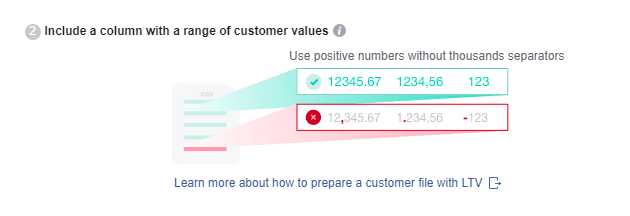
Next, you’ll add another column to this spreadsheet for your customer lifetime value data.
Make sure you use a broad range of numbers here. This will make your data more accurate as opposed to using your customers with the highest value.
Facebook will calculate the difference between a top customer and an average one.
Don’t use negative numbers to show customers with a poor value. Doing this will mess up the calculations.
If your business accepts multiple currencies, make sure it’s all converted to just one on this spreadsheet. Facebook won’t be able to make the conversion for you if your data includes more than one currency.
As you can see from the screenshot above, Facebook also doesn’t want you to use commas to separate values in the thousands.
You can use a decimal point to show a cents value, but otherwise, you can’t include any other punctuation or separators in your lifetime value column.
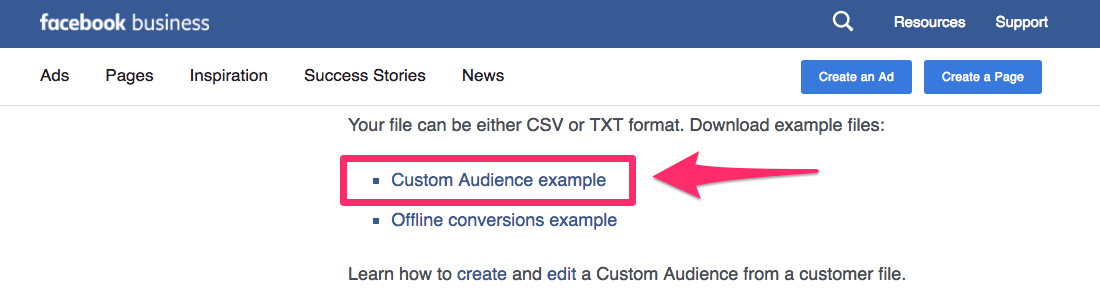
Step #3: Select “audiences” from your Facebook Ads Manager dashboard
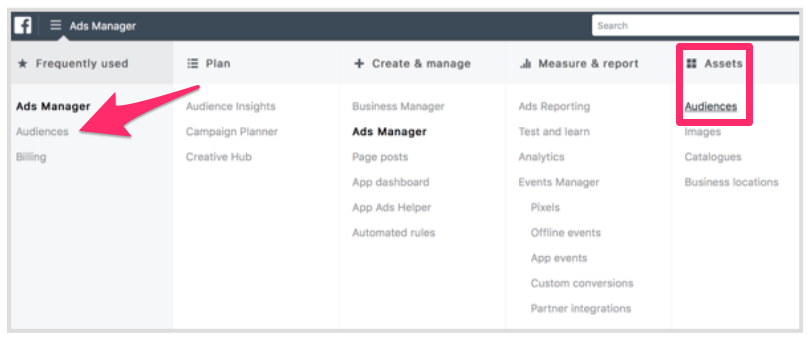
Now that all your customer information and lifetime value data is organized and formatted, you can continue.
Navigate to the “audiences” menu from the Facebook Ads Manager dashboard.
Click on the “create audience” option as opposed to “create lookalike audience.”
Truthfully, either would work. But I think it’s better to set up a custom audience first before you start experimenting with lookalike audiences.
Step #4: Choose the “customer file” option from the list of audience types
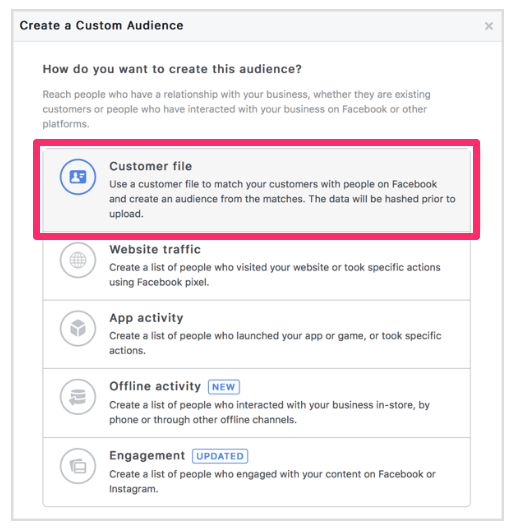
As you can see from the menu above, there are several different ways for you to create a custom audience.
Each of these five options has a purpose, depending on your goals.
However, for our purposes here today, you’ll select “customer file” from the menu.
Step #5: Upload your lifetime value customer data
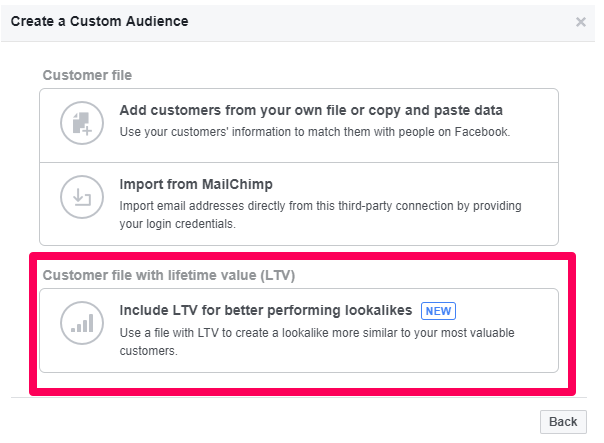
Now you have to decide which type of customer file you’ll use to create a custom audience.
Those of you with a MailChimp account can directly import customer email addresses as a data source.
However, that data won’t be as detailed as the spreadsheet you created in previous steps.
That’s why you’ll select the “customer file with lifetime value (LTV)” option.
Simply upload the spreadsheet, and Facebook will use the data, including the customer lifetime values, to create a custom audience.
Step #6: Run an ad with your new custom audience

Once your custom audience has been uploaded, all you have to do is run a Facebook ad the same way you normally would.
But unlike in your previous campaigns when you manually choose an audience based on age, gender, language, and location, you’ve got another option this time.
Now, you’ll select the custom audience you created with the uploaded file.
This will ensure your ads will be shown to Facebook users who are relevant to your business and primed to convert.
Set your budget and schedule
As with any marketing campaign, you need to stay within a reasonable budget. This number will be different for everyone.
Just because your new ads target a more accurate audience doesn’t mean you should dump every last marketing dollar into this campaign.
Test the waters first to see how successful you are.
Facebook makes it easy for you to stay within your budget and schedule your ads accordingly.
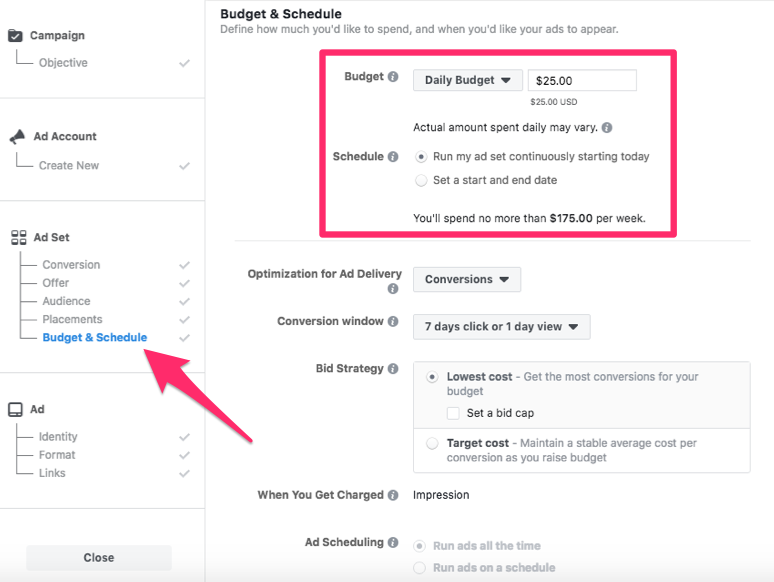
This feature will make sure you have weekly caps that won’t be exceeded.
I recommend starting with smaller amounts until you can be sure your ads are the most efficient for conversions. But we’ll talk more about this concept as we continue.
Choose your ad format
What type of ads are you going to run?
You’ve got lots of options to choose from. It all depends on what fits well with the promotion you’re running.
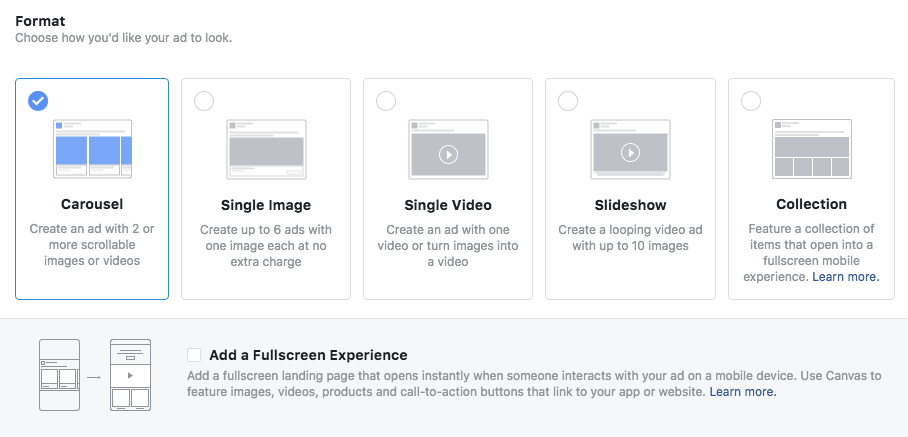
Truthfully, I don’t have a definitive answer for you here.
Some ad formats work better for certain brands compared to others. That’s why it’s in your best interest to keep your budget low when you’re first starting out.
I suggest running ads with multiple formats to see which ones have the highest conversion rates.
Now that you’re targeting a custom audience, these ads will already be better than the ones you ran in the past. But don’t stop there.
You still need to have great ads if you want your audience to convert.
Experiment with split tests to improve your efficiency as well.
For example, run two identical ads in the same format, changing only the CTA to see which one generates the most clicks.
Which ads had the most success? Make sure to use those ones moving forward when you’re ready to increase your budget.
Conclusion
Don’t be discouraged if your past Facebook ads were unsuccessful.
The ads you were running may not have been the problem. You were probably just not targeting the right audience.
One of the best ways to improve your audience is by integrating your customer lifetime value data. This is one of the most important pieces of information you need to use when it comes to running any type of marketing campaign.
Simply follow the step-by-step guide I’ve outlined above to create a custom audience with your customer lifetime values.
Once it’s uploaded to Facebook, you can continue running ads the same way you did in the past. Only this time, you’ll be much happier with the results.
How is your company creating custom audiences on Facebook to drive conversions?


from Quick Sprout https://ift.tt/2NLR1n1
via IFTTT
