Building a new website from scratch can feel a bit intimidating, especially if you’ve never done it before. But with user-friendly platforms like Wix, anyone can create a professional-grade website without writing a single line of code.
Wix is one of the best website builders on the market today.
It’s built to accommodate the needs of complete beginners. You’ll be able to fully design your website by customizing stunning templates and moving things around with a drag-and-drop editor.
If you’re ready to launch a new website, but you’ve never used Wix before, you’ve come to the right place.
What to Expect When Using Wix
Anyone comfortable browsing the Internet can create a website with Wix. Just follow along with the steps below, and you’ll have a website built by the end of this guide.
- Create an Account
- Determine How You Want to Use Wix
- Choose and Edit a Template
- Publish Your Site
- Select a Package
The Good
The best part about building a website with Wix is its simplicity. You don’t need any design skills or coding knowledge. There’s no reason to hire a developer or an expensive web design firm.
This web-based website builder is so easy to use that literally anyone can do it.
Wix also has 800+ free designer-made templates. So you won’t be starting from a blank canvas. You can browse through categories like business, music, blog, education, fashion, travel, restaurants, and more to find a template that fits your needs. Then it’s just a matter of customizing that template with your content.
The platform even supports ecommerce sites. So you can use Wix to build an online store with features like automated sales tax, integrated shipping solutions, dropshipping services, 40+ supported payment gateways, and so much more.
Another benefit of using Wix is that it’s a one-stop-shop for all of your site needs. All plans come with built-in web hosting, so you won’t need to go through a third-party provider. You can also use Wix for domain registration, and they’ll even give you a free SSL certificate. In fact, if you register a domain with Wix, it’s free for the first year.
Wix is really affordable. Premium plans start as low as $14 per month. If you’re just using Wix for personal use or want to play around with the website builder, you can even use Wix to create a website for free.
For anyone who wants to build a website as quickly as possible with minimal manual effort, you can leverage Wix’s artificial intelligence tool. Just answer a few questions, and the AI will create a unique website for you in minutes that you can then tweak and personalize.
Between the simple UI, low cost, and powerful features, Wix is a no-brainer for anyone looking for a fast and easy way to create a new website from scratch.
The Bad
It’s worth noting that Wix isn’t perfect. There are a handful of drawbacks and potential limitations you should be aware of before you get started.
First and foremost, if you’re going to use Wix’s free plan, your site will have ads and Wix branding. Even your URL is going to be yourwixusername.wixsite.com/yoursiteaddress. Obviously, this is not a viable option for business use. So don’t expect to use the free plan for anything beyond a small personal project.
While Wix is easy to use, there’s still a learning curve for the editor. There are lots of different icons for adding content and making adjustments. You won’t be a pro in your first five minutes.
Another potential drawback of Wix is that you won’t have limitless control in terms of site functionality. You’re restricted by what Wix offers. For the vast majority of users, especially beginners, this is a non-issue. But developers or people who want to make advanced custom changes to their sites will find Wix a bit restricting.
If you start getting a ton of traffic down the road and ultimately determine that Wix is holding you back in terms of adding custom features, you might decide to move your site elsewhere. Unfortunately, migrating your data away from Wix is not an easy task. It could be harmful to SEO, and it will likely be a job for a professional web developer.
But overall, the Wix pros outweigh the cons. This is especially true for first-time website builders. Most beginners can look past these drawbacks without thinking twice.
Step 1 – Create an Account
Before you can do anything with Wix, you’ll need to sign up and create an account. This step is pretty self-explanatory. Just head over to Wix.com and click any of the “Get Started” buttons.
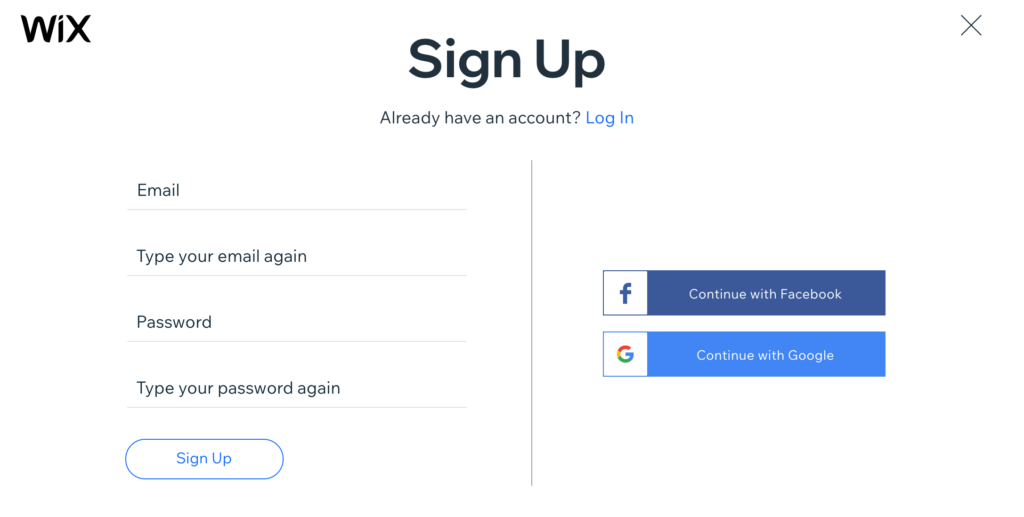
Fortunately, you just need an email and password to create an account. Wix doesn’t ask for an address, credit information, or anything like that when you’re first signing up. You can create an account with a single click using your Facebook or Google accounts.
As previously mentioned, Wix is free to use. So don’t worry about any payment details right now. You can wait until later to decide if you want an upgrade to a premium plan.
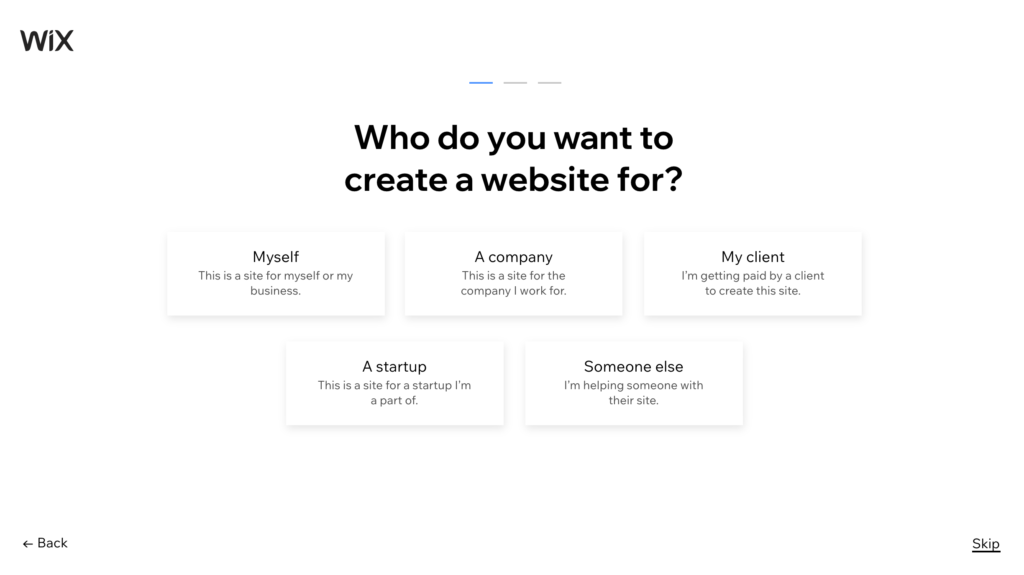
Answer a Few Questions (Optional)
Immediately upon creating your new account, Wix will ask you a handful of questions about the website you want to make. It takes about 20 seconds to answer these questions, and everything is multiple choice.
Your answers will ultimately help tailor your Wix experience according to your personal needs. So I’d recommend answering them, but it’s not a requirement. You can always click “Skip” at the bottom right corner of the screen if you want to proceed without answering.
Here’s an example of what those questions entail:
You’ll also be asked questions like:
- Have you ever created a website before?
- What kind of website do you need?
- Is this a new business?
- Do you want to let clients schedule appointments online?
- What would help you run your business?
Again, straightforward stuff here. But it’s all part of the initial account creation process.
Step 2 – Determine How You Want to Use Wix
Once your account has been set up, it’s time to figure out how you want to proceed. There are two different options for how to create a website with Wix:
- Wix ADI
- Wix Editor
The Wix ADI uses artificial intelligence to design a custom website for you. Just answer a few questions, and a unique site, completed with text and images, will be generated for you within minutes.
The Wix Editor is a little more labor-intensive. But it’s still straightforward. You’ll start with a template and ultimately populate your content using the drag-and-drop design tool.
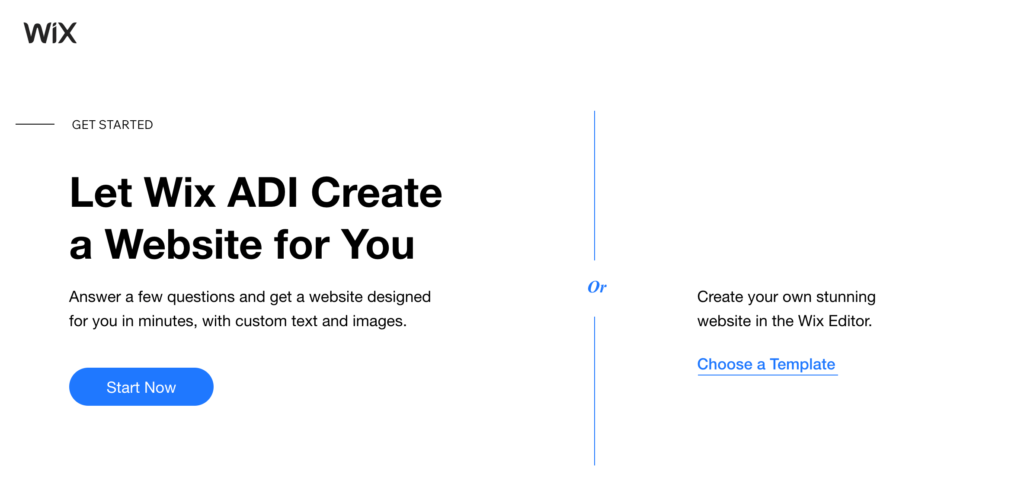
Which option is the best? It’s a matter of personal preference. You can’t go wrong either way, but I’ll break down each option in greater detail below.
Wix ADI
The Wix ADI brings you through a series of questions related to what you want your site to include. Here’s an example showing the first question that you’ll be presented with:
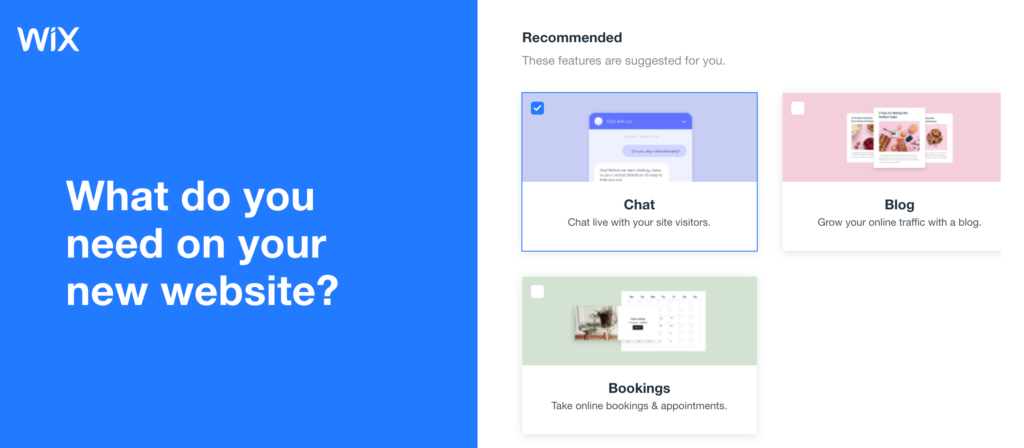
Just go through the list and check off whatever features you want. Options include:
- Blog
- Bookings
- Chat
- Online Store
- Video
- Events
- Pricing Plans
- Forum
- Music
- Instagram Feed
- Menus
- Reservations
- Orders
- Groups
Next, Wix will ask you the name of your business and give you an option to import pictures from your existing website or Google Places. So if your business is already up and running, the Wix ADI will pull content from the web about your company and include it on your custom website.
Continue adding information about your business like your address, phone number, fax number, email, and social media links.
Now Wix will ask you to choose a theme. The theme will be used as the design, font, and color scheme of your site.
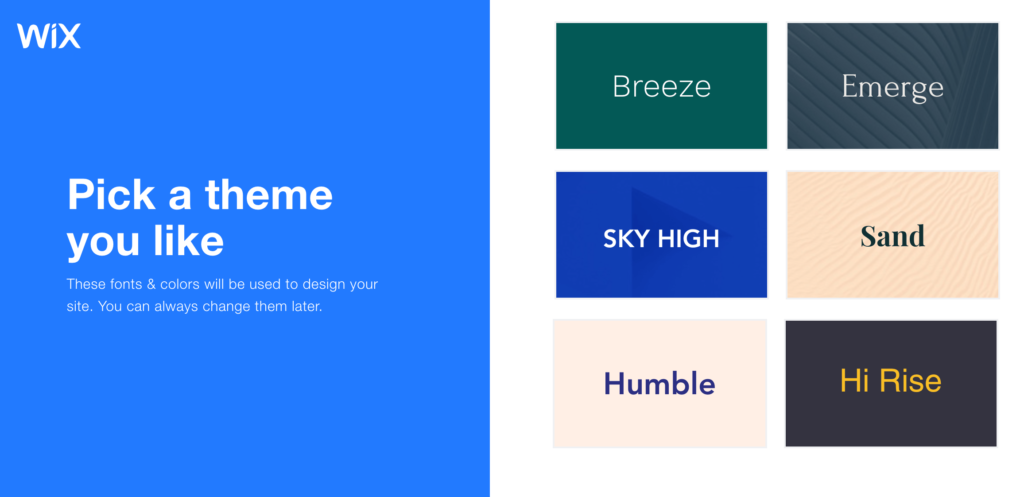
The theme isn’t set in stone. So if you don’t love the way it turns out, you can always change this down the road at a later time. Don’t overthink this step, and just pick whatever you think represents your brand the best.
Next, Wix will use your theme choice to present you with some home page designs. Pick whichever one you like the best to continue.
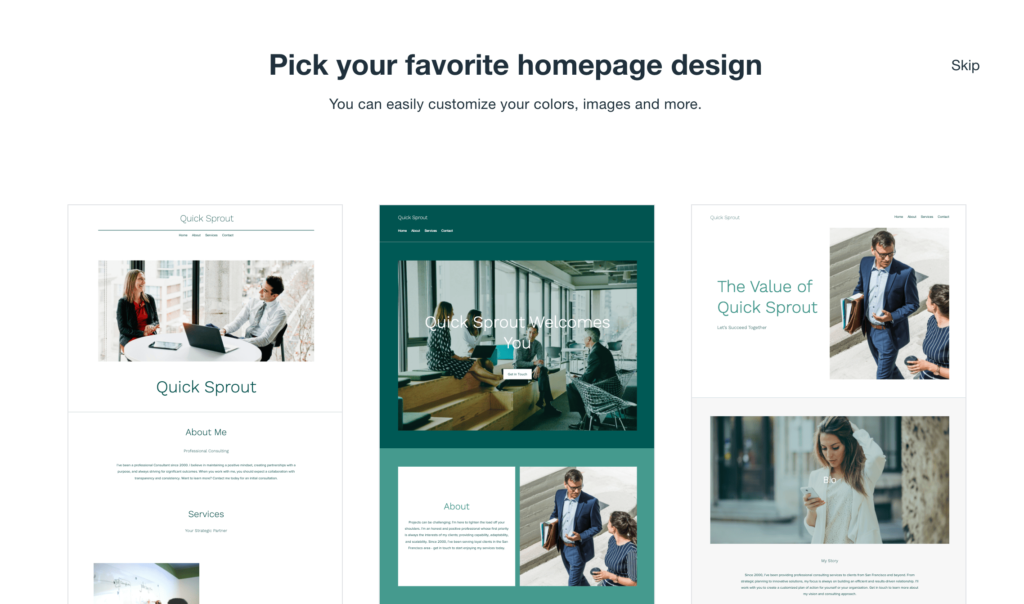
Here’s what it came up with for creating a new Quick Sprout site from scratch. As you can see, all of the design options are really clean, modern, and professional.
Now just select the pages you want to include, like About Us, Contact, Services, etc.
That’s it! Based on your responses, the Wix ADI will automatically generate a site that’s ready to be published. The whole process takes just a few minutes, and it’s perfect for anyone that doesn’t need anything too advanced on their website. If you just want to get something published as quickly as possible, go with the ADI. You can always customize your content and add more later.
Wix Editor
Most Wix users choose to use the Wix Editor. This gives you a bit more control over how your site looks and feels.
With the Editor, you’ll start by choosing a template, and then you’ll manually populate the content from there. Fortunately, the templates are really easy to follow and edit. The design work is all done for you. It’s just a matter of swapping out a template image with one of your own or removing a default block of text with something custom for your site.
Using the Wix Editor to create your website will definitely take a bit longer. But if you need to publish your site and get it live on the web ASAP, you can still do so fairly quickly.
You could always just put your homepage up and add other pages down the road.
Since the Wix Editor requires a bit more work, Step #3 in this guide will focus on that process. If you’re going to use the Wix ADI, you can skip ahead to Step #4.
Step 3 – Choose and Edit a Template
Using the Wix Editor begins with a template. Don’t rush through this step, as your template will become the backbone of your website.
Don’t let yourself get turned off by minor details within the template. This is a work in progress. You’ll still have complete control to customize the template and make it your own. Wix has thousands of design features to choose from.
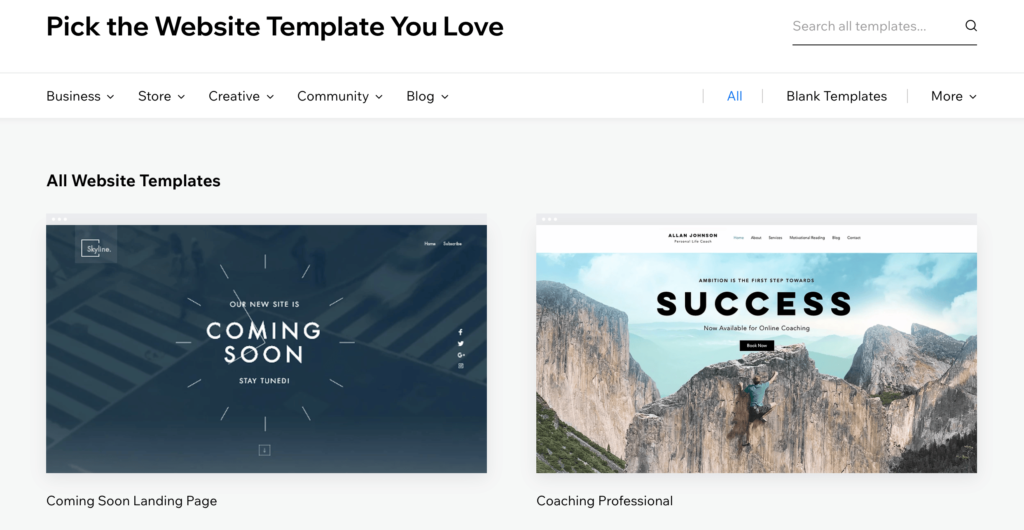
Narrow your focus and browse by category. Choose between business, store, creative, community, or blog. Within each category, there are even more subcategories to choose from.
For example, photography, music, portfolio, video, design, and creative arts are all subcategories within “Creative.” Health and wellness, restaurants and food, travel and tourism, and fashion are all subcategories within “Business.”
Each subcategory gives you even more options. So within restaurants and food, you’ll see templates for cafes, bakeries, bars, restaurants, catering, and more.
Try your best to continue digging deep through these segments to find a template that best fits your site’s needs. This will make the editing process so much easier, as you won’t have to move as much around.
Customize the Template with Your Content
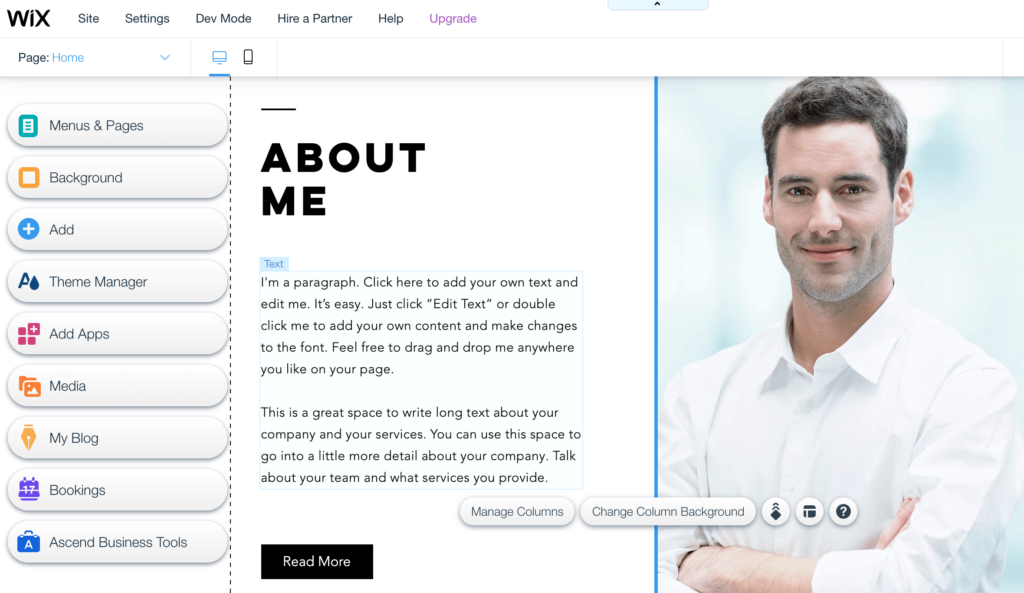
Now that you’ve selected a template, you’ll need to go through each section of each page to swap the default copy for your own.
To edit something, just click on the block, and you’ll have the option to do whatever you want. Wix lets you change the text, font, colors, and more. You can drag a block to somewhere else on the page or even delete it altogether.
Check out this example so you can see what I’m referring to:
For this example, I chose a business consultant template. This is the default content on the middle part of the template’s homepage.
Obviously, I’m not going to publish the page like this. I’d need to swap out the picture for an image of myself and get rid of the default text with something more unique about my services.
Once you start playing around with the editor, you’ll see how easy it is to use.
Maybe you don’t like the positioning of the “About Me” text? Just click the block, and drag it wherever you want to place it on the screen. Or maybe you want to change the font or colors. That’s all just a click away.
Add and Edit Landing Pages
Beginning with the home screen is the most logical place to start, but from there, you’ll want to focus on editing the internal landing pages within your website.
Click on the “Menus & Pages” icon on the top left side of your editor.
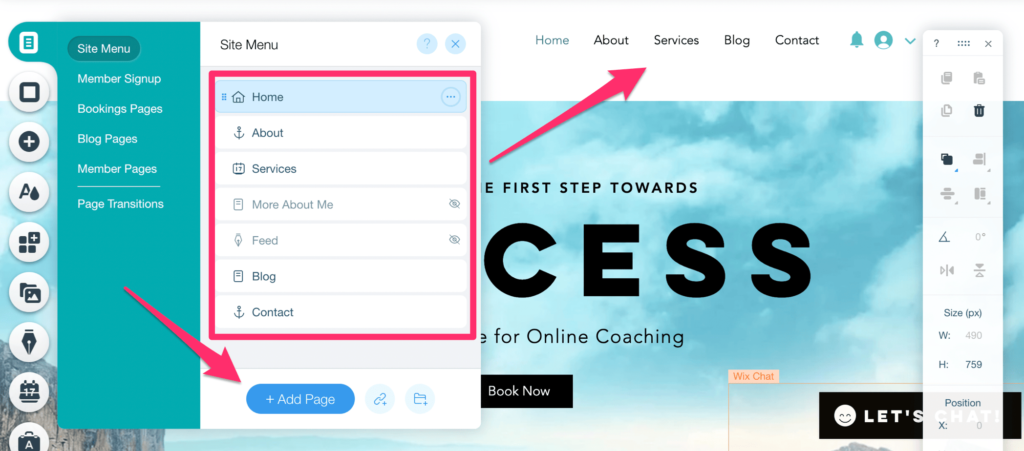
Here’s where you can add or remove pages from your website. You’ll also have control over which pages are shown in the menu at the top of the screen.
As you can see in this example, two of the pages (“More About Me” and “Feed”) are both hidden from the top-level navigation menu. But those pages can still be accessed on the site once it’s live.
Step 4 – Publish Your Site
Once you’ve finished editing the template, it’s time to publish your site. Just click the “Publish” button on the top right corner of the editor to continue.
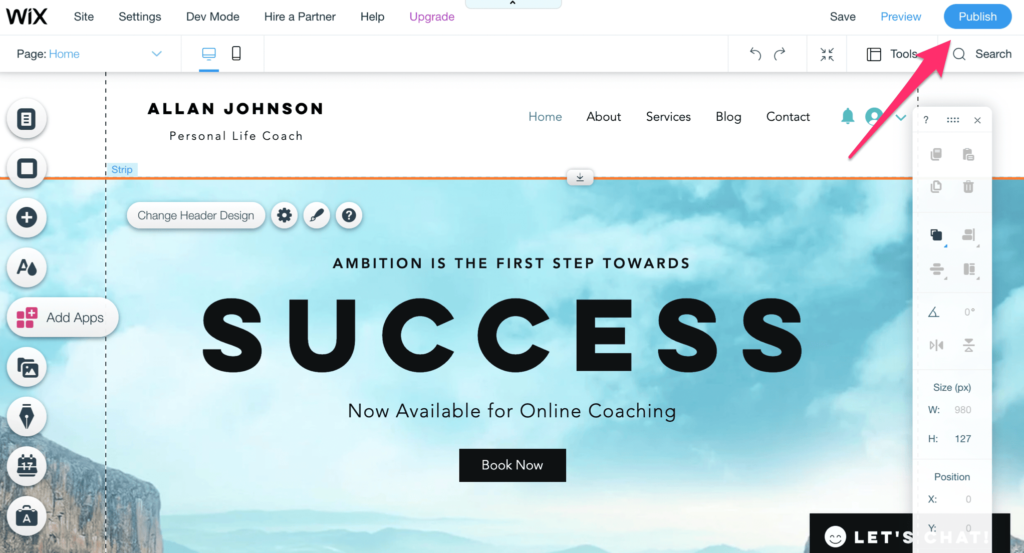
To preview your site and how it looks before going live, just click the “Preview” button located directly next to “Publish.”
There are a few other small steps to go through before your site is officially live. Getting a domain is one of them.
Get a Domain
If you’re on a free plan, then your live URL is going to be yourwixusername.wixsite.com/yoursiteaddress.
I strongly recommend using a custom domain name.

If you already purchased a domain from a domain registrar, connect your Wix site to a domain you already own. For those of you who haven’t bought a domain yet, you can get a new one directly from Wix.
The latter is the easiest option for new people. Going to a third-party domain registrar is just an extra step and something else you’ll need to keep track of it.
If you get a domain from Wix, it’s free for the first year.
Step 5 – Select a Package
Assuming you don’t want a Wix-branded domain, you’ll need to upgrade to a premium plan before you can publish a site with your custom domain.
Wix has a plan for everyone. Here’s a basic overview of your options:
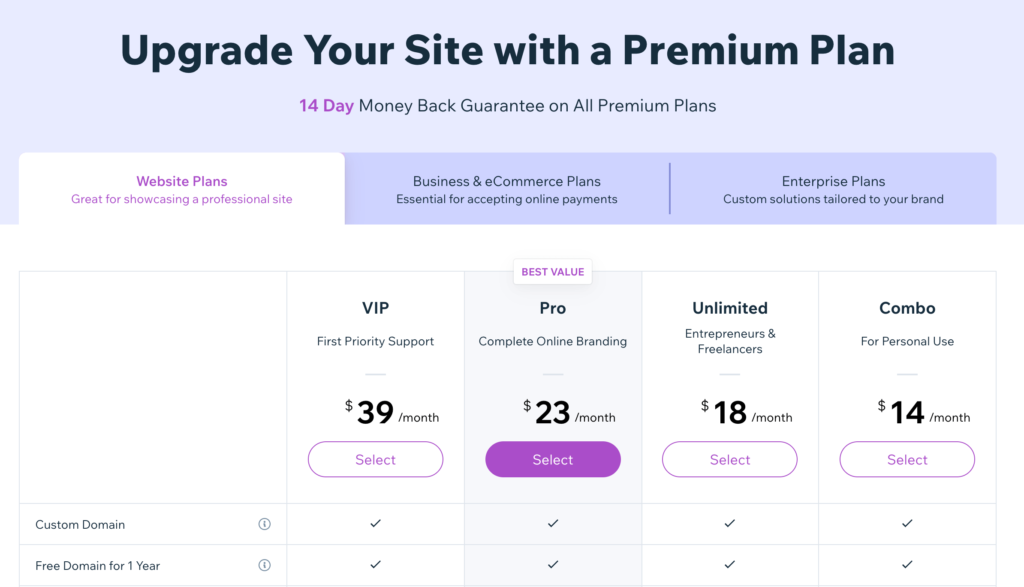
Every Wix premium plan comes with a custom domain, a free domain for one year, and a free SSL certificate. All Wix advertisements will be removed from your site as well.
As you go up at each tier, you’ll start to get more features and benefits like increased storage space, more video hours, ad vouchers, visitor analytics, a professional logo, and more.
Business sites that need to accept ecommerce payments start at $23 per month. Wix even offers custom enterprise packages starting at $500 per month if you need something advanced.
The vast majority of you will be fine with a website plan or a business and ecommerce package.
Every Wix plan is backed by a 14-day money-back guarantee. Try Wix for free today!


from Quick Sprout https://ift.tt/3k5BpbI
via IFTTT
