Want to jump straight to the answer? The best way to create a website for most people is definitely by using Wix.
Creating a website from scratch is easier than ever.
With the right tools and systems, creating a great website is as simple as ever.
You don’t need a bunch of coding knowledge, and you don’t need to spend a chunk of your budget hiring a web developer.
In fact, you don’t need anything besides a computer with a good Internet connection and an hour or two of time.
In this step-by-step guide, I want to show you exactly what you need to create a website from scratch. By the end, you’ll have a website to show for it and with none of the headaches.
- Great for beginners
- Drag and drop site builder
- E-commerce ready
- Create a website in minutes
How to Create a Website in 5 steps
Below are our 5 steps to create a website.
They are:
- Step 1: Choose a domain and register it
- Step 2: Set up a Wix account
- Step 3: Customize your website
- Step 4: Connect your domain
- Step 5: (optional): Add online store
Let’s jump into each step now.
Step 1: Choose a domain and register it
It’s crucial that you nail the domain name first.
After all, this is how people will remember your website and your brand. You want them to associate with something memorable, yet unique to your business.
But there’s bad news: Most of the good domain names are taken.
The Internet has been alive for four decades now. Of course the good ones have been snagged .
Luckily, there are still ways to come up with a good domain name for your brand:
- Easy to say and spell. Rule of thumb: Potential visitors should be able to say your domain at a bar with their friends without them having to ask twice how to spell or say it.
- Short and sweet. We recommend no more than 14 characters. You don’t want an overly long domain name that’s hard to remember and say.
- Go with .com, .org, or .net. While there are plenty of domain name systems out there, it’s best to stick with the tried-and-true ones. You want people to be able to remember it after all.
- Use your name. Great choice for a personal blog, website, or portfolio.
- Avoid numbers and hyphens. This just makes it look weird in the URL. Plus it makes it harder for people to say what your URL is to others.
If you want to learn more about this, check out our article on how to buy the right domain name.
Come up with a list of 5 – 10 potential domain names. Then go to Domain.com to see if any of your domains are available.
If you have a few available, great! Choose the one you like the most and use that for your website domain. If you don’t have any available, that’s okay.
I recommend you brainstorm more ideas and search until you do find an available domain. Alternatively, you can buy a domain — but I really don’t recommend doing that because it’s very expensive. In fact, domains typically cost a few thousand dollars at minimum. I’ve seen it go as high as six figures for a domain.
Keep it easy on yourself and keep ideating until you find a free one. Once you do, you can register it right off of Domain.com (get 25% off with coupon code QUICKSPROUT).
Once you do that, let’s jump into web hosting.
Step 2: Set up a Wix account
- Great for beginners
- Drag and drop site builder
- E-commerce ready
- Create a website in minutes
Website builders like Wix make things extremely easy.
Simply go to their site, pick a domain that’s available, and use their software to put everything together. They walk you through every step.
Wix is absolutely perfect for:
- Restaurants
- Local businesses
- Freelancers
- Hobby sites
- Student groups
- Community projects
- “Resume” sites
- Short term projects
Notice something about these sites? You don’t need to go super crazy with traffic building. Instead, you simply need a site that has a few pages when people want to know more about the business or project.
Website builders like Wix do have a few downsides. They don’t handle large sites and lack the advanced features you’d need for building large amounts of traffic. Most businesses don’t need this anyway so a basic website builder is more than enough. You’ll get more value out of the simplicity and won’t notice the lack of advanced features. You won’t need them anyway.
Now that we’ve covered that, let’s jump into how exactly to build a Wix website.
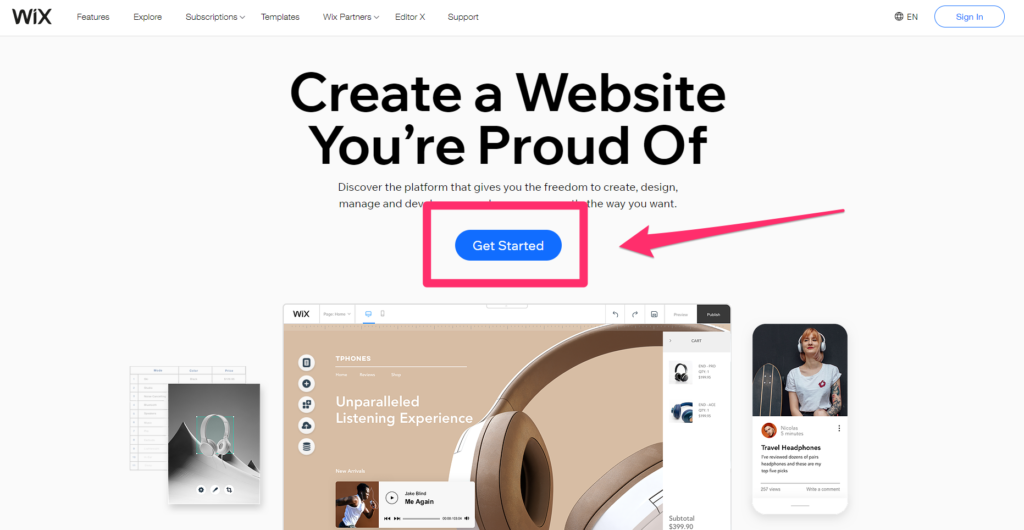
First, go to the Wix website.
Click on the Get Started button in the middle of the page.
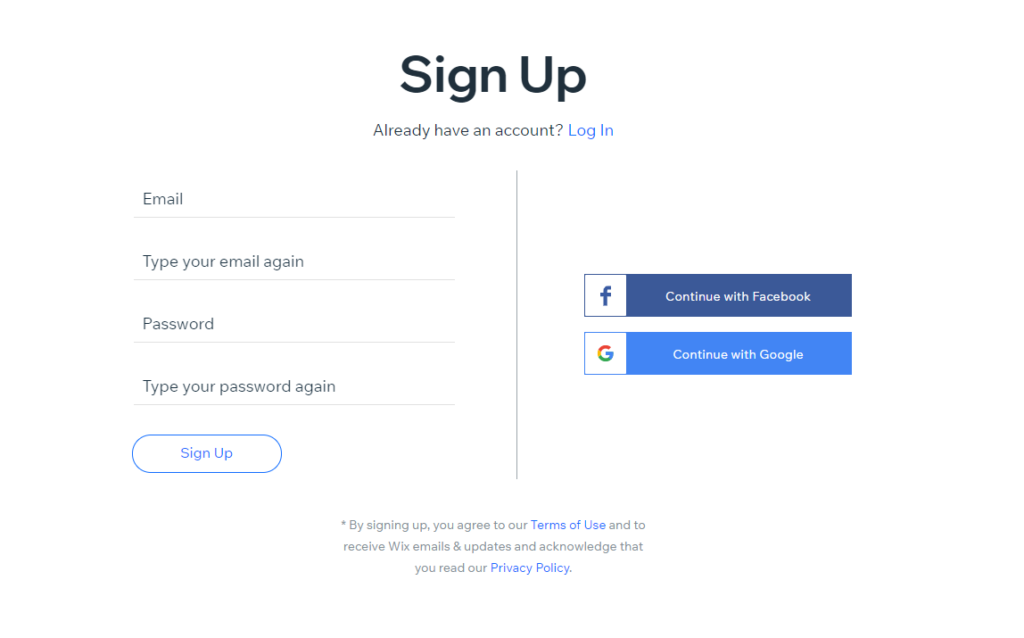
Create an account with Wix by entering your email and creating a password. You can also use Facebook or Google to create an account.
From here, they’re going to walk you through a series of questions to tailor your website building experience to you. Answer the questions as you see best.

Step 3: Customize your website
After you answer the questions, you now have two options:
- Use Wix ADI. This is their artificial design intelligence solution that automatically creates a website for you after you enter in a few more details about your website. This is the easiest route.
- Create your own. Choose a template from the Wix Editor and create your own website. While this route is more hands on, it’s still very simple and straightforward.
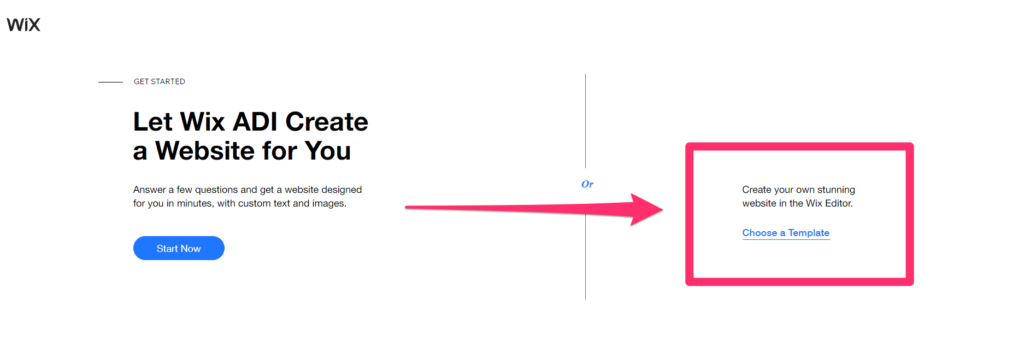
The choice is up to you. If you want a bit more control over your website’s design, choose the second option. If you want to get through it a little faster or if you’re nervous about creating your first website, choose Wix ADI.
For now, we’re going to choose to create our own website using a template. Click on Choose a Template.
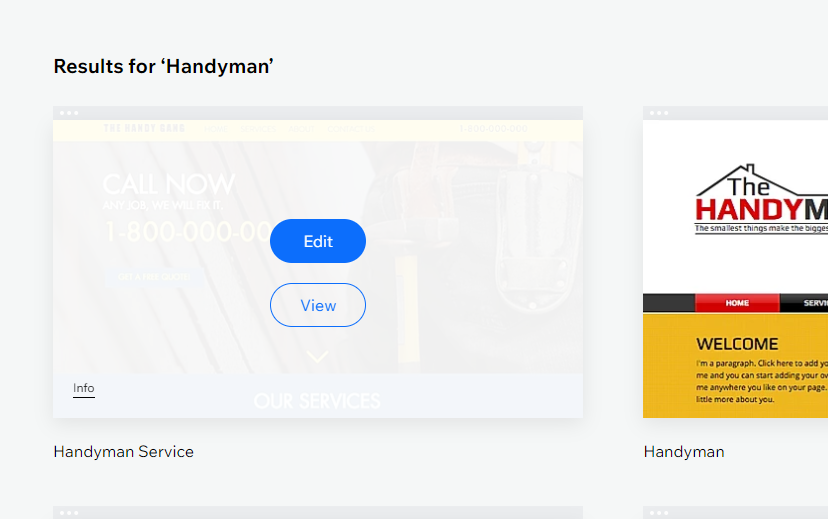
On the next page, Wix offers you a host of free templates to choose from based on your answers from Step 3.
Search through them now for a template you want to use. Can’t find a good one? Use their search function or the navigation buttons to find new templates.
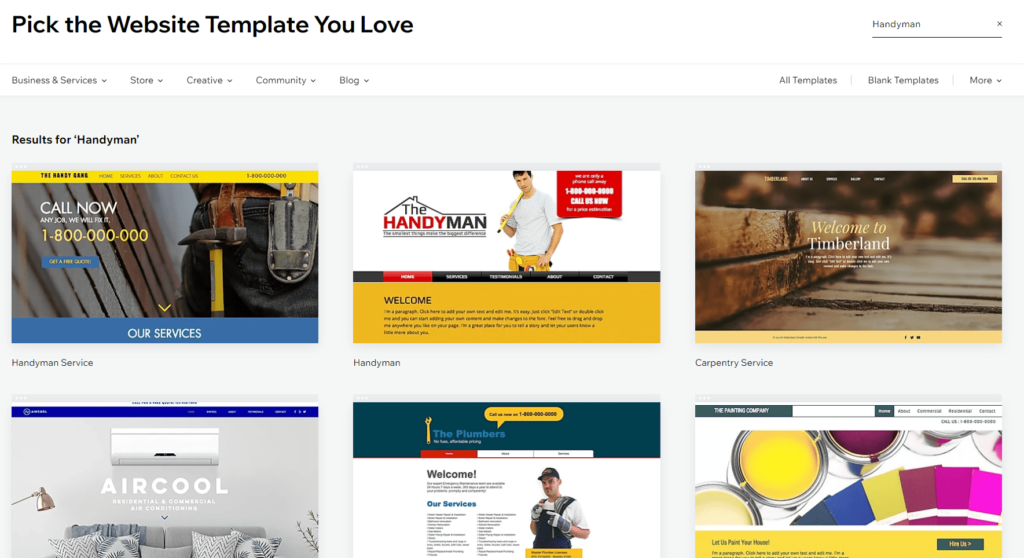
Choose the template you’d like to use. If you’re wondering how it would look as a website, you have the option to view the demo by hovering your mouse over the template in the menu.
Once you’re ready, click on Edit on the template you want to use.
The Wix website editor will automatically appear in a new tab. In this editor, you’ll be able to make changes to the design of the template. You’ll also be able to change any text you see.
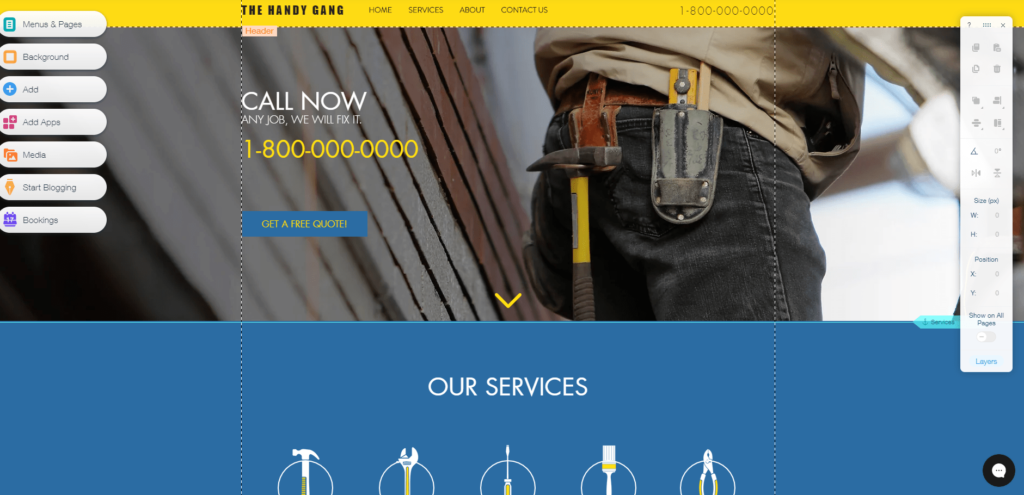
If there’s an element you want but don’t see, you can use the editing menu on the left hand side to add it to the page.
Spend the next hour or so making adjustments to the website as needed. Click on Preview whenever you want to see what it’ll look like when all is said and done.
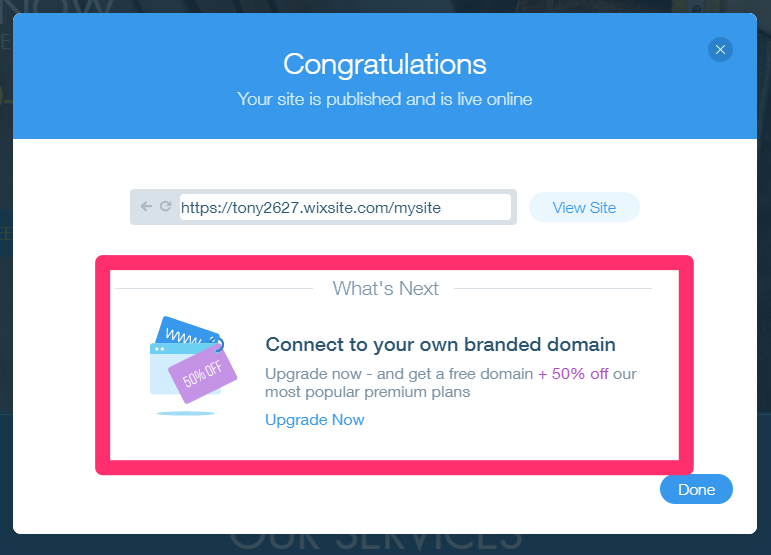
Once the text is edited and you have everything you want in your website, click on Publish in the top right corner.
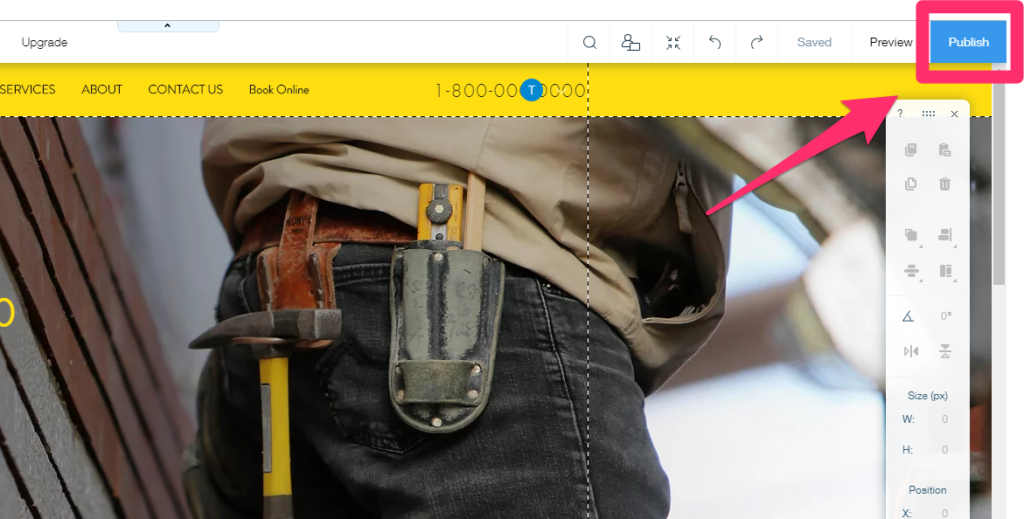
Once it’s published, you’ll have a customized Wix domain to your website.
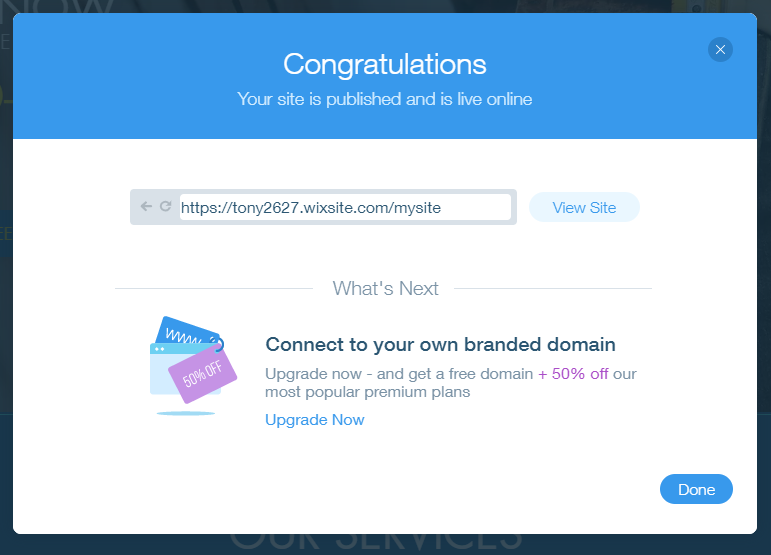
Remember the domain you registered in Step 1? Now it’s time to connect it with your Wix account.
Step 4: Connect your domain to Wix
Before we jump into the steps to connect your domain, we need to upgrade to a Wix Premium Plan.
From the window we last left off, click on Upgrade Now.
You’ll be taken to a new window that allows you to choose a paid plan. Prices start at $23/month for Business plans and $8.50 a month for normal website plans.
To accept payments you’ll want to go with a Business plan (that might come in handy later, and we’ll go into that in a bit).
All the paid plans allow you to connect your domain to your Wix website.
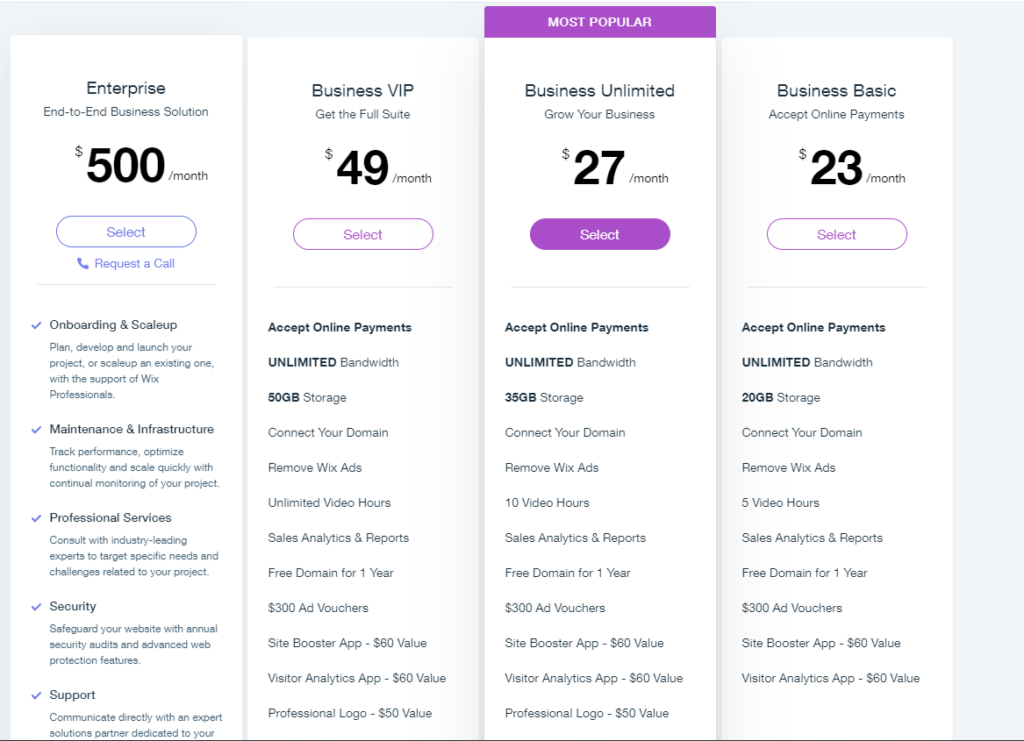
Choose the plan that you’d like to use. You’ll then have an option to choose the subscription period for the plan.
The cheapest option will always be the 3 year subscription period. That means you’ll pay in full for three years of your Wix subscription—but it winds up being cheaper each month.
Once you’ve upgraded to a premium plan, head back to your website’s dashboard, and go to the Settings > Domains.

Click on Connect a domain you already own.
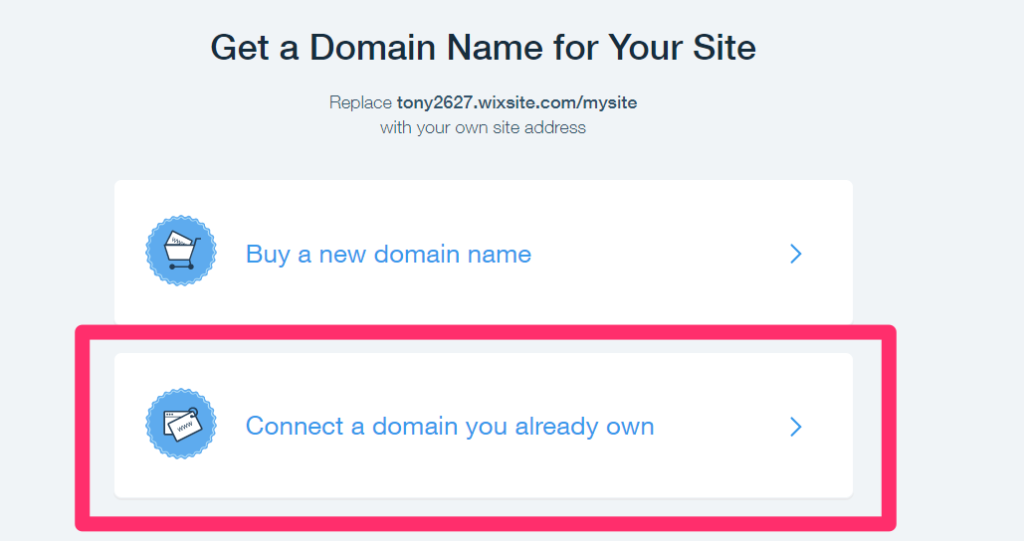
Select the Wix site you want to connect your domain to then click Next.
Enter in your domain name. Then click DNS near the Connection Method at the bottom. Choose Pointing.
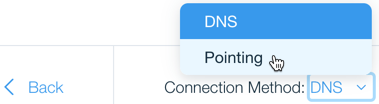
Click Confirm. Then click Next.
Now you need to update your domain’s DNS records.
To do that, head back to Domain.com and head to your Domains Dashboard.
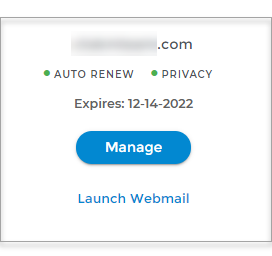
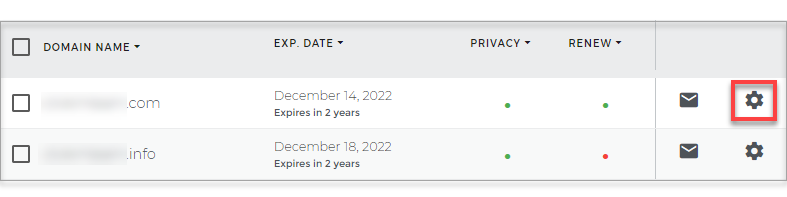
Click on Manage underneath the domain you want to point to Wix.
Click the settings icon on the side of the domain.
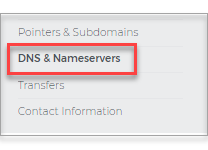
Click on DNS & Nameservers.
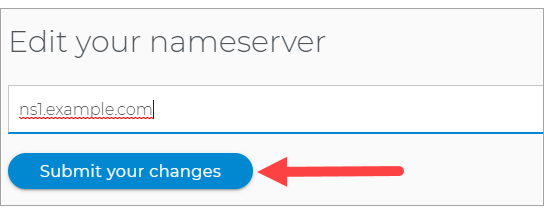
Click on the three dots on the right side of the nameservers.
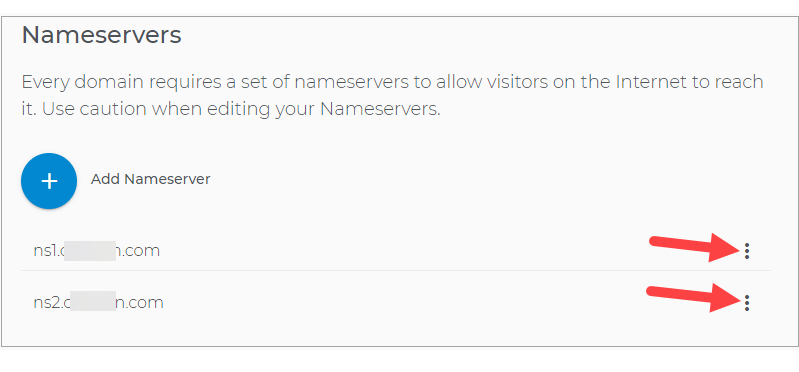
Now you’ll be able to change the name servers. To connect to Wix, change the name servers to the following:
- For yourdomain.com, create an A record that points to: 23.236.62.147
- For www.yourdomain.com, create a Cname record that points to: www141.wixdns.net
Once you do so, click on Submit your changes.
It will take 1-2 days for the website to fully process this change. Once it does, the domain will point to your Wix website!
Step 5 (optional): Add an online store
One of the areas where Wix really shines is their ecommerce functionality.
With Wix, you’ll be able to create an online store to help you sell any of your products and services with ease.
Not only will this allow you to start generating cash with your website, but you’ll be well on your way to launching a successful ecommerce business.
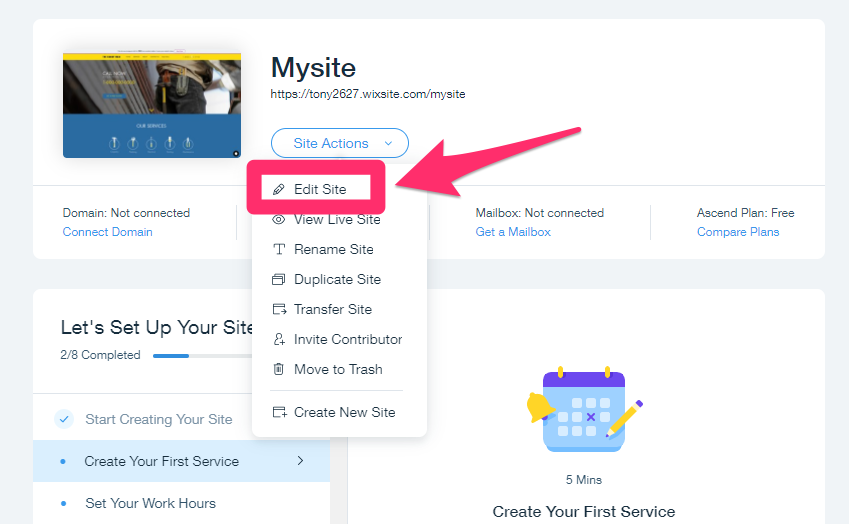
To start, head to your Wix dashboard. Underneath your website’s name, click on Site Actions > Edit Site.
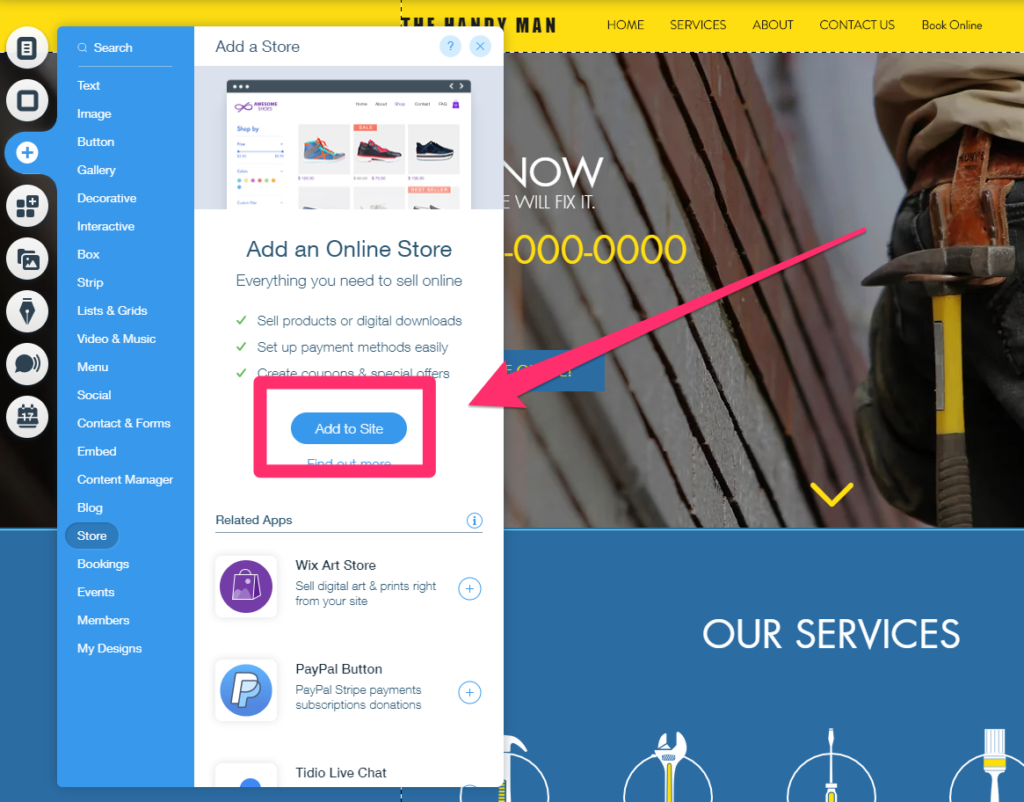
You’ll now see the site editor as you did in Step 3. Click on the Add button on the left menu. Then choose Store. You’ll then be able to choose Add to Site to … well, add it to your site.
From here, it’ll furnish a default store template you’ll be able to fully customize. To change the products and prices, go to your store Dashboard.
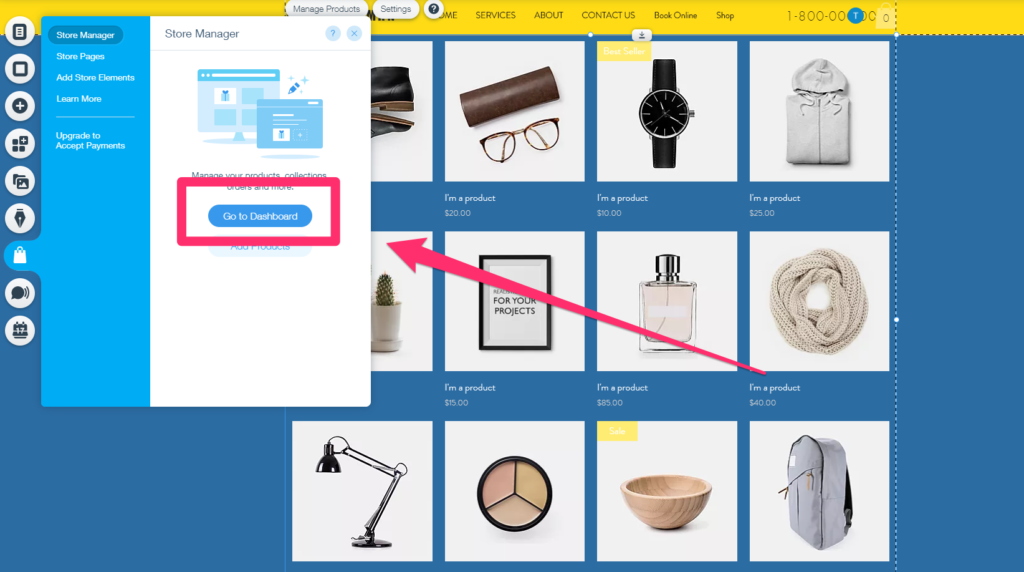
Here you’ll be able to add and edit any products or services you have in your store.
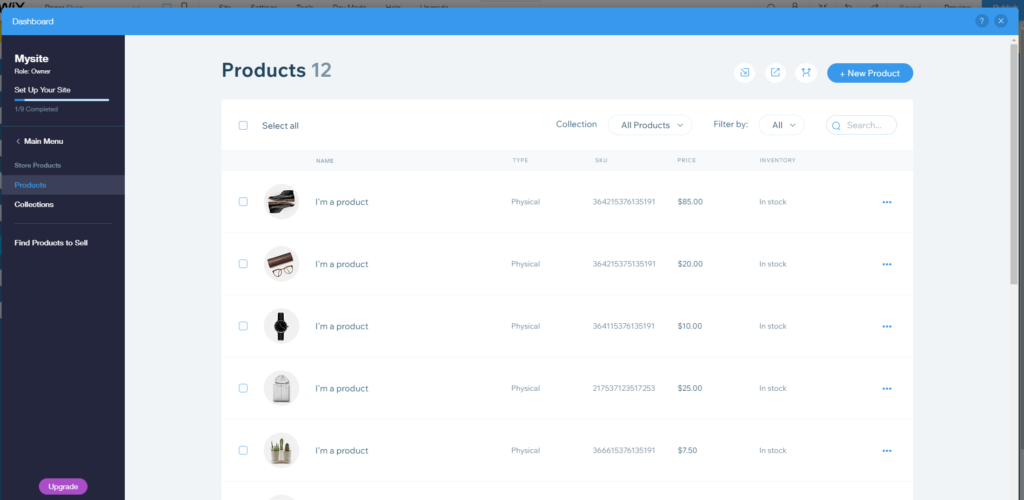
Spend some time adding new products and services, or deleting the default ones. Once you’re finished. You’ll now have to set up a payment method.
Head back to your website dashboard. Then click Settings on the left side. On the right, click on Accept Payments.
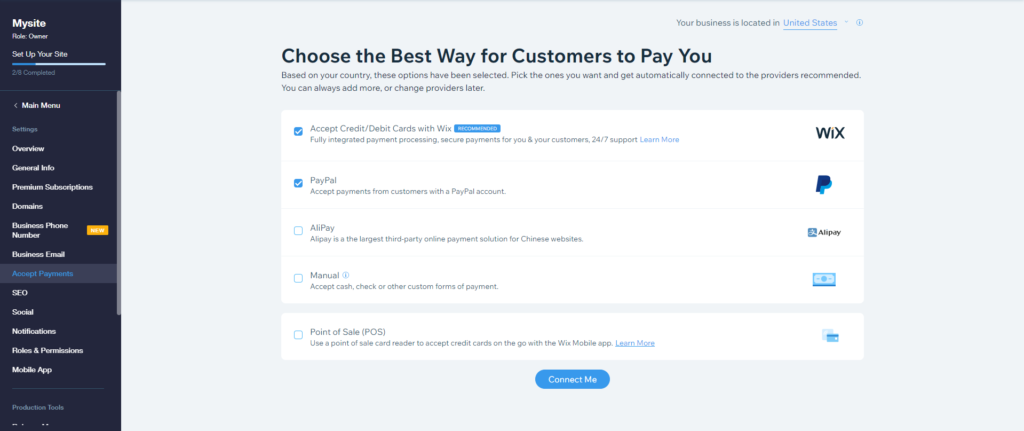
From here, Wix gives you the option to start accepting payments via:
- Credit and debit cards
- PayPal
- AliPay
- Cash/Checks
- Point of Sale (POS)
Choose the options you want to use then click Connect Me at the bottom.
You’ll need to complete a few more steps to get it done. If you haven’t upgraded to a business plan yet, you’ll need to in order to accept debit and credit card payments.
To accept credit and debit payments, follow the steps in the following video.
The Pros and Cons of Hiring a Pro
What about hiring someone to build your site for you?
It’s certainly an option.
My main piece of advice is to pick the right tool yourself. So make the decision on whether you need Wix, WordPress, or another site builder. Don’t let someone else make this decision for you.
And once you’re on the right tool, you’ll be able to look for someone that has a lot of experience with the tool that you’ve chosen. Whether you’re working with a freelancer or an agency, find someone with experience in the tool that you’ve picked.
Folks that have a lot of experience with WordPress tend to not have as much experience with Wix. And vice versa. The quality of your site will be higher if you find someone with plenty of experience on that tool.
All of this is completely optional though.
If cash is tight, skip all this and do it yourself. Wix has tons of themes that you can use. They might not be perfect but they’re more than good enough to get your site off the ground.
These days, themes that cost $30-150 are often just as good as sites built by hand. Even many of the free themes are indistinguishable from top-tier sites.
When picking a freelancer or agency to work with, ask to see their portfolio of live sites. Pick someone that has built sites that are pretty close to what you want. Most likely, you’ll get a site that’s very similar to their past work.
If you’re using a site builder, you don’t need to pay someone to put it together. Since there isn’t much to customize or configure, you’ll be wasting your money. The site builders are designed for complete beginners, you’ll be able to get everything live within an afternoon by yourself. They also produce sites that look fantastic without any extra customization.
Time to Build Your Site
Let’s recap.
There are five steps to building a website:
- Step 1: Choose a domain and register it at Domain.com
- Step 2: Set up a Wix account
- Step 3: Customize your website
- Step 4: Connect your domain to Wix
- Step 5 (optional): Add online store
- Great for beginners
- Drag and drop site builder
- E-commerce ready
- Create a website in minutes


from Quick Sprout https://ift.tt/2VnEEOc
via IFTTT
