Want the quick answer? The best way to create an ecommerce website is with Wix. Keep reading to learn how.
Whether you have a brick and mortar business and want to expand online or you’re interested in starting a new business from scratch, ecommerce can be a highly profitable venture.
But before you can start thinking about your profit margins and selling products online, you need to create an ecommerce website.
For those of you who have never done this before, it can seem like a daunting task. But it’s not as difficult as you think. Regardless of your experience level and technical knowledge, I’ll teach you how to get your ecommerce site up and running in no time.
The Best Platform For Your Ecommerce Site
Before you can create your ecommerce site, you need to figure out what platform you’re going to use.
There are dozens of options on the market today, but Wix is the clear winner.

- 14-day free trial
- Drag and drop site builder
- Integrated payment processing
- 500+ ecommerce templates
In fact, we ranked Wix first on our list of the best ecommerce website builders.
It’s the best ecommerce website builder due to one thing: Simplicity.
You don’t need to learn how to code or have any technical expertise. The platform makes it easy for anyone to create a beautiful and highly functional ecommerce site from scratch in no time at all.
Wix is a top choice for beginners. It’s a drag-and-drop site builder that’s fully customizable and SEO-friendly.
What’s drag-and-drop? It’s a type of builder that allows you to simply use your mouse to drag different website elements around — changing them to your specific needs.
The platform has everything you need to start selling online. In addition to the site builder features, you’ll be able to accept commission-free payments, manage end-to-end fulfillment, and set custom shipping rules worldwide.
Wix supports dropshipping and multi-channel sales. It allows you to sell on other platforms like Facebook and Instagram.
If you want the ability to fully customize your storefront, shopping cart, product galleries, and more without writing a single line of code, choose Wix. You’ll even be able to set up features like a customer wish list, related product galleries, mini-cart, quick add-to-cart buttons, and more.
You can add coupons, promo codes, and even let your customers create accounts to increase loyalty and speed up the checkout process with saved billing and shipping details.
The price for ecommerce capabilities starts at $23 per month. It comes with bonus features like $300 in advertising vouchers and a free domain for one year.
As your site grows, you can easily upgrade your plan to scale with you.
How to Build an Ecommerce Site: A Step-by-Step Guide
- Step 1: Sign up and choose your plan
- Step 2: Decide how you want to create your website
- Step 3: Connect your domain
- Step 4: Set up your ecommerce site
- Step 5: Publish your ecommerce site
Follow these steps with any ecommerce site builder. But for this article, we’ll use Wix as an example.
Step #1: Sign up and choose your plan
The first thing you need to do is create an account with Wix. Compared to other platforms, the sign-up process is about as easy as it gets—10 seconds max. You’ll only need to provide an email address and password to continue.
You can start using Wix for free right away. But the free plan doesn’t give you any ecommerce capabilities. It’s basically an extended trial to play around with the site builder.
Navigate to the premium subscriptions and make sure to select “Business & Ecommerce,” as I’ve highlighted in the screenshot below.

The “Website” plans don’t all have online selling capabilities, which you’ll obviously need for your ecommerce site.
All of the ecommerce plans come with the ability to accept online payments, a free SSL certificate, increased storage, unlimited bandwidth, and a free domain for one year.
Choose a plan based on the size of your website and business. If you’re a small company selling a handful of products, you’ll be fine with the Basic Business or Business Unlimited plans. Bigger websites with additional needs should go with the Business VIP plan or potentially the Enterprise solution.
Wix offers a 14-day money-back guarantee. So you can always opt-out or switch plans within two weeks if you’re not satisfied with your choice.
Step #2: Decide how you want to create your site
Once you sign up, there are two different ways to get started. You can use the Wix ADI or the Wix Editor to continue.
With the ADI, you’ll answer a series of questions about your ecommerce site, and the platform will automatically design it in minutes using artificial intelligence. With the editor, you’ll start with a template and make it on your own.

There’s no right or wrong way here. It all depends on your personal preference. Even if you use the ADI, you’ll still be able to make changes using the editor later on.
For beginners, leveraging AI to build your ecommerce site based on the answers to you provide will likely be the best option. It’s faster, and you’ll have a working site to edit instead of just starting from scratch with a template.
But the editor is easy straightforward too. It will just be a bit more time-consuming.
If you use the ADI, you’ll be asked to choose the type of ecommerce site you’re building (like an online clothing store, jewelry store, etc.), and pick your features (like an Instagram feed, live chat, subscribe form, etc.).
For those of you who already have an online presence, the AI tool can import content from your existing website or Google Places.
Next, you’ll be asked to pick a theme and select a template.

I went through this entire process in less than two minutes, and the platform automatically created an ecommerce site for me. Then it’s just as simple as editing the template with your own content, images, and anything else you want to customize.
Step #3: Connect your domain
Now connect your domain before you publish the ecommerce site.
Navigate to the “Settings” menu on the left side of your dashboard and click on “Domains.”

You’ll find two options here: Buy a new domain name or connect a domain name you already own.
Pro tip: Need a domain? Find one of the best domain registrars. Once purchased, you can simply follow the steps to connect a domain that you own. Check out our guide on how to buy a domain name if this is your first time going through this process.
Getting a domain from a domain registrar is typically the best course of action. But if you want to keep it simple and go directly through your ecommerce platform, that’s fine too.
Step #4: Set up your ecommerce site
After the domain has been connected, you need to set up the ecommerce functionality of your site. These are the components that will actually allow you to sell products online.
- Add products
- Set up shipping regions
- Select payment methods
I’ll give you a quick overview of each one of these ecommerce site elements below.
Products
To add a product, navigate to the “Store Products” section of your dashboard on the left side of the screen. Then click “+ New Product” on the top right corner of the screen.
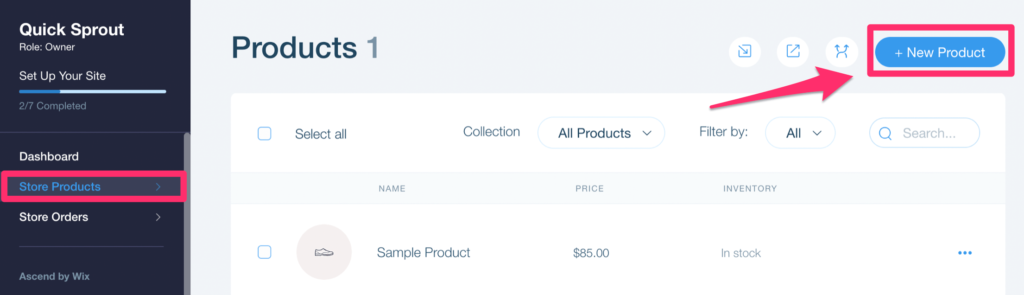
From here, you’ll be able to name the product, add it to a collection, set the price, and write your product description. You can add product images and videos as well.
Wix lets you add a product ribbon (such as “new arrival), mark the product as “on sale,” create a section for things like a return policy or care instructions, and manage the tax settings.
You’ll also be able to control the product size options, color choices, and inventory tracking.
Shipping
Next, you’ll have to manage your shipping rules. Determine what regions you’re shipping to and how those rates are calculated.
For the example site I’ve been creating in this tutorial, I set up free shipping in the US and set a flat rate for international orders.
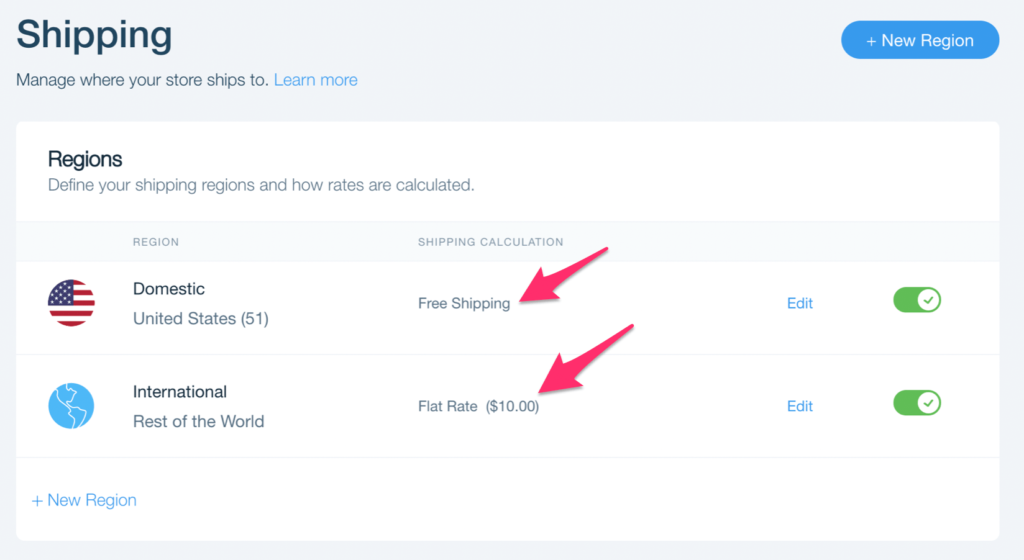
Maybe you only want to sell to customers in the US and Canada. Just uncheck the international toggle box on the right side of the screen, and add a new region for Canada.
You’ll have lots of flexibility with the shipping rates. For example, you could offer free shipping to customers that spend a certain amount of money per order.
In addition to a flat rate, you can charge shipping by weight, based on order total, or USPS calculated rates. You can even manage handling rates and give your customers the option to pick up orders in-store for certain regions.
Payment Methods
Before you can get paid, you need to set up your accepted payment methods. This is very easy to do with Wix’s integrated payment processing system.
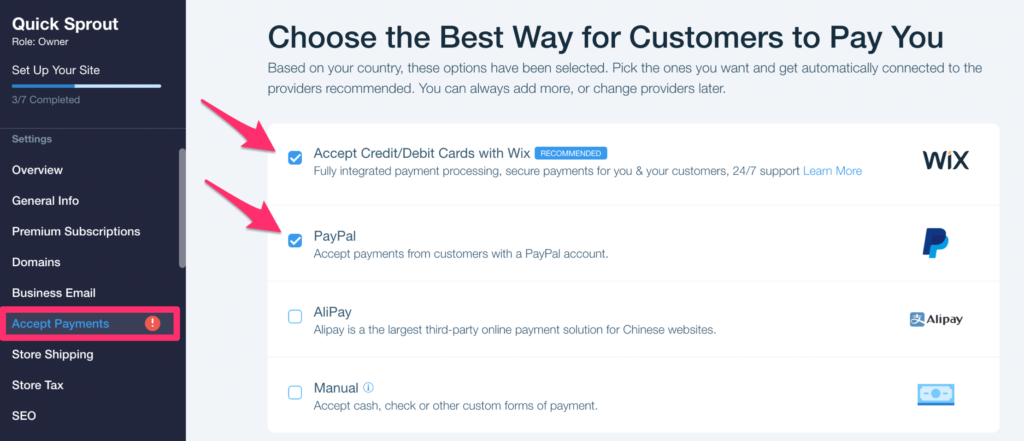
For this example, I selected the integrated processor as well as PayPal.
This gives you the ability to accept all major credit cards like Visa, American Express, Discover, Mastercard, UnionPay, JCB, and Maestro.
Processing rates are 2.9% + $0.30 per transaction, which is pretty standard in this space. Wix doesn’t take any commission on top of that.
Step #5: Publish your ecommerce site
Now it’s time for the big moment: Publishing your site.
In order to do this, you MUST have a connected domain (explained in step #3).
You also must be on a paid Wix plan. Technically, you could publish your site while on a free plan, but it won’t be with your custom URL. You won’t have any of the ecommerce capabilities either without a paid plan. So if you haven’t done so already, make sure you go ahead and finalize your subscription before proceeding.
Click on the publish button in the top right corner of your editor for the site to go live.
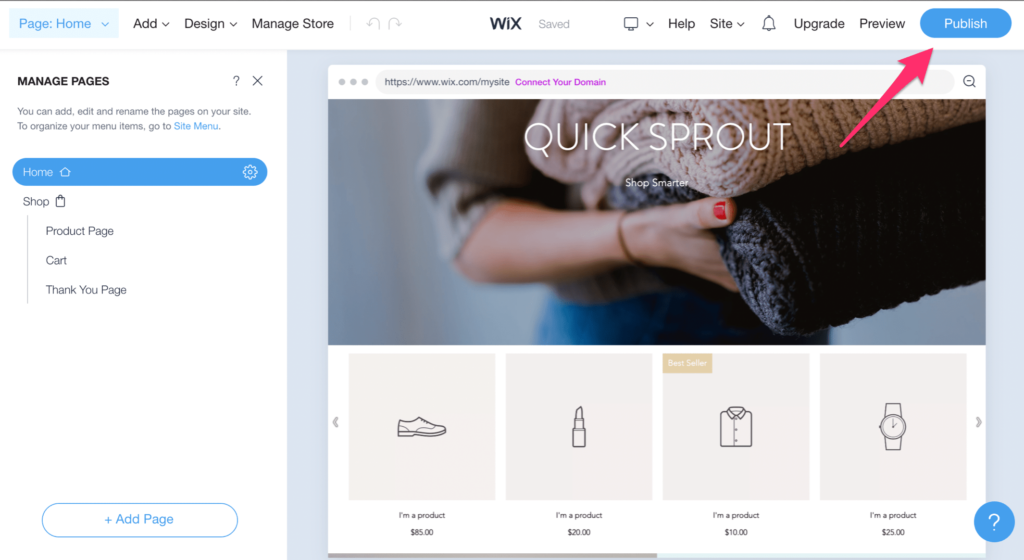
By the way, the preview of the site you’re seeing on the screen was 100% generated by the AI solution we discussed earlier. I didn’t adjust the layout, add images, or customize anything yet.
It just goes to show you how easy it is to create an ecommerce site if you go that route.
Best Practices For Creating an Ecommerce Site
The five steps explained above will get your ecommerce site up and running in no time. It’s simple, and anyone can do it.
But that alone won’t make your site successful. Here are some best practices to keep in mind while you’re building out the site and going through this process.
Keep it Simple
Your theme, homepage, product pages, and interior pages should be simple.
Don’t try to clutter your homepage with every product that you’re selling. Just highlight 3-6 of your most popular products. You can even take your all-time best seller and include a giant photo of it with a CTA above the fold.
The simplicity and layout ensure that your website visitors are immediately exposed to your most popular offerings, which increases the chances that they make a purchase.
Contact Page
Like the rest of your ecommerce site, the contact page should be simple.
It should include your phone number, address, email address, and a contact form so people can reach out. Make sure that the contact form goes to an email account that’s actively monitored. This way, you can respond to customer inquiries as fast as possible.
About Us Page
The About Us page should not just be a boring history about when your company was founded and what you’re selling.
This is your chance to tell a compelling story that inspires customers to join your mission. Maybe you donate 10% of all sales to save the planet. Or maybe you’re a Certified B corporation that only sources inventory from sustainable vendors.
Your About Us page should be authentic, and written as clearly as possible. It should speak to your target audience and resonate with them as well.
Product Names
Rule of thumb: Unless you have lots of experience in naming products, you should stick to names that are clear without trying to get too creative.
Too many ecommerce websites get too cute with their product names. This results in confusion and eye rolls from the customers.
A simple and boring name for a great product will still generate tons of sales. But the wrong name could destroy it.
Product Descriptions
Every product on your ecommerce site should have a unique product description. This is essentially a one or two paragraph pitch for your products.
Here’s the standard structure that I’d recommend for a product description:
- One or two sentences identifying the problem that the product solves.
- One or two sentences painting a picture of what life will be like once problem is solved.
- Two or three sentences describing how your product solves those problems and what features make this possible.
With that said, not every product solves problems. Clothing and apparel is a perfect example. If you’re selling a trendy t-shirt, consumers are buying it to make them feel confident, refine their identity, and change their look. In this case, the description should be less about the product itself and more about how the item makes the buyer feel.
Product Photos
I know it sounds lame—but a picture really is worth 1,000 words. You can’t rely on descriptions alone to sell your products.
Hire a professional photographer to shoot your products. Capture the products from every angle. Show it in action. If you’re selling a shirt, take photos of a person wearing that shirt, as opposed to just laying it flat on a table. If you’re selling hiking boots, show someone wearing them on a hiking trail. If you’re selling bed sheets, take a photo of the sheets on an actual bed.
As I briefly mentioned in the step-by-step guide, you can also add videos to products. This is perfect for products that require any type of demonstration that can’t be shown in photos alone.
Conclusion
Creating an ecommerce website isn’t hard. You can do it in less than 10 minutes.
Creating an ecommerce website that visitors will love (and purchase from) is a bit harder. That takes a combination of good design, solid marketing, and plenty of grit.
Using an ecommerce website builder, you can create an online store in just five easy steps.
Follow the step-by-step instructions that I’ve outlined in this guide. You don’t need to know how to code or have any technical experience to get through this process.
- 14-day free trial
- Drag and drop site builder
- Integrated payment processing
- 500+ ecommerce templates


from Quick Sprout https://ift.tt/2AylzAx
via IFTTT
