So, your online business or blog is booming and you’re sending out some incredible content and products to your audience’s delight.
However, you’re starting to struggle to separate your content using the traditional “Pages” and “Posts” that WordPress has to offer. Instead, some of your content is falling into categories it shouldn’t, users are having troubles navigating to where they want to be on your site, and you’re having a nightmare managing it from the backend.
That’s where custom post types come in.
With five simple steps, you can create as many custom post types as you like, designed to both assist you with cleanly managing all your different content types and for your audience to easily find the content they’re after.
Want to know how you can live this dream? You’re in luck, because I’m not only going to tell you how, I’m going to walk you through the whole process.
What to Expect When Creating Custom Post Types in WordPress
There are actually multiple ways to create custom post types in WordPress.
Some of the more technical ways include manually creating the custom post type by adding the required code in your theme’s functions.php file. Unless you really know what you’re doing with code, I’d steer you away from this way.
At the very least, make sure your hosting provider allows you to easily back up your sites and restore from those backups. Don’t have that with your web host? Check out our list of the best web hosting providers for WordPress sites to find one that does.
Instead, we’re going to focus on creating custom post types the easy way—using a plugin! The steps we’re going to go through together include:
- Choosing which plugin to use
- Downloading your chosen plugin
- Creating a new custom post type
- Creating custom content
- Displaying your custom post type on your website
The Good
When you hear “Custom Post Type,” do you immediately cringe and think you are going to need to know code to get it done? Honestly, I did too!
But the good news is, it’s very easily done code-free with a plugin. This means that no matter whether you’re new to WordPress or have been around the block for many years, you can take advantage of custom post types too.
There’s also no limit as to how many custom post types you can create and use on your site, meaning you have the ability to customize your content to your heart’s desire.
The Bad
Without a plugin, it can be easy to get custom post types wrong and really mess up your site. If you’re inexperienced with manipulating your website using code, but attempt to create custom post types using code, you could accidentally end up altering the entire structure of your site. That’s a really bad outcome.
(To be fair, it would be really hard to do this as long as you just avoided the code, but we all know someone who thinks they’re better at coding than they really are and just has to try it by themselves, right?)
The point is, if you choose to follow the steps I’ve outlined below, there is not really anything bad about the process. Sure, it’s a little fiddly and takes a bit of time, but once you’ve created your new post types and can easily manage your content, you’ll be laughing!
The only two things that I found tedious or unclear were arranging my custom post types to appear exactly where I wanted them on my website and knowing which labels to fill out when creating the custom post type itself.
At the end of the day, neither of these things are a deal-breaker, and they do end up being pretty straightforward once you’ve done them a few times. I’ll cover how to do each of these things below, so stick with me, follow the steps I lay out below, and you’ll be absolutely fine!
Step 1 – Choose Which Plugin To Use
It seems straightforward, but like with anything you want to add to your website, it’s important to do your due diligence in researching the best option for the job at hand.
Why is this so important?
Not all plugins are created equal. And I don’t know about you, but downloading a plugin that is going to constantly glitch, require updates, or slow down my website, just to provide me with custom post types is just not worth it. That’s why it’s important that you take your time to consider your options.
Luckily, WordPress is so well-established that there are literally thousands of web developers out there, all building plugins to help your website in the hopes you’ll buy or download theirs.
This does make it a bit tricky when it comes to choosing which one is the best for you. With this in mind, we’re going to break this section down into a few smaller tasks.
Start With Google
On top of the thousands of web developers who all want you to use their plugin, there are also thousands of bloggers or tech experts who’ve graced the internet with their knowledge. All you need to do is search ‘Best Custom Post Type Plugins for WordPress’, and you’ll get a wealth of knowledge right at your fingertips.
Take some time here to read reviews from a few different sources, to get an idea of which plugin you’d like to use based on what you’re trying to achieve.
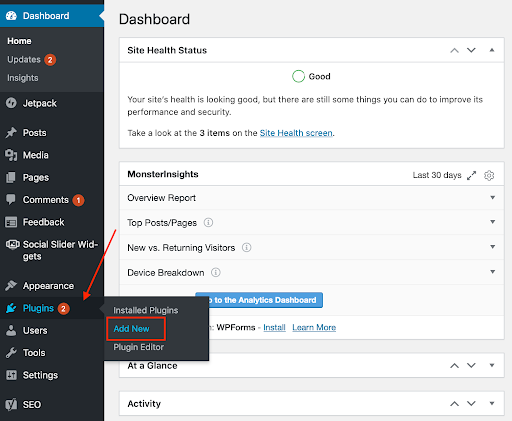
Next, Go To The WordPress “Add Plugin” Interface
Once you’ve narrowed down your options, jump into WordPress and carry out some further research in the ‘Add Plugin’ section of your dashboard.
This step is important because you may have settled on a plugin that is highly recommended by a lot of other WordPress users, but when you dig deeper into this plugin, you may find that it’s either not compatible or untested with your version of WordPress.
That’s not to say that you can’t still give a certain plugin a go! It may mean that your WordPress is not updated (it should always be, by the way), or that the plugin itself hasn’t been updated recently (also somewhat of a warning sign).
Furthermore, by finalizing your research here, you’ll be able to read notes from the developer, reviews from other users, and compare similar plugin statistics and features side-by-side.
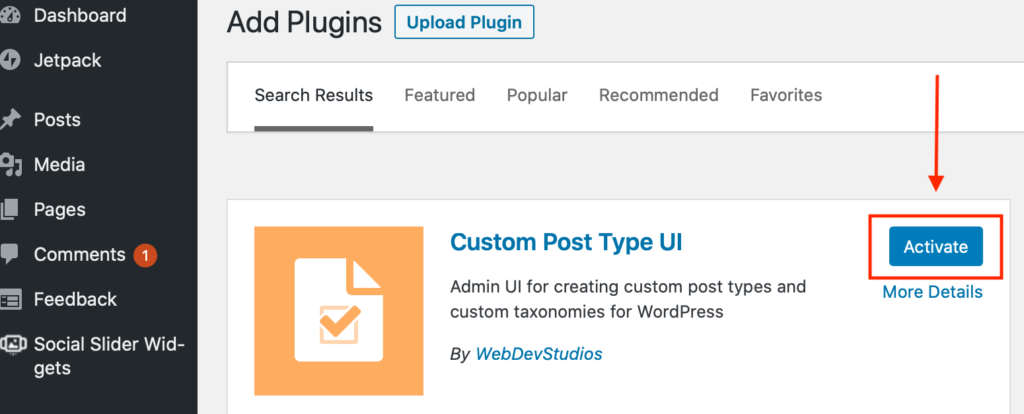
For the purpose of this post, I’ve chosen to use Custom Post Type UI. It’s highly recommended by WordPress, has excellent reviews on the support provided by developers, and seems to be updated by the developers regularly.
Step 2 – Download Your Chosen Plugin
Once you’ve done your research and are satisfied with your chosen plugin, it’s time to download it. In the same area you’ve just done your research, you can click ‘Install Now’ against your preferred custom post type plugin.
Activate Plugin
Once the plugin has finished downloading, the ‘Install Now’ button will change to ‘Activate’. Make sure you click ‘Activate’ so that your plugin is ready to start using.
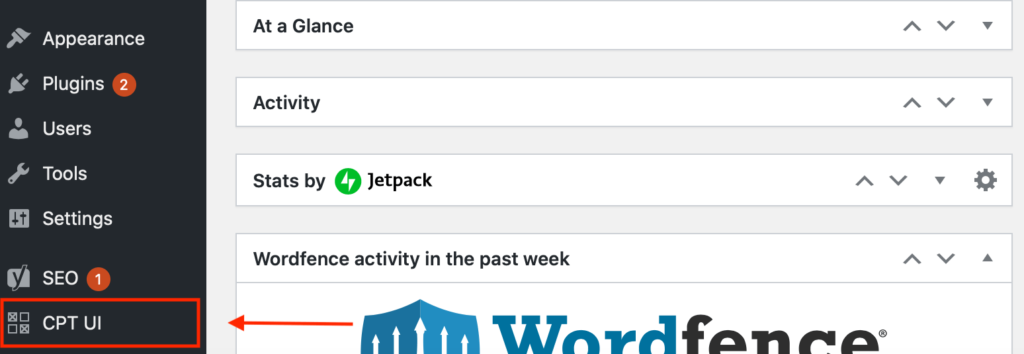
Once the plugin is activated, your screen will refresh automatically, taking you straight to the plugin’s “About” page. It will also create a new menu item in your WordPress admin menu so that you can always come back to it whenever you need to. For the Custom Post Type UI plugin, it’s called CPT UI.
Step 3 – Create A New Custom Post Type
Now that our plugin is downloaded and activated, we are ready to create some new custom post types!
To do so, hover over the menu line ‘CPT UI’ and click on ‘Add/Edit Post Types’.
There are tons of things that you can do here to customize your new custom post type. For most of us, we will just need the very top section.
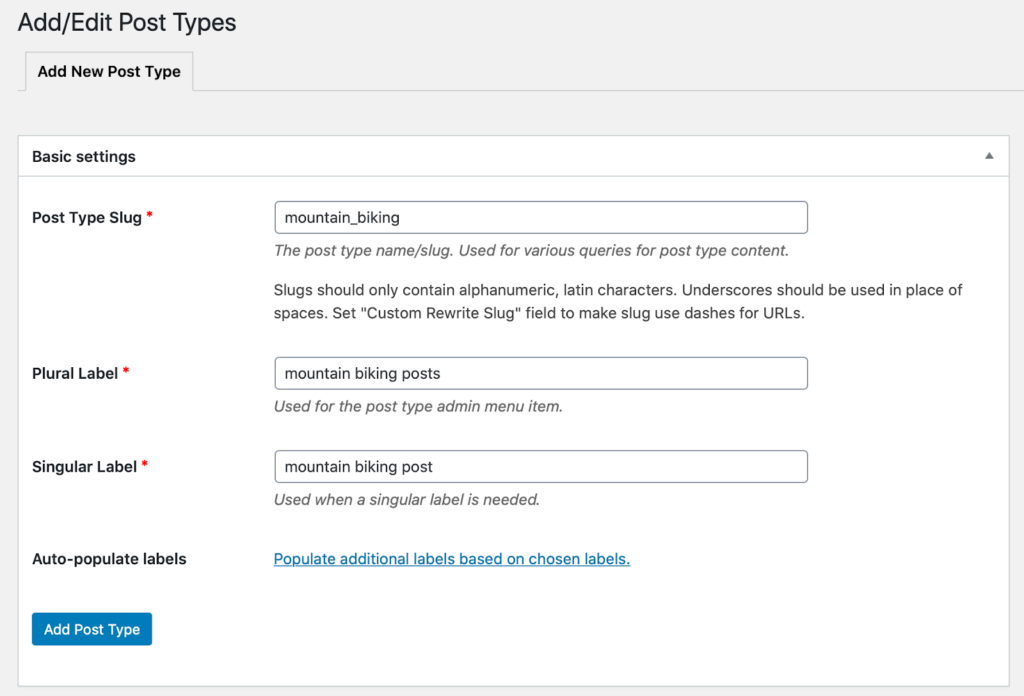
Choosing Your Custom Post Type Slug
The slug is the final word or phrase in your post’s URL–the thing that tells readers what the post is specifically about. When it comes time to create the slug for your custom post type, it’s important to consider SEO and whether or not this slug is something your site’s potential users are likely to be searching for.
As with standard post types, custom post type slugs can only contain letters or numbers and they should always make sense to the reader. For example, a good slug for a movie site would be “mynewsite.com/archives/movies”, rather than “mynewsite.com/archives/mooovystow4tch”–it might seem clever inside your head, but no one is searching for it.
Fill Out Required Additional Labels
As I mentioned above, there are tons of additional labels you can add to your Custom Post Type. Which of these you fill out is completely up to you and what you’re using them for.
Let’s say I want to be able to add content about mountain bikes to a completely separate area of my website, given it’s so unrelated to what my readers are usually looking for. Here’s what that would look like:
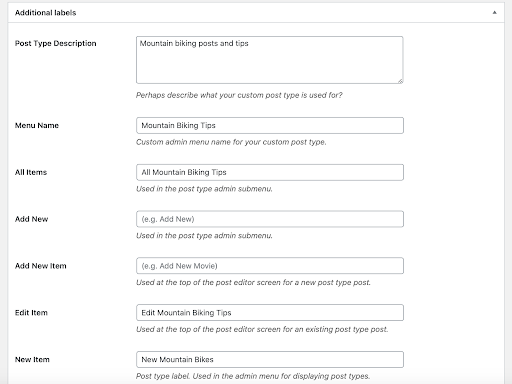
The labels are mostly important for backend content management. They’re used throughout the WordPress interface and allow you to tell WordPress where you want the posts to show up and where you want them to stay hidden.
Once you’ve finished entering all the details you require, scroll back to the top, and click “Add Post Type.”
Repeat this step for as many post types as you need!
Step 4 – Creating Custom Content
Once you’ve saved your new Custom Post Type, it will appear in your WordPress admin menu, alongside other things like Posts, Pages, Comments, Media, etc.
If yours doesn’t appear here, go back into the CPT UI panel and click “Add/Edit Post Types” again to see where you may have missed a step. If you ever want to adjust any Custom Post Types that you’ve created, you can do that here too.
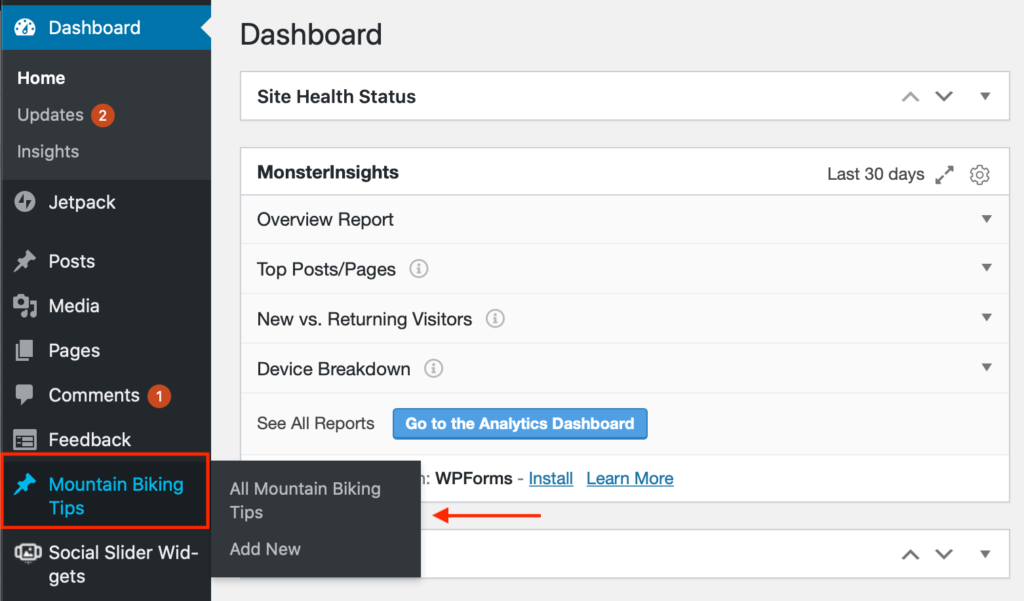
By hovering over your new post type in the admin menu, you’ll see two options. In my case, they look like this:
- All Mountain Biking Tips
- Add New
If I want to view all the content that I’ve added under this custom post type, I’d click “All Mountain Biking Tips.” Here, I can manage all content created under this post type.
Adding New Custom Post Type Content
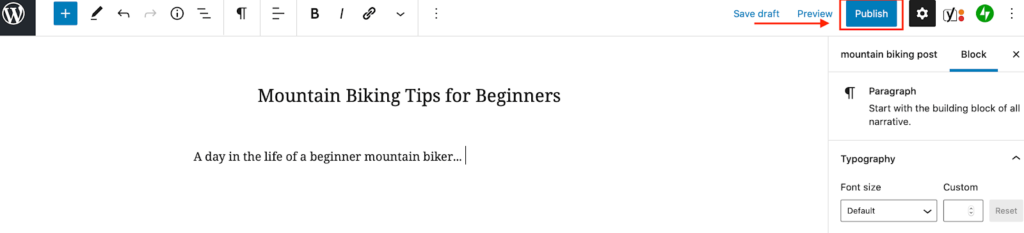
When you’re ready to create some new custom content for your shiny new custom post type, just hover over the menu as discussed above, and click “Add New.”
Here is where the magic happens! You’ll be able to create the custom content exactly the way you would with a standard post or page. As usual, when you’re finished with your content and ready to dazzle the internet, click “Publish.”
Step 5 – Displaying Your Custom Post Type On Your Site
This step is really important, otherwise nobody is going to see the amazing content you’ve created underneath your new custom post type on your website.
Luckily, it’s a really straightforward step, so your audience will be enjoying your new content in no time.
Adding Custom Post Type To Your Website Menu
When we create a new post or page on our website, we have to add it to the menu so that it appears to viewers right? Well, it’s exactly the same for custom post types.
Ideally, you’d have added a few items into your custom post category already, so by the time it’s displayed on your website, you have a few products or posts to share with your audience (instead of one lonely line item).
To add the custom post type to the menu, hover over ‘Appearance’ on your WordPress admin menu and click ‘Menus’. Here you’ll see all your site menus in one place and have the ability to add your new custom post type to whichever menus you’d like.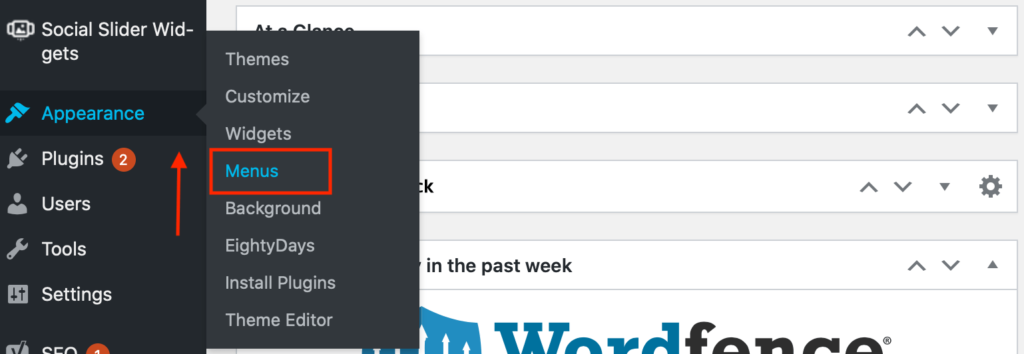
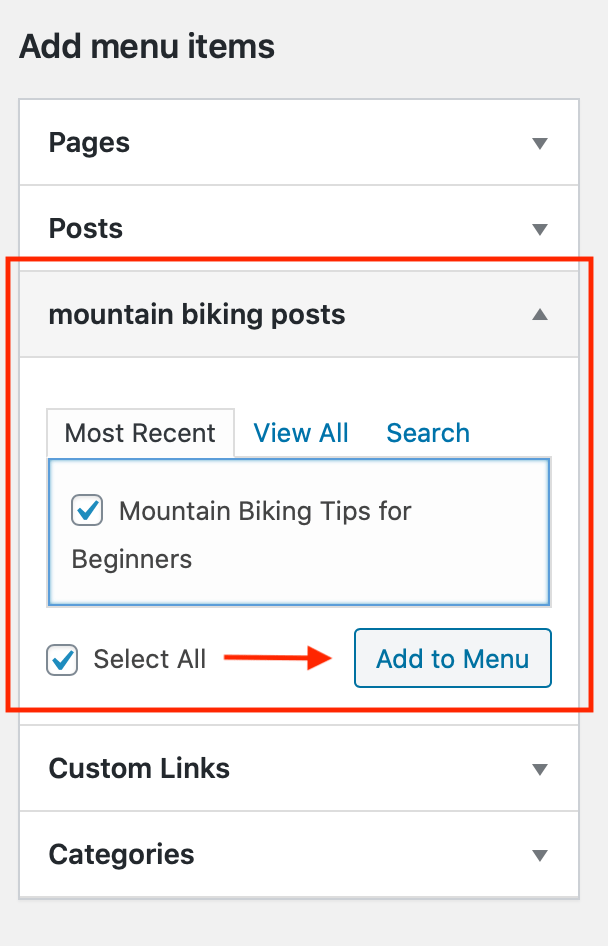
Underneath ‘Add Menu Items’, you’ll see your new custom post types on their own, just waiting to be added to your menu. You can either add them to your existing main menu or create a new menu completely. It’s up to you!
Simply, drop the area on each custom post, tick the box against it, and click ‘Add to Menu’.
From there, you’ll be able to drag it into the place you want it to appear on your website, and “Save Menu.”
Check Everything Is In Order
This is the end of the road for your new custom post type. Once you’ve added it to your menu and all the content you’ve created underneath the post type is published, everything should be live on your website. However, it’s important that we don’t just trust it’s done, but do a quick check ourselves.
After all, I’d hate for you to have done all this great work in managing your website content, only to have it missing in action from your website.
So, always take a test drive of your menu and custom post type archive of your website, to make sure everything is in order, before moving on to create your next one. Rinse and repeat this process as many times as you need.


from Quick Sprout https://ift.tt/3svsRgV
via IFTTT
