Pictures are worth a thousand words—more so when you’re working on a WordPress blog or running an ecommerce store.
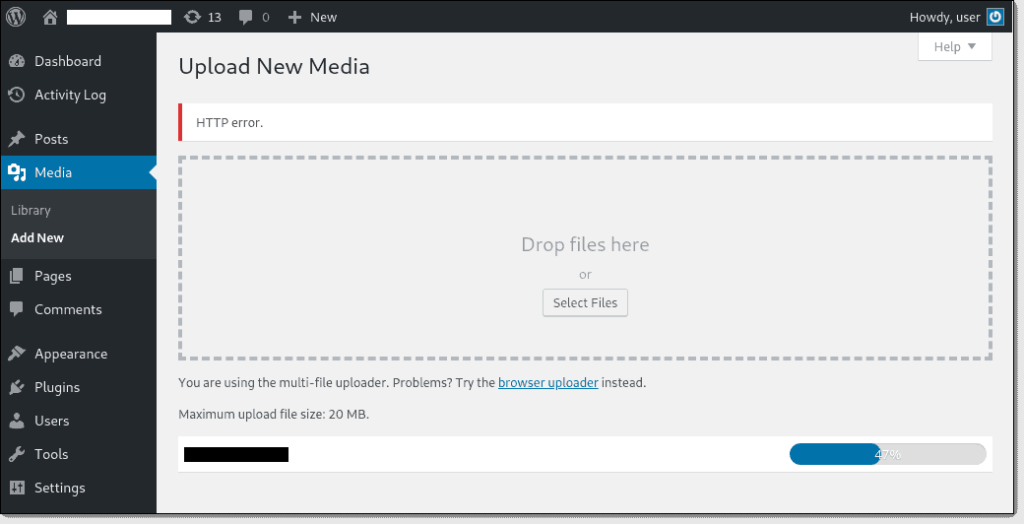
They help visitors understand the content better while adding some eye candy to your otherwise text-heavy pages. But what if you see an HTTP error when uploading images to WordPress?
Nightmare!
Don’t worry, though. I’ll show you how you can fix the HTTP error and successfully upload images to WordPress. I’ll cover the main reason behind the HTTP error and how you can solve the problem, among other stuff.
Excited? Great.
Let’s begin!
What to Expect When Fixing an HTTP Error When Uploading Images to WordPress?
Facing an HTTP error when uploading images isn’t that big of a deal. But as there can be so many potential causes for it, the fixing process can get a bit elaborate. But overall, the process is surprisingly straightforward.
Here’s how you fix the HTTP error when you upload images to WordPress:
- Step 1 – Verify the HTTP Error
- Step 2 – Increase Server Memory
- Step 3 – Modify WordPress Image Editors
- Step 4 – Deactivate Your Website’s Plugins and Themes
The Good
There are specific solutions that range from adjusting your image format to checking your internet connection to the slightly more complicated plugin and theme deactivation. But nothing that will have you pulling out your hair.
Most times, you only have to wait for a few minutes and refresh your page for the error to be resolved. Yes, it can be that easy.
You also have tons of solutions to fix the error. If you cannot solve it by resizing your image, you can always try deactivating your plugin. If that doesn’t work, increasing your memory limit is another option.
The solution list is long, to say the least! And if all else fails, you can get in touch with your web host provider for assistance, which, again, will help you resolve the problem efficiently.
Additionally, you can create and use a staging site when testing out solutions to locate the problem. This way, your live site will remain unaffected while you work on fixing the HTTP error.
The Bad
HTTP errors are easy to fix. But it doesn’t make them any less frustrating.
After all, there’s nothing worse than spending half an hour trying to find a perfect image, upload it, and suddenly see the error message pop up on your screen. Ugh.
The term “HTTP error“ is also very vague, as there can be many causes for the issue. There’s not a single word explaining the problem, making the warning completely non-informative and useless.
Plus, like two sides of a coin, there are so many possible solutions that it can make things time-consuming very fast. You have to keep trying different solutions to locate the problem until the error gets resolved—something that can seriously interrupt your workflow.
You may need to contact your hosting provider for help if everything fails or if you get stuck somewhere, so keep that in mind, too.
Let’s dive into the individual steps.
Step 1 – Verify the HTTP Error
WordPress shows you a very vague “HTTP error” when your image fails to upload. It’s because there can be several possible causes for this issue. That’s why you need to be analytical to find the culprit.
Disclaimer: When you go through this process, make sure you clear your cache after doing each one. This will help you identify the main cause of the problem.
Let’s take a look at how you can verify an HTTP error.
Determine Whether You’re Dealing With Temporary Issues
Here’s what you need to do first: Sit back and do nothing.
Wait a few minutes and try uploading your image to your WordPress site again. If the upload is successful, voila! Your problem is solved. No joke.
If it fails, try to upload a smaller image or media file. If the file uploads without any errors, you know that the file’s size was the issue. To avoid this, you can reduce the dimensions of the original image or change the file format.
Carry Out Browser-Related Tests
Still facing issues? Try refreshing your web page.
If you find the image or media file isn’t uploading even after changing the image size and format, try refreshing the page and re-uploading the image.
If you find your login session has expired, go to your dashboard, and log in again. Refresh the page by either pressing the Reload button or the F5 key on your keyboard. Re-upload the image then and see if it works.
Switch Your Web Browser
Most of us use Google Chrome when working on our WordPress sites, and it’s easy to see why. It’s fast, reliable, and works brilliantly. But the web browser is known to have issues with image upload, which is why I recommend switching to another web browser like Firefox.
Upload your image again after changing your web browser.
If you find the problem persists, move on to Step 2.
Step 2 – Increase Server Memory
Insufficient memory is the most common reason for the HTTP error because an adequate memory limit is required to upload images.
Understandably, your next step here should be directed toward increasing the memory used by the server. There are two important prerequisites for increasing your memory limit in WordPress:
- Make sure you have appropriate hosting package limits. If you extend memory usage past these limits, you’ll see an internal server error (error 500). I highly recommend signing up with a WordPress-specific web hosting provider that can meet these needs.
- You have an FTP client to edit files.
Let’s now take a look at the different methods that let you increase your memory limit.
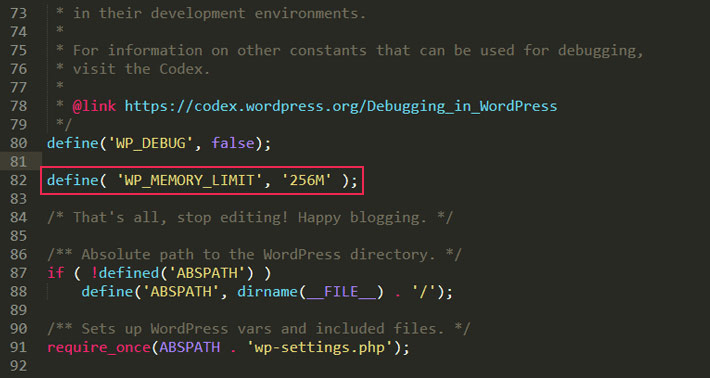
Method #1: Editing “wp-config.php” File
You can increase the memory limit by editing the “wp-config.php” file. All you have to do is add a single line of code to it: define( ‘WP_MEMORY_LIMIT’, ‘256M’ );
Method #2: Changing the Memory Limit Value Within the cPanel
Login to cPanel, and scroll down to the Software field. Click on MultiPHP INI Editor.
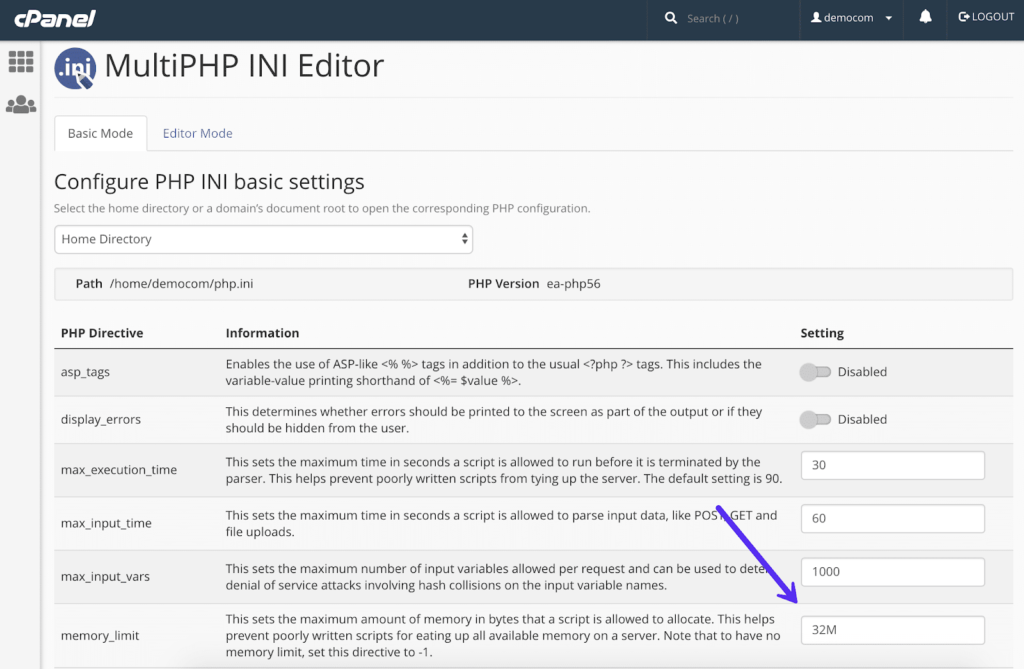
Choose your domain from the displayed options, and then search for “memory_limit.” Insert 256M instead of 32M as the value.
Method #3: Edit the php.ini File
The WordPress root directory has the php.ini file. Open the file, and search for “memory_limit.“ Change the value associated with it to increase the memory limit.
If you don’t find the php.ini file, create one, and enter the following code: memory_limit = 256M
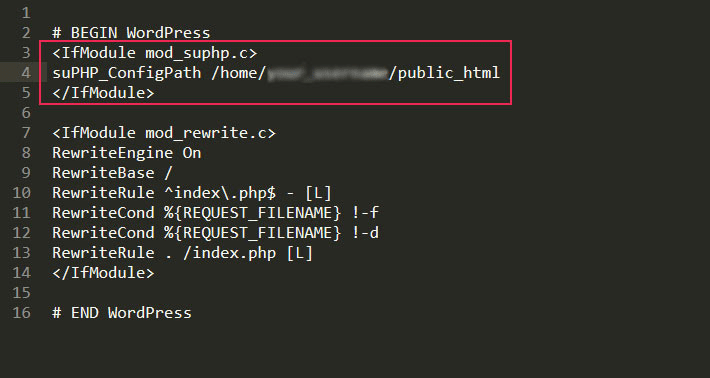
If you’re using shared hosting, you’ll have to edit the .htaccess file before changing the memory_limit value. You see, with shared hosting, there are often multiple php.ini files, which is why you have to specify the exact location of the one created or edited by you.
To make the edit, you have to add the following code to the .htaccess file, toward the top:
<IfModule mod_suphp.c>
suPHP_ConfigPath /home/your_username/public_html
</IfModule>
Replace “your_username” with your actual cPanel username.
Here’s how it should look:
Method #4: Edit the .htaccess File
Lastly, you can edit the .htaccess file to increase the memory limit.
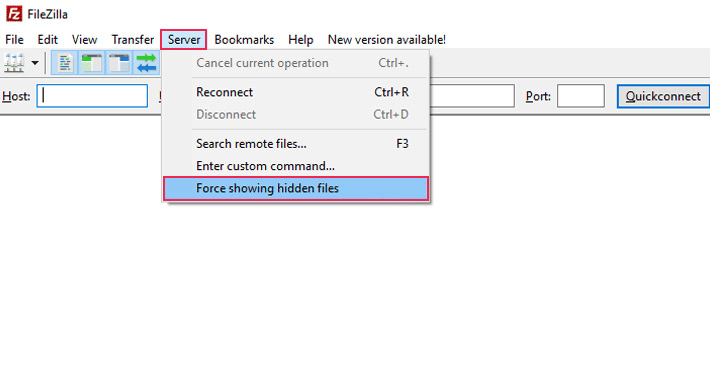
As mentioned before, this file is found in the root WordPress directory since it’s a server configuration file. You’ll have to enable the relevant options for showing hidden files within your FTP client to access this folder.
FileZilla is one of the best FTP clients, in my opinion, but you can choose the one you prefer best. If you use FileZilla, go to the Server tab and click on Force showing hidden files.
Search for “memory_limit“ by opening the file, and change the value associated with it. Again, if you don’t see any code present, add the following line: php_value memory_limit 256M
Although increasing your memory limit is one of the most popular solutions for fixing the HTTP error for uploading images to WordPress, it isn’t the only one.
It’s possible that even after increasing your memory, the error won’t go away. If that’s the case, proceed to the next step.
Step 3 – Modify WordPress Image Editors
You can tackle the HTTP issue by adding code that modifies WordPress image editors.
WordPress uses two image editor modules: GD Library and Imagick. While you can use both interchangeably, Imagick can cause memory drain, leading to the HTTP error during image upload.

This image editor uses multiple threads in a bid to make image processing more efficient. And while this is a good thing, using Imagick can be very restrictive on several shared hosts, which may cause the HTTP error.
Precisely why we’ll make the GD Library image editor the default.
Resolving the Image Editor Issue
Add the following code into functions at PHP of your theme at the end of the file:
function wpb_image_editor_default_to_gd( $editors ) {
$gd_editor = ‘WP_Image_Editor_GD’;
$editors = array_diff( $editors, array( $gd_editor ) );
array_unshift( $editors, $gd_editor );
return $editors;
}
add_filter( ‘wp_image_editors’, ‘wpb_image_editor_default_to_gd’ );
This code ensures GD Library is always used as the first image upload option as it prioritizes it over others.
Alternatively, you can also force Imagick to use a single thread for image processing instead of using multiple threads. Simply insert this line of code into your .htaccess file:
SetEnv MAGICK_THREAD_LIMIT 1
Try uploading the image again. If you still see the HTTP error, you may have to deactivate your plugins and themes temporarily.
Step 4 – Deactivate Your Website’s Plugins and Themes
We’ve exhausted the easy tricks at this stage, which is why we have to amp up our efforts.
You have to deactivate some of your plugins and switch your WordPress theme to default—in that order—to find out whether the issue is resolved. There are a few plugins, especially image optimization and security plugins, that could be the culprit.
Luckily, you can also clone your live site to a staging environment if you don’t want the changes to reflect on your main WordPress website. If you find the HTTP error taking place even on staging, it’s best to deactivate all your plugins and narrow them down.
Here’s how to do it:
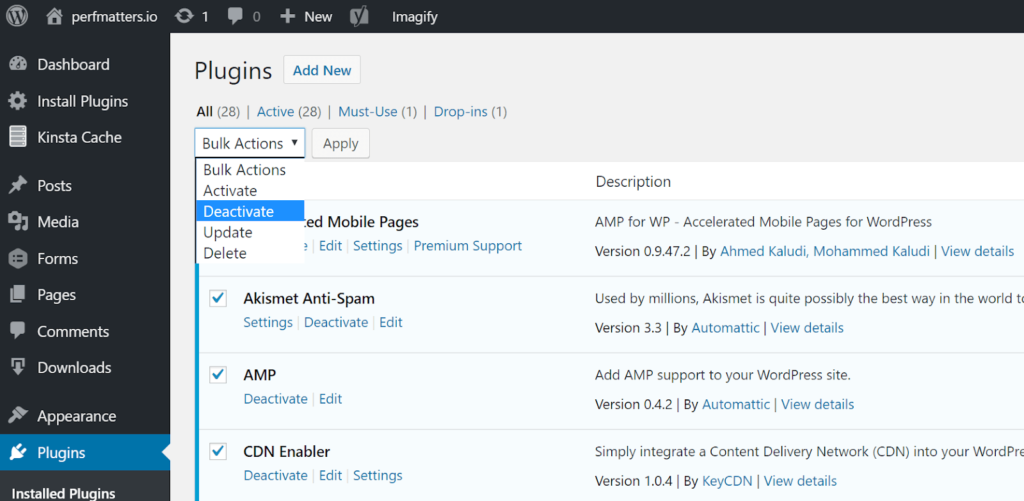
Deactivate Your Plugins
Go to your main WordPress dashboard, and browse to Plugins. You’ll find the bulk actions tab at the top of your screen, hover your cursor there, and select Deactivate from the list of options.
This will instantly disable all of your plugins. Don’t worry, though. You won’t lose any data by deactivating a plugin.
If you find the issue is resolved, the next step is to find the culprit.
Find Out the Glitching WordPress Plugin
All your plugins are deactivated, so now you‘ll have to activate them one by one while you try uploading your image.
It’s when you see the HTTP error return after activating a specific plugin that you’ve found the culprit. You have two options here: Either reach out to the plugin developer directly or post a support ticket in the WordPress repository.
Alternative: Renaming Your Plugins Folder
You can FTP into your server and rename your plugins folder if you can’t access your admin. Change it to something like “plugins_old”, and then recheck your website.
If it works, test every plugin manually. Rename the folder back to “plugins,” and then rename every folder inside it—one by one—until you find the misbehaving version.
Again, you can replicate this on your staging site if you don’t want the changes to affect your live site.
If the problem still isn’t solved, it’s time to contact your hosting provider.
Get in touch with a support representative, describe the issue you’re facing, the different ways you try to solve it, and then ask them for further assistance.


from Quick Sprout https://ift.tt/3xfY1wx
via IFTTT
