WordPress widgets are excellent customization tools. You can use it to add text, social media buttons, banners, pages, or any other element to extend your website’s capabilities.
Technically speaking, they’re little snippets of code that you can drag and drop into your WordPress website’s sidebar for display—or other areas of your site, depending on your theme.
As I said, they’re awesome.
Sometimes, the existing available widgets are exactly what you need. But sometimes, you may want them to function in a certain way or look slightly different.
Luckily, you can develop custom WordPress widgets from scratch and implement them on your site. Or collect it into a plugin that’s compatible with multiple WordPress themes.
The even better news? Creating custom widgets for WordPress is super easy.
What to Expect When Creating a Custom WordPress Widget
WordPress and PHP sound intimidating as it is, but when you club them together, it becomes even more daunting.
The reality couldn’t be any more different, though. All you need is WordPress and PHP, and you can create a customized widget for your website in no time.
Here’s what you need to do:
- Step 1 – Understanding the Requirements of Creating Custom WordPress Widgets
- Step 2 – Develop a Plugin to Paste Widget Codes
- Step 3 – Create the Widget in WordPress
- Step 4 – View Your Custom Widget on Your Website
The Good
There are two ways to create a custom widget in WordPress:
- You can either edit the function.php, or
- You can use a plugin to develop the widget
If you aren’t comfortable with a particular method, you can always switch to the other one. In addition, you can also test out the widget in a local environment before implementing it on your main site.
You can use a widget for all kinds of purposes. From displaying your latest offerings to creating awareness for a special event or deal, there’s so much you can do to expand the basic functions of your existing WP widgets. This is particularly useful when dealing with WordPress theme builders and web developers with limited default widgets.
Moreover, since the widgets are (obviously!) customized, you get to take all the creative decisions. How the widget looks and where it’ll be placed on the site is totally up to you.
The Bad
Before you start developing a custom widget, there are a few considerations for you to think about. Think of it as a planning session. Getting this right will help you create your niche of coding more effectively, while getting it wrong will make it very troublesome.
The problem here is that long-term planning isn’t always easy. You have to determine the widget’s purpose, brainstorm ways to make your widget unique, and know exactly where you want to implement your widget, among other things.
Having a basic understanding of WordPress and PHP is also necessary. Otherwise, everything will go right above your head, and you may end up making errors when writing the code. Therefore, you must familiarize yourself with the basics before you start developing the widget.
Step 1 – Understanding the Requirements of Creating Custom WordPress Widgets
WordPress is so popular that even web hosting services offer WordPress-customized plans to attract more customers, and it’s easy to see why. It’s SEO-friendly, easy to manage, secure, and free, but the fact that WordPress is highly customizable is hands down its biggest USP.
This includes the ability to create a personalized widget, which can make it easier for you to manage your website.
There are about 18 functions you can use to create a custom widget. But to keep this article brief, I’ll focus on the following four main elements in the WP Widget class to create your widget. This includes:
- _construct() – This is the constructor function that lets you define your widget‘s parameters. It determines what your widget will look like in the administration panel.
- widget() – This contains the output of the widget. It processes your functions and displays the HTML code on the front end of your website.
- form() – This determines your widget settings in the WordPress dashboard. Here, you can set up form fields to retrieve option values from your widget’s database in the administration panel.
- update() – This allows you to update widget settings, after which they get saved to the database.
Of course, you have tons of other options that can ensure additional functionality, but the above four is the minimum requirement for any widget to work.
Make a WordPress Backup
Before proceeding to the next steps, start by creating a full backup of your WordPress site. Additionally, you can use a WordPress child theme to prevent your main theme from glitching or having other potential issues.
Step 2 – Develop a Plugin to Paste Widget Codes
When you’re creating a WordPress widget, you have two choices:
- Create a new plugin to paste the widget codes
- Paste the budget code directly on the functions.php.file of your theme
In this article, we’ll focus on creating a custom widget in WordPress using a plugin. Once you activate this plugin, the widget will be listed in the WordPress dashboard’s widget area.
Tip: Create your plugin in a local install (or a staging environment) of your WordPress website. Place it on your live site only when you’ve run tests to ensure it’s working correctly. This way, you won’t have to worry about real-time glitches even if you make an error.
Here’s how you do it.
Download a Text Editor
The very first step of creating a WordPress plugin is downloading a text editor.
iOS owners can download Coda, while PC (as well as iOS users) can use Dreamweaver.
Adding Your Plugin
Open the folder wp-content/plugins. This will be the main folder where you add your plugin.
Create a new directory in this folder. While you can name this directory whatever you want, I’ll call it “widget-plugin” for this article.
Follow this up by creating a new file called “directory-name.php” (in our case, it’ll be “widget-plugin.php.”). Open this file.
I recommend using a new folder for every plugin you create—even if it’s a single file—to avoid confusion.
Add Your Code
You have to add your first line of code in this stage.
WordPress has a very specific definition of a plugin. Here’s how it looks in its language:
<?php
/*
Plugin Name: Name Of The Plugin
Plugin URI: http://URI_Of_Page_Describing_Plugin_and_Updates
Description: A brief description of the Plugin.
Version: The Plugin’s Version Number, e.g., 1.0
Author: Name Of The Plugin Author
Author URI: http://URI_Of_The_Plugin_Author
License: A “slug” license name, e.g., GPL2
*/
When you modify this code, putting in your selected plugin name, URI, description, and other details, it’ll look something like this:
<?php
/*
Plugin Name: My Widget Plugin
Plugin URI: https://ift.tt/1hiXdra
Description: This plugin adds a custom widget.
Version: 1.0
Author: John Smith
Author URI: https://ift.tt/1hiXdra
License: GPL2
*/
Cross-Check Whether the Plugin Has Been Created
After entering the code, save your file. Congratulations! You have now created a plugin.
The plugin won’t do anything right now, but that wasn’t what we were aiming for. Our goal was to make WordPress recognize it.
To cross-check whether the plugin actually exists, go to the main WordPress dashboard, and click on Plugins. If your plugin appears in the dropdown list, you’re good and can now activate it.
If not, simply repeat Step 2 instructions.
Step 3 – Create the Widget in WordPress
Finally, to the fun part of the article!
Now, all this may look complicated to you, but it really isn’t if you go through every aspect carefully.
Step 3 is all about creating the widget itself. This is a PHP class that extends the core WP class WP_Widget. Here’s how to define the widget:
// The widget class
class My_Custom_Widget extends WP_Widget {
// Main constructor
public function __construct() {
/* … */
}
// The widget form (for the backend )
public function form( $instance ) {
/* … */
}
// Update widget settings
public function update( $new_instance, $old_instance ) {
/* … */
}
// Display the widget
public function widget( $args, $instance ) {
/* … */
}
}
// Register the widget
function my_register_custom_widget() {
register_widget( ‘My_Custom_Widget’ );
}
add_action( ‘widgets_init’, ‘my_register_custom_widget’ );
Remember the four crucial elements we mention in Step 1? We’ll use it here.
If you go through the code, you’ll find four elements:
- Constructor to initiate the widget
- The form function to create the widget form in the WordPress administration
- The update function to save any widget data during the editing process
- The widget function to display the widget content on the front end of your site.
You can copy and paste the above code to give WordPress all the information it needs to create the widget (after changing relative fields however you want, of course).
I’ll explain the four elements in a little more detail to give you a more precise concept of how everything works. Let’s take a quick look:
Element #1: Constructor
The constructor part of your code defines the widget name and its main arguments. It looks something like this:
// Main constructor
public function __construct() {
parent::__construct(
‘my_custom_widget’,
__( ‘My Custom Widget’, ‘text_domain’ ),
array(
‘customize_selective_refresh’ => true,
)
);
}
Do you see the __ and () symbols around the widget name? WordPress uses them for translation, which is also why I recommend using them to make your theme fully translatable.
‘customize_selective_refresh‘ refreshes the widget whenever you edit the widget under Appearance > Customize. As a result, instead of refreshing the whole page, only the widget is refreshed.
Element #2: Form()
The form() function is responsible for creating the widget form settings in the WordPress admin area. This is where you type in your data that’s to be displayed on your website. You can add text areas or fields, select boxes, checkboxes, and so on to your widget form settings.
Click on Appearance and then Widgets, or click on Appearance followed by Customize and then Widgets to access this function.
Take a look at the form function code below:
// The widget form (for the backend )
public function form( $instance ) {
// Set widget defaults
$defaults = array(
‘title’ => ”,
‘text’ => ”,
‘textarea’ => ”,
‘checkbox’ => ”,
‘select’ => ”,
);
// Parse current settings with defaults
extract( wp_parse_args( ( array ) $instance, $defaults ) ); ?>
<?php // Widget Title ?>
<p>
<label for=”<?php echo esc_attr( $this->get_field_id( ‘title’ ) ); ?>“><?php _e( ‘Widget Title’, ‘text_domain’ ); ?></label>
<input class=”widefat“ id=”<?php echo esc_attr( $this->get_field_id( ‘title’ ) ); ?>“ name=”<?php echo esc_attr( $this->get_field_name( ‘title’ ) ); ?>“ type=”text“ value=”<?php echo esc_attr( $title ); ?>“ />
</p>
<?php // Text Field ?>
<p>
<label for=”<?php echo esc_attr( $this->get_field_id( ‘text’ ) ); ?>“><?php _e( ‘Text:’, ‘text_domain’ ); ?></label>
<input class=”widefat“ id=”<?php echo esc_attr( $this->get_field_id( ‘text’ ) ); ?>“ name=”<?php echo esc_attr( $this->get_field_name( ‘text’ ) ); ?>“ type=”text“ value=”<?php echo esc_attr( $text ); ?>“ />
</p>
<?php // Textarea Field ?>
<p>
<label for=”<?php echo esc_attr( $this->get_field_id( ‘textarea’ ) ); ?>“><?php _e( ‘Textarea:’, ‘text_domain’ ); ?></label>
<textarea class=”widefat“ id=”<?php echo esc_attr( $this->get_field_id( ‘textarea’ ) ); ?>“ name=”<?php echo esc_attr( $this->get_field_name( ‘textarea’ ) ); ?>“><?php echo wp_kses_post( $textarea ); ?></textarea>
</p>
<?php // Checkbox ?>
<p>
<input id=”<?php echo esc_attr( $this->get_field_id( ‘checkbox’ ) ); ?>” name=”<?php echo esc_attr( $this->get_field_name( ‘checkbox’ ) ); ?>” type=”checkbox” value=”1″ <?php checked( ‘1’, $checkbox ); ?> />
<label for=”<?php echo esc_attr( $this->get_field_id( ‘checkbox’ ) ); ?>“><?php _e( ‘Checkbox’, ‘text_domain’ ); ?></label>
</p>
<?php // Dropdown ?>
<p>
<label for=”<?php echo $this->get_field_id( ‘select’ ); ?>“><?php _e( ‘Select’, ‘text_domain’ ); ?></label>
<select name=”<?php echo $this->get_field_name( ‘select’ ); ?>“ id=”<?php echo $this->get_field_id( ‘select’ ); ?>“ class=”widefat“>
<?php
// Your options array
$options = array(
” => __( ‘Select’, ‘text_domain’ ),
‘option_1’ => __( ‘Option 1’, ‘text_domain’ ),
‘option_2’ => __( ‘Option 2’, ‘text_domain’ ),
‘option_3’ => __( ‘Option 3’, ‘text_domain’ ),
);
// Loop through options and add each one to the select dropdown
foreach ( $options as $key => $name ) {
echo ‘<option value=”‘ . esc_attr( $key ) . ‘” id=”‘ . esc_attr( $key ) . ‘” ‘. selected( $select, $key, false ) . ‘>‘. $name . ‘</option>’;
} ?>
</select>
</p>
<?php }
I’ve only added five fields in this code—title, text, text area, checkbox, and select box—to the widget.
Here, the idea is to define the default of your widget first. Then the next function will parse the current settings for your widget with the saved defaults. Let’s also not forget to add the HTML for every field.
You may have noticed I’ve used esc_attr() when adding the form fields. This is done entirely for security purposes to make sure every user-defined variable on your site is well-sanitized.
Element #3: Update()
The good news is that WordPress core developers have already created a super powerful API that’s considerably simplified this functionality. Due to this, all you need to do is copy and paste the following code to update each field:
// Update widget settings
public function update( $new_instance, $old_instance ) {
$instance = $old_instance;
$instance[‘title’] = isset( $new_instance[‘title’] ) ? wp_strip_all_tags( $new_instance[‘title’] ) : ”;
$instance[‘text’] = isset( $new_instance[‘text’] ) ? wp_strip_all_tags( $new_instance[‘text’] ) : ”;
$instance[‘textarea’] = isset( $new_instance[‘textarea’] ) ? wp_kses_post( $new_instance[‘textarea’] ) : ”;
$instance[‘checkbox’] = isset( $new_instance[‘checkbox’] ) ? 1 : false;
$instance[‘select’] = isset( $new_instance[‘select’] ) ? wp_strip_all_tags( $new_instance[‘select’] ) : ”;
return $instance;
}
Check every setting carefully, and if it isn’t empty, save it into the database.
You’ll find plenty of wp_strip_all_tags() and wp_kses_post() functions writing across the code. This is primarily to sanitize the data before adding it to the database.
The first wp_strip_all_tags() function removes everything aside from the basic text, allowing you to use it for any field that has a string as the end value. On the other hand, the second wp_kses_post() function is used for the post content to remove all tags besides basic HTML. This includes divs, spans, links, images, and so on.
That said, you must ensure the content submitted to the database doesn’t have any malicious code.
Element #4: Widget()
The widget() function outputs the content on the website that is visible to your visitors. You can customize this function to include specific tags that match your theme, as well as CSS classes.
Here’s what it looks likes:
// Display the widget
public function widget( $args, $instance ) {
extract( $args );
// Check the widget options
$title = isset( $instance[‘title’] ) ? apply_filters( ‘widget_title’, $instance[‘title’] ) : ”;
$text = isset( $instance[‘text’] ) ? $instance[‘text’] : ”;
$textarea = isset( $instance[‘textarea’] ) ?$instance[‘textarea’] : ”;
$select = isset( $instance[‘select’] ) ? $instance[‘select’] : ”;
$checkbox = ! empty( $instance[‘checkbox’] ) ? $instance[‘checkbox’] : false;
// WordPress core before_widget hook (always include )
echo $before_widget;
// Display the widget
echo ‘<div class=”widget-text wp_widget_plugin_box“>’;
// Display widget title if defined
if ( $title ) {
echo $before_title . $title . $after_title;
}
// Display text field
if ( $text ) {
echo ‘<p>‘ . $text . ‘</p>’;
}
// Display textarea field
if ( $textarea ) {
echo ‘<p>‘ . $textarea . ‘</p>’;
}
// Display select field
if ( $select ) {
echo ‘<p>‘ . $select . ‘</p>’;
}
// Display something if checkbox is true
if ( $checkbox ) {
echo ‘<p>Something awesome</p>’;
}
echo ‘</div>’;
// WordPress core after_widget hook (always include )
echo $after_widget;
}
You can easily modify the above code to meet your needs. Just check if a variable is set. If it isn’t, you’ll get an error message once you print it.
Step 4 – View Your Custom Widget on Your Website
You’ve added the code and modified every function to customize your widget exactly how you want it to be.
Wouldn’t you now want to check whether your efforts paid off?
Add the Widget to the Sidebar
On your main WordPress dashboard, go to Appearance and click on Widgets. You’ll see the newly created My Widget Plugin in the list of available widgets. You can drag and drop the widget to a sidebar.
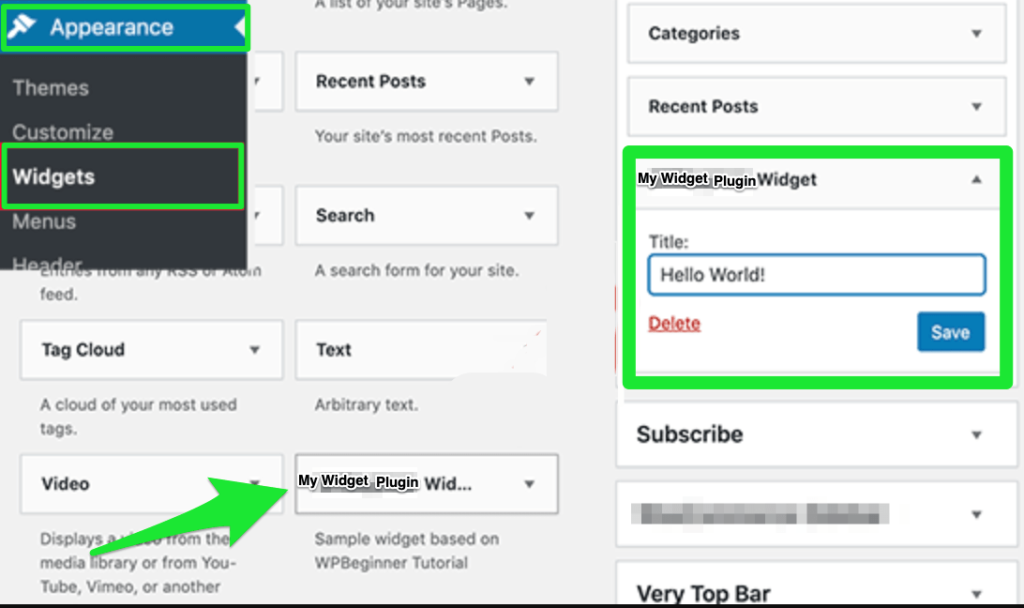
Add Text in the Form Field
The only thing left is to fill in the form field. You can add your text and then click on the Save button to save the changes. Head over to the front-end to see your widget live in action!

All done! Go to your website to see your custom widget live in action.


from Quick Sprout https://ift.tt/2QzEXbG
via IFTTT
